Sending messages to Azure Service Bus Queues using Sentinet API Management and Shared Access Signature
Microsoft Azure platform offers quite a few messaging services. In one of my previous articles I wrote about an interesting scenario and effective integration point between Sentinet API Management and Azure Service Bus Queues and Topis. In that article I covered specifics of sending and receiving SOAP messages to and from Azure Service Bus using Sentinet.
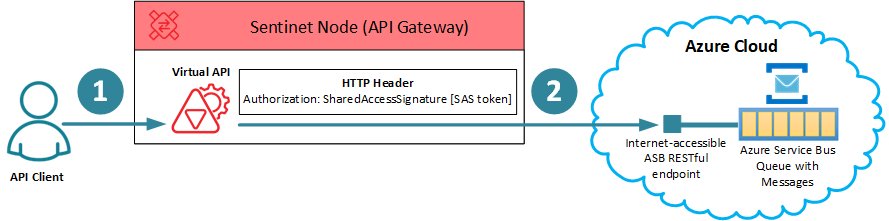
In this article I am going to cover another interesting option for integrating Sentinet API Management with Azure Service Bus Queues and Topics, where messages can be sent through Sentinet to an Azure Service Bus Queue in any format over RESTful APIs using Shared Access Signature. The scenario is depicted below:
NOTE
Azure Service Bus also supports authentication using Azure Active Directory. This authentication model is a bit more complex to setup in Azure Portal. It is not covered by this article even though Sentinet API Management also supports this scenario.
In the diagram above:
API Client sends a message in any format (with any Content-Type HTTP header) to a RESTful Virtual API hosted in the Sentinet Node (API Gateway) (1). Note, that this can be implemented with any security that fits your requirements (even using Windows Integrated security with local Active Directory if API Client and Sentinet Node are hosted on-premises).
Virtual API forwards the message to Azure Service Bus RESTful API, which will be available for your queue (2) once you create it in Azure Service Bus (note, that Sentinet’s Virtual API can also do additional transformations of the message if needed).
The call to Azure Service Bus RESTful API must implement special security that uses Authorization HTTP header with specially formatted Shared Access Signature value (SAS):
Authorization: SharedAccessSignature sr=<QUEUE URL>&sig=<SIGNATURE>&se=<TOKEN EXPIRY INSTANT>&skn=<SHARED KEY NAME>
Authorization HTTP header in this case does not fall into any industry security standard (it is a custom Authorization header), and requires custom code to generate header’s value. In Sentinet this code can be implemented using either a Custom pipeline component or a Custom Code pipeline component. Both components require custom .NET code, and both of them can be configured in the web-based Sentinet Administrative Console. The difference is that Custom pipeline component requires compilation of your code into a .NET assembly and its deployment with Sentinet Node(s), while Custom Code component can be configured with your .NET code right in the Sentinet Administrative Console, and it does not require pre-compilation or deployment (your custom .NET code will be compiled and executed by the Sentinet “on-a-fly”).
Now let’s see what are the steps in this process, which involves configuration of a queue in Azure Portal, and configuration of the Sentinet API Management to send messages to it.
Configuring Azure Portal
Within your Azure Subscription create Azure Service Bus service (service bus namespace, which will look something like [mynamespace].servicebus.windows.net)
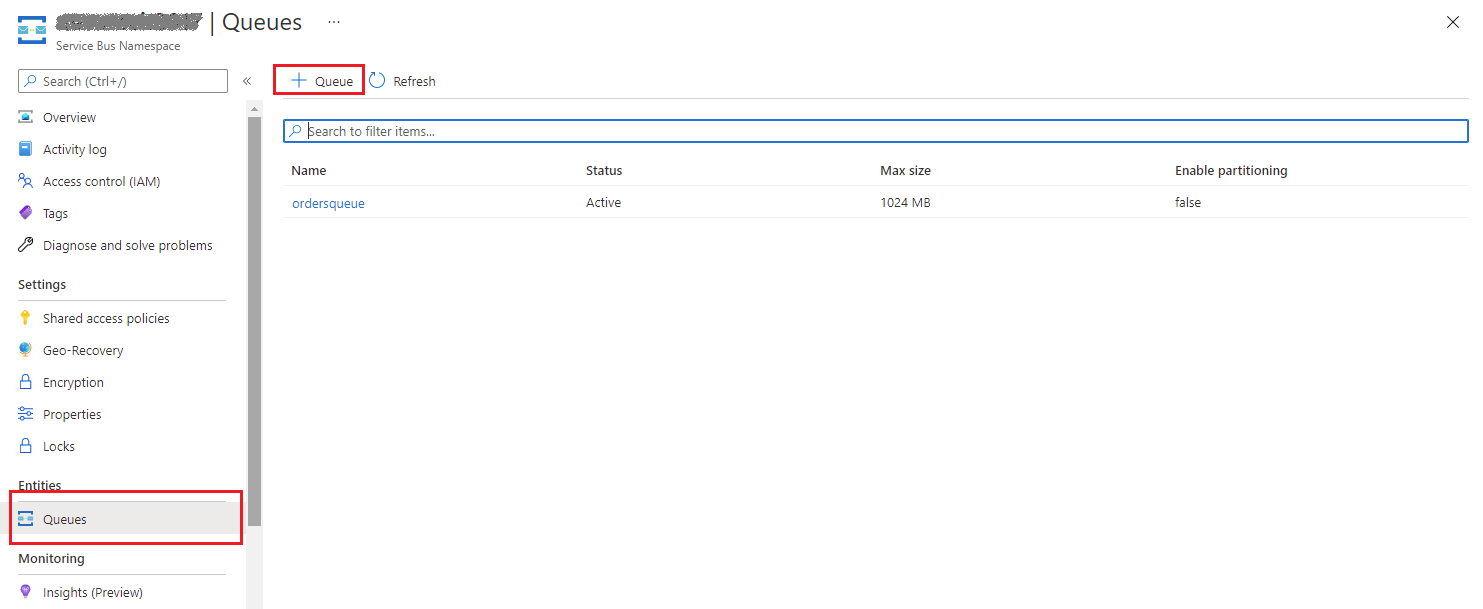
- In your Azure Service Bus namespace click Queues and click +Queue to create a new Queue. Below I create a queue named ordersqueue.
Once queue is created, click on it (see screenshot above with ordersqueue created) and navigate to Shared Access Policies, where you click +Add to add a new policy. Create a new policy with Send permission (because sender, Sentinet API Management will need policy with only that access level). I named my policy SendPolicy (see screenshot below).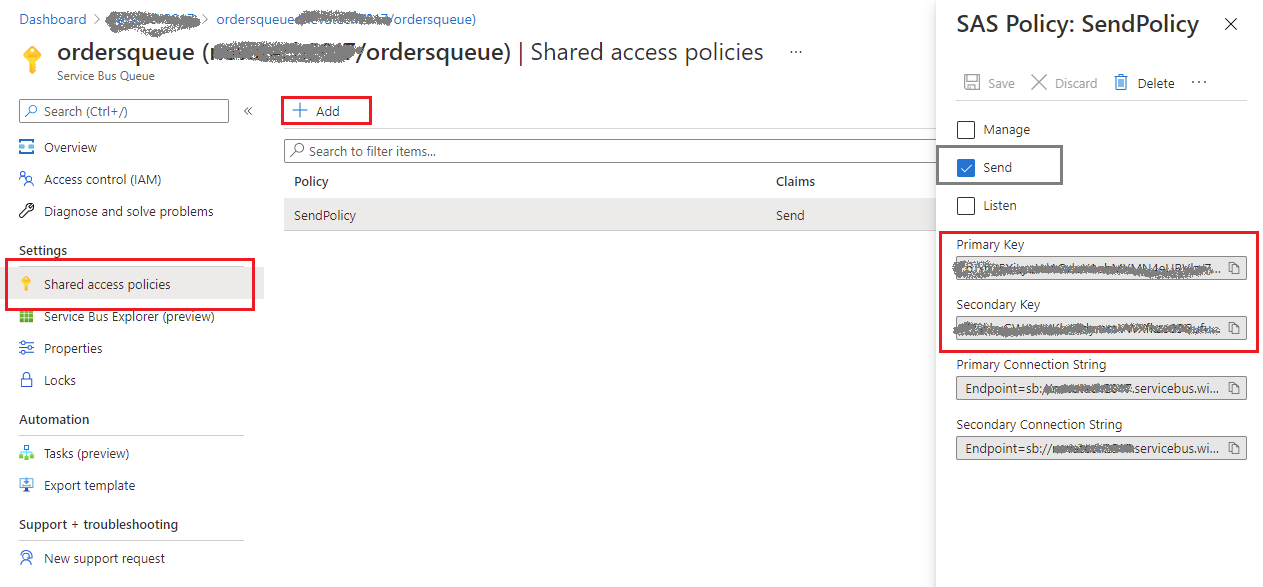
Make a note of a Primary Key or Secondary Key on the screenshot above. You will need either of them to access this ordersqueue queue.
In the Overview page for your queue, you will see Queue URL that takes form of:
https://[mynamespace].servicebus.windows.net/[myqueuename]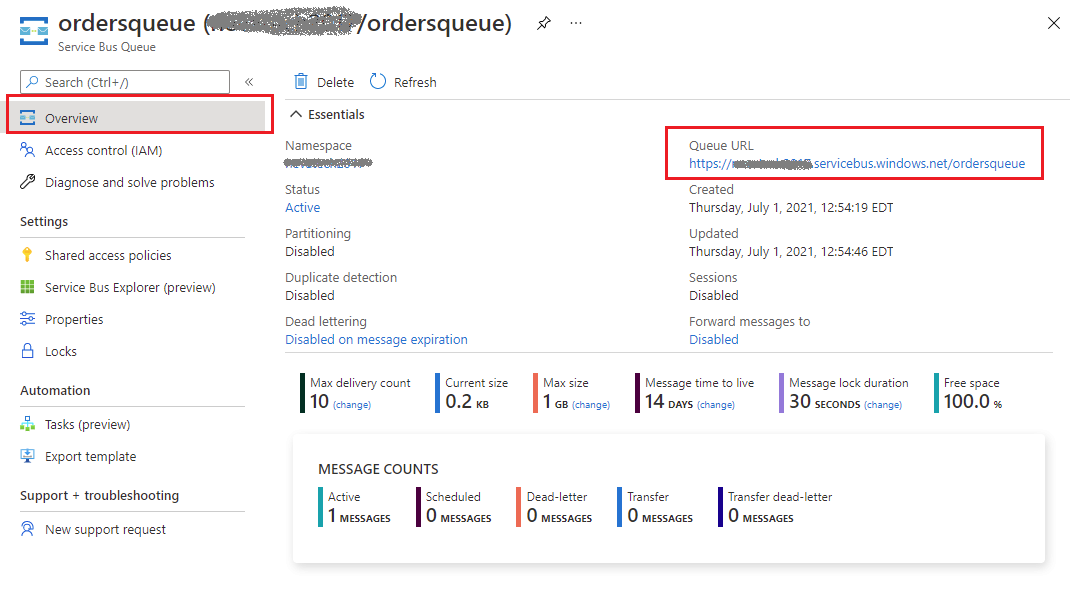
Important
Queue URL is not the URL where you will be posting messages to! You will always have to append /messages to this URL in order to send messages using Azure Service Bus RESTful API, so that the ultimate address always takes the form of:
https://[mynamespace].servicebus.windows.net/[myqueuename]/messages
Configuring Sentinet API Management
In the Sentinet Administrative console create a physical service that represents Azure Service Bus RESTful API for your queue.
Register empty API (let’s say named Order API)
Add endpoint with address
https://[mynamespace].servicebus.windows.net/[myqueuename] and security policy REST – HTTPS.
Add new POST operation (for example named Place) with Request’s URI template specified as /messages.
Now the full URL to Place operation automatically becomes:
https://[mynamespace].servicebus.windows.net/[myqueuename]/messages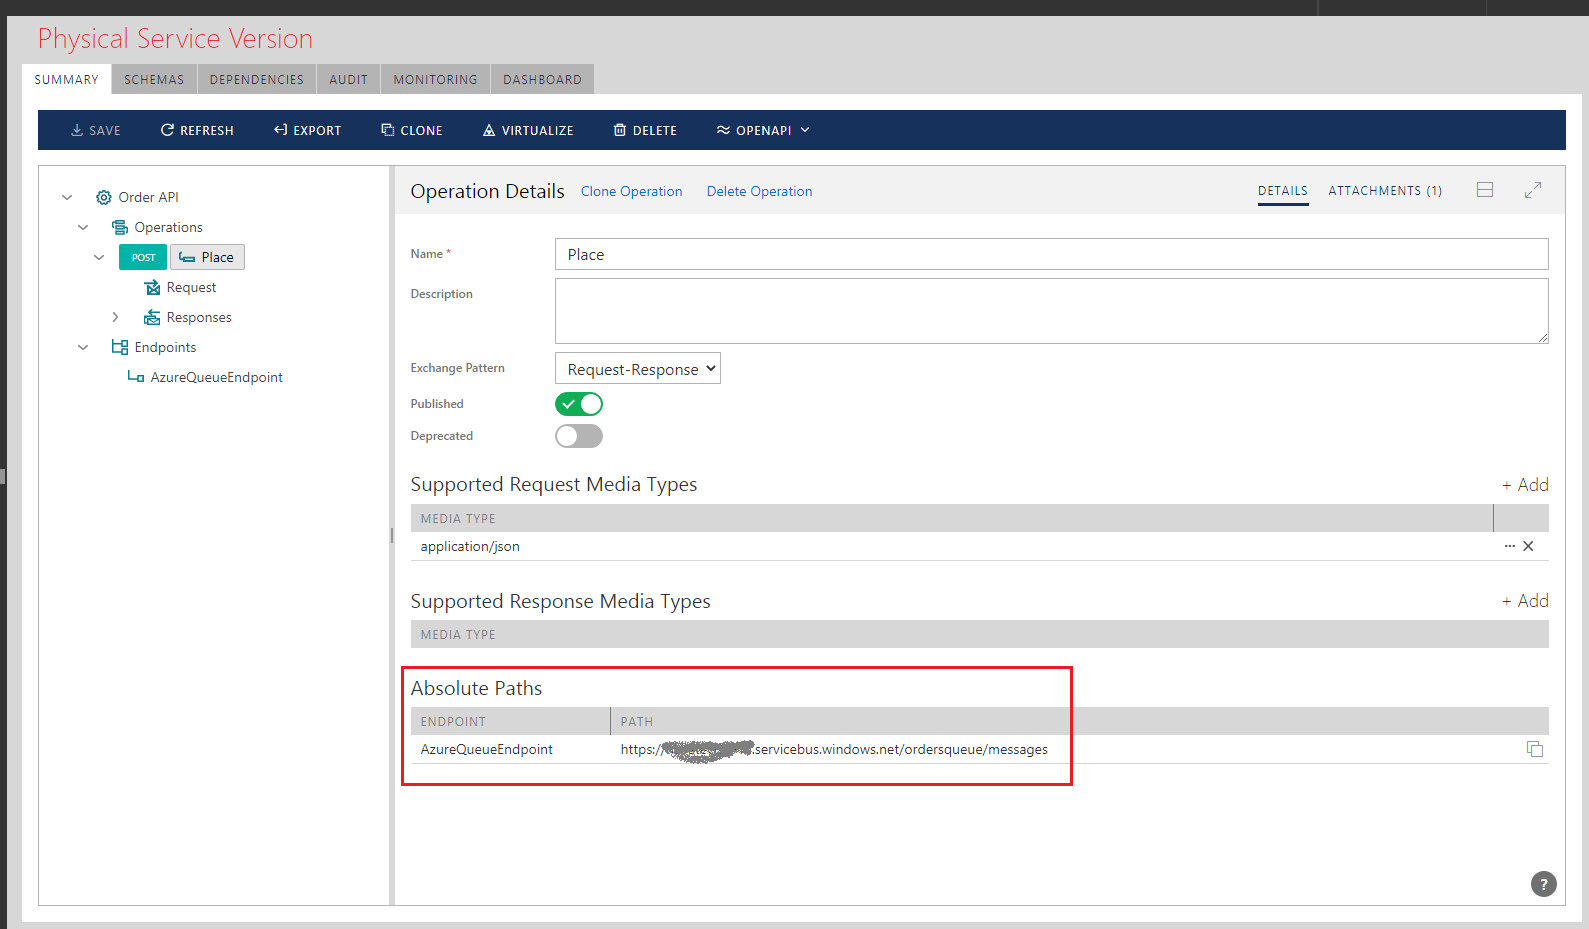
Using Sentinet standard technique virtualize this physical API through a Sentinet Node (API Gateway).
- Navigate to virtual service’s PROCESSING tab and drag-and-drop either precompiled and pre-configured Custom pipeline component or Custom Code component. In this article I will use Custom Code component, while if you use Custom component, its code can be quite similar.

Configure your component with additional .NET Using namespaces, System.Security.Cryptography and System.Text (other basic namespaces are included by default).
Populate Method with the following .NET code that uses built-in variable context to add Authorization HTTP header with the custom generated value for Azure Service Bus Shared Access Signature:
var traceMark = context.TraceWriter.WriteStart("SEND_TO_AZURE_QUEUE");


try

{

  string resourceUri = "https://[mynamespace].servicebus.windows.net/ordersqueue";

  string keyName = "SendPolicy";

  string key = "[Primary or Secondary Key for SendPolicy created in Azure Portal]";

  TimeSpan sinceEpoch = DateTime.UtcNow - new DateTime(1970, 1, 1);

  var expiry = Convert.ToString((int)sinceEpoch.TotalSeconds + 120);

  string stringToSign = System.Uri.EscapeDataString(resourceUri) + "\n" + expiry;

  HMACSHA256 hmac = new HMACSHA256(Encoding.UTF8.GetBytes(key));


  var signature = Convert.ToBase64String(hmac.ComputeHash(
    Encoding.UTF8.GetBytes(stringToSign)));


  string authHeaderValue = String.Format(
    "SharedAccessSignature sr={0}&sig={1}&se={2}&skn={3}",
    System.Uri.EscapeDataString(resourceUri), System.Uri.EscapeDataString(signature),
    expiry, keyName);


  context.TraceWriter.WriteMessage("authHeaderValue = '{0}'", authHeaderValue);


  context.Message.SetHttpHeader(true, "Authorization", authHeaderValue,
    ExistingValueAction.Overwrite);


  return MessagePipelineResult.Continue;

}


finally

{

  context.TraceWriter.WriteEnd(traceMark);

}
Note that resourceUri variable is initialized with the Queue URL https://[mynamespace].servicebus.windows.net/ordersqueue, while messages will be sent to https://[mynamespace].servicebus.windows.net/ordersqueue/messages
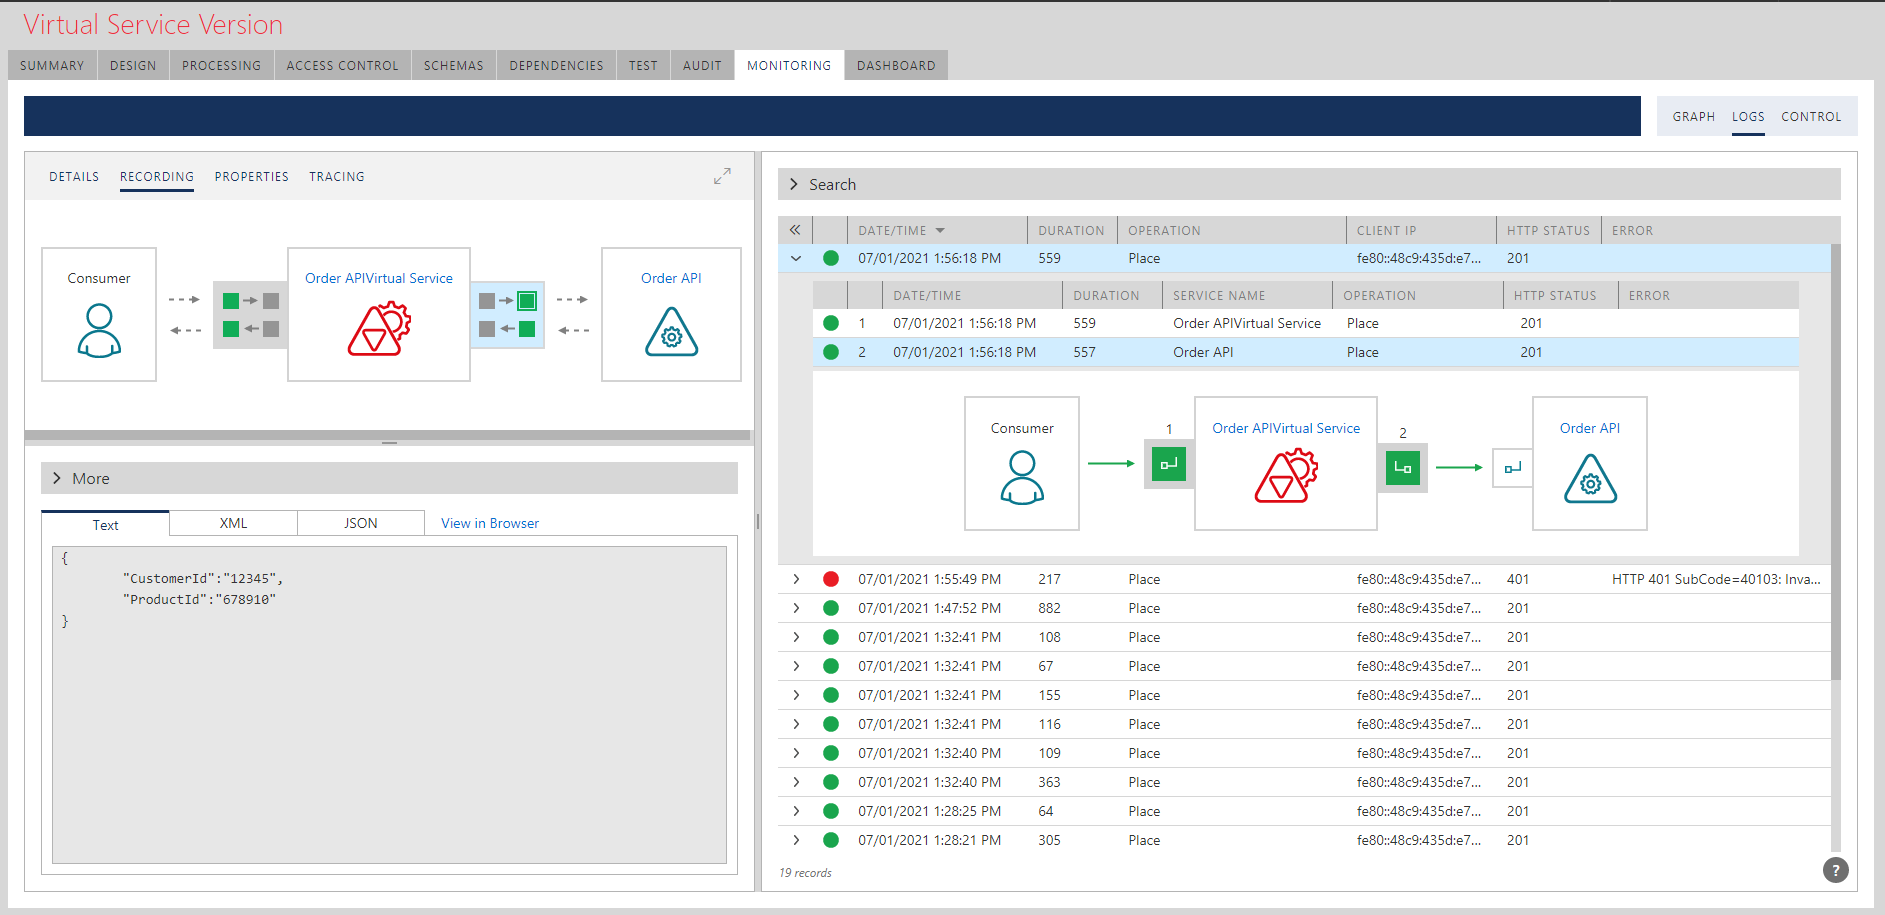
Now if you send messages to a virtual service hosted in API Gateway over your own API security, they will be forwarded to Azure Service Bus queue ordersqueue, where you can find them using Azure Service Bus Explorer. They are ready to be picked up by whatever application needs them.
Sentinet provides end-to-end detailed monitoring of all messages sent to a queue along with possible errors if something did not work (expired Primary Key, etc.)
Conclusion
Sentinet API Management can be used with Azure Service Bus messaging while delivering valuable add-on benefits. Among few are remote implementation of Azure Service Bus security, monitoring, and reporting.