Few years ago, I wrote a series of three-part articles about how API Management and API Gateways help APIs and API Client applications to handle OAuth security models. The content of these articles is still not only very much valid, but actually gains more attention given increased popularity of OAuth and OpenID Connect security protocols.
Second part of this series, specifically talks about integration with the Azure Active Directory as an OAuth service provider. In this article, I want to revise its nearly 4 years-old content, given new User Interface and User Experience of evolved Microsoft Azure Portal, and new capabilities of the Nevatech Sentinet API Management product. I also changed here the demo use case scenario in order to make it much easier to implement using just Sentinet and Azure Portal alone with no other dependencies or custom code.
NOTE
This article demonstrates Azure Portal user interface and its Azure Active Directory configuration in their current state as of September 2020. Even though Microsoft may change user interface at later times, it most often maintains backwards compatibility of implemented configurations for existing applications.
Introduction
API Client applications and API service applications carry different responsibilities. This is also true in the context of OAuth/OpenID Connection security protocols. API Client applications have responsibility to acquire Access tokens from external OAuth service provider, and then use these tokens in their actual requests sent to APIs. APIs are responsible for receiving API requests with attached Access tokens, validating tokens and (typically) authorizing access to API resources based on the claims contained in received tokens. API Gateways can help both API Client applications and APIs, to execute their respective responsibilities without any code or configuration changes.
Taking Azure Active Directory as an example of an external OAuth service provider we can depict the following two scenarios:
API Gateways for API Client applications
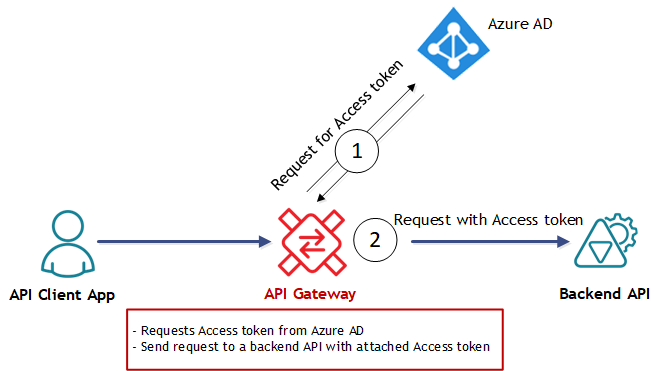
In this scenario API Gateway helps API Client application, because it receives requests from an API Client application, which is completely “unaware” of any need for OAuth. API Client application may use whatever security it agreed to use with API Gateway, while API Gateway takes responsibilities (shown in red frame on the diagram above) to acquire Access token from Azure AD (step 1 on the diagram above), and to attach this token to the request forwarded to the Backend API (step 2 on the diagram above). As a result, the Backend API will receive request with attached Access token just like it expects.
In the Sentinet API Management product for this scenario we use the terms Virtual Service with Client OAuth Security to indicate that Sentinet Node (a.k.a. API Gateway) provides virtual (or façade) API with specific OAuth configuration on the virtual service’s outbound (client) side.
API Gateways for APIs
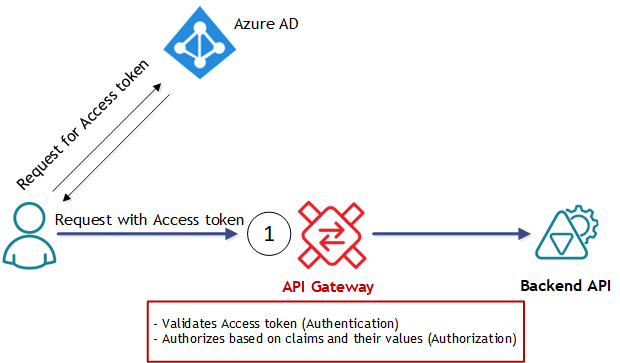
In this scenario API Gateway helps Backend API, because it receives requests from an API Client application with already attached Access token, and takes responsibilities (shown in red frame on the diagram) to validate received token and authorize access to the Backend API based on the claims and their values in Access token (step 1 on the diagram above). Backend API here completely “unaware” of any need for OAuth, and can use whatever security it agreed to use with API Gateway.
In the Sentinet API Management product for this scenario we use the term Virtual Service with Service OAuth Security to indicate that Sentinet Node (a.k.a. API Gateway) uses specific OAuth configuration on the virtual service’s inbound (service) side.
Combined Scenario
In this article I will use “combined” scenario, where both API Client application and Backend API are “unaware” of any need for OAuth. Backend API is virtualized through double-virtualization (when one virtual service is also virtualized by another) in order to avoid using any custom code for API Client and API applications, and at the same time to demonstrate both scenarios, API Gateways for API Client applications and API Gateway for APIs.
For the Backend API I will use a simple Basic Calculator API with its public endpoint located at https://calcapi.cloudapp.net/api . You can download metadata of this API in Swagger 2.0 or OpenAPI 3.0 format from the links provided at the bottom of this article.
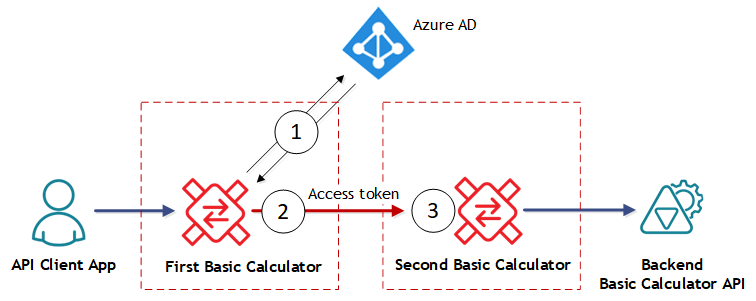
The flow of messaging depicted on the diagram above is as following:
API Client App (which in this case will be just a browser) calls First Basic Calculator Virtual Service hosted in the Sentinet Node (API Gateway). Inbound endpoint of the First Basic Calculator virtual API will be configured with no security, while outbound endpoint will be configured with integration with Azure Active Directory (steps 1 and 2 on the diagram above). First Basic Calculator covers demonstration of API Gateways for API Client applications scenario.
First Basic Calculator Virtual Service forwards messages to the Second Basic Calculator Virtual Service, which is also hosted on the same API Gateway (at least in my demo). This is the “double-virtualization” technique I mentioned above. Inbound endpoint of the Second Basic Calculator virtual API will be configured with integration with Azure Active Directory (Access tokens validation and Authorization, step 3 on the diagram above), while outbound endpoint will be configured with no security to call public endpoint of the Backend Basic Calculator API. Second Basic Calculator covers API Gateways for APIs scenario .
Azure Active Directory Configuration
Configuring Azure Active Directory to issue claims for your API(s) can be done in many ways depending on how far you want to go with securing your APIs and their resources. In this article, I will demonstrate the simplest (and yet still practical) configuration, which uses just one registered application to represent both API and API Client application.
First, you need to capture either Tenant ID or Primary domain of your Azure Active Directory’s tenant. I prefer to use Primary domain, because it is represented by humanly readable string that often takes form of [your-domain-name].onmicrosoft.com. You will need either of them when later configuring Access tokens validation issued by your Azure Active Directory.
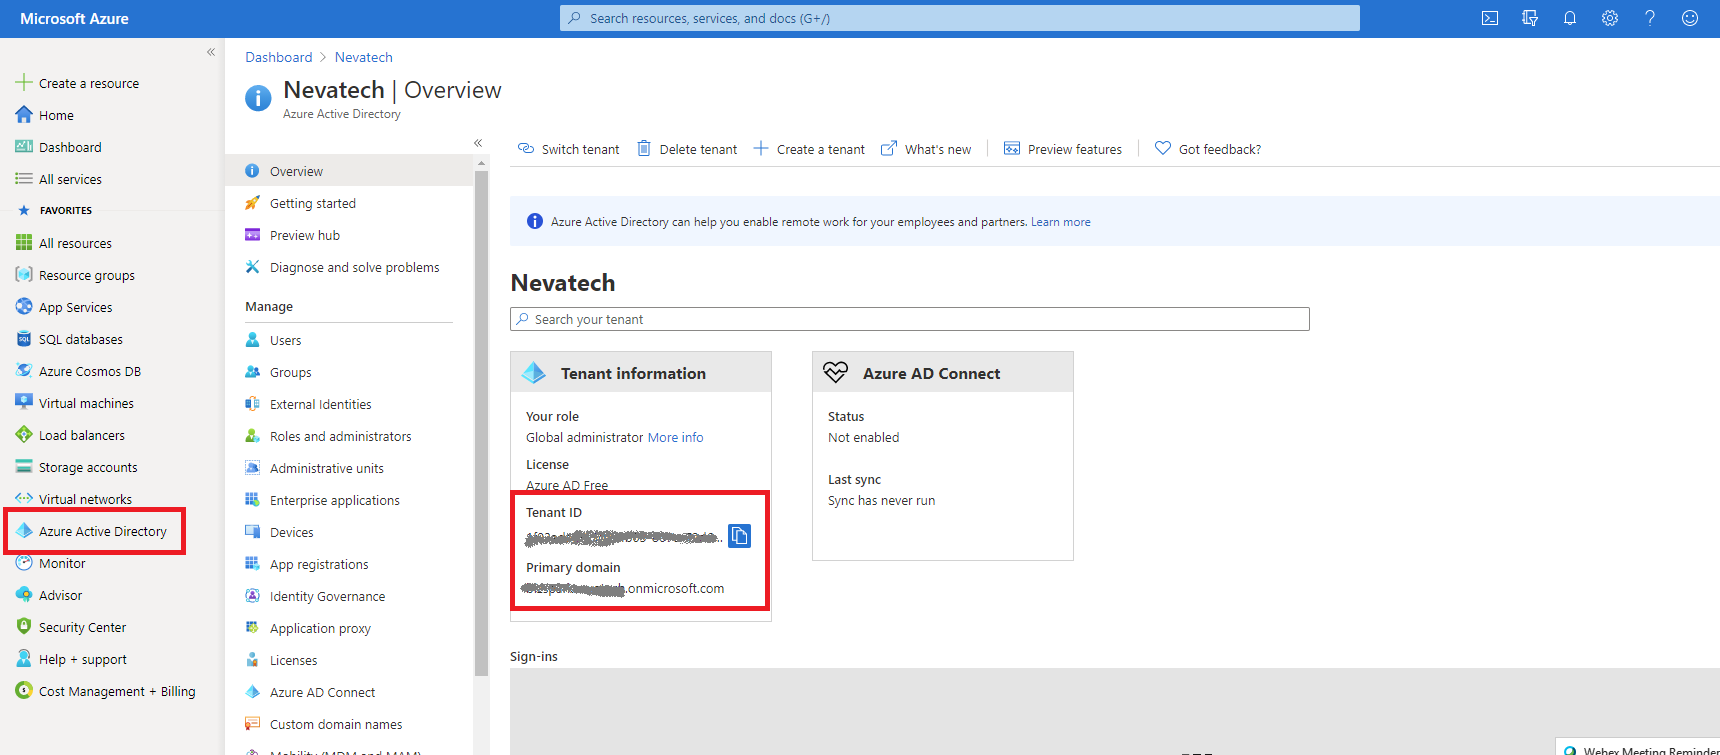
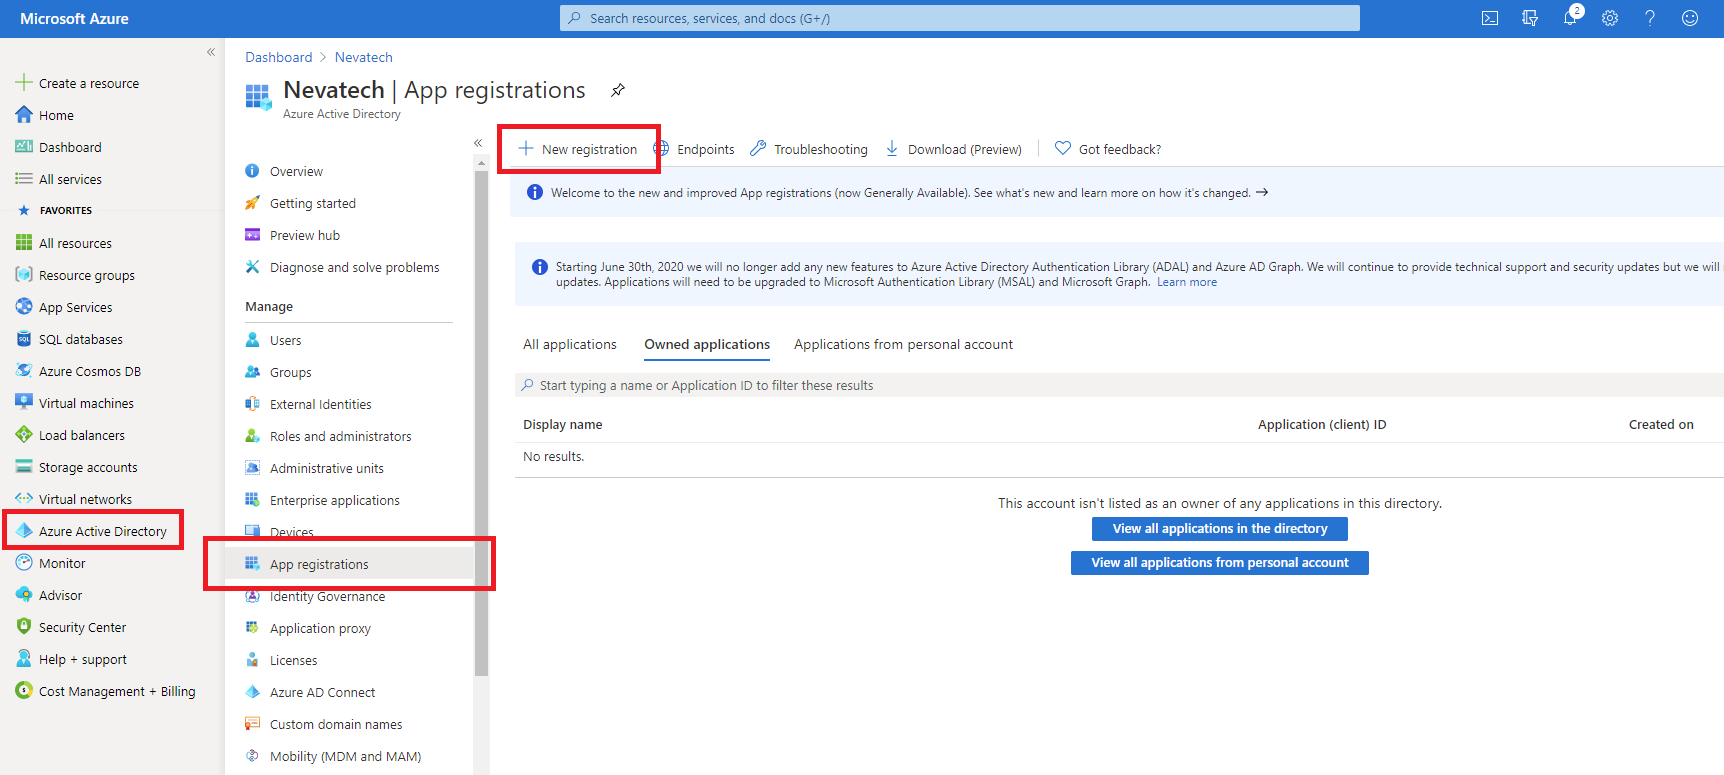
Next, you need to register your API in the Azure Active Directory. Navigate to your Azure Active Directory service, select App registrations and click New registration button.
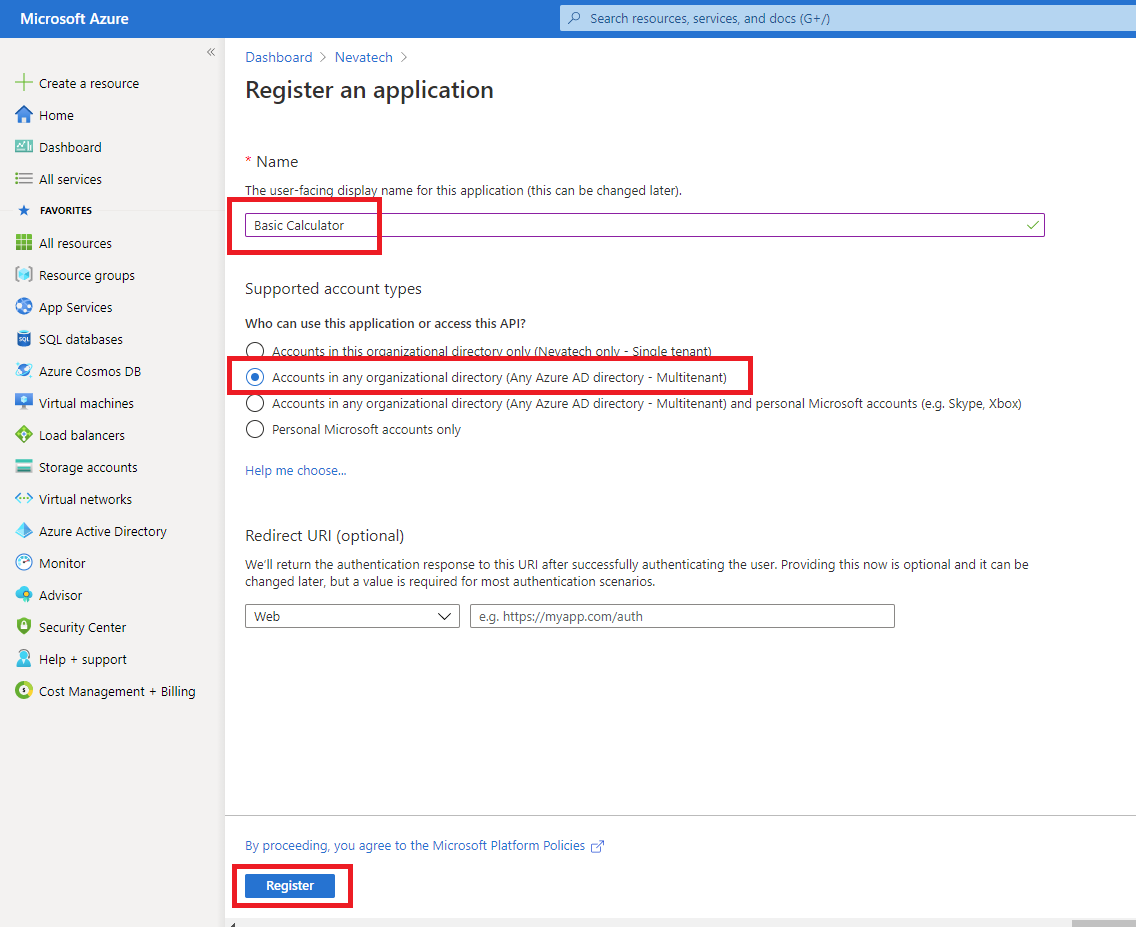
Provide name for your API application (for example, Basic Calculator), chose one of the radio buttons for Supported account types (for example, as highlighted below) and click Register button.
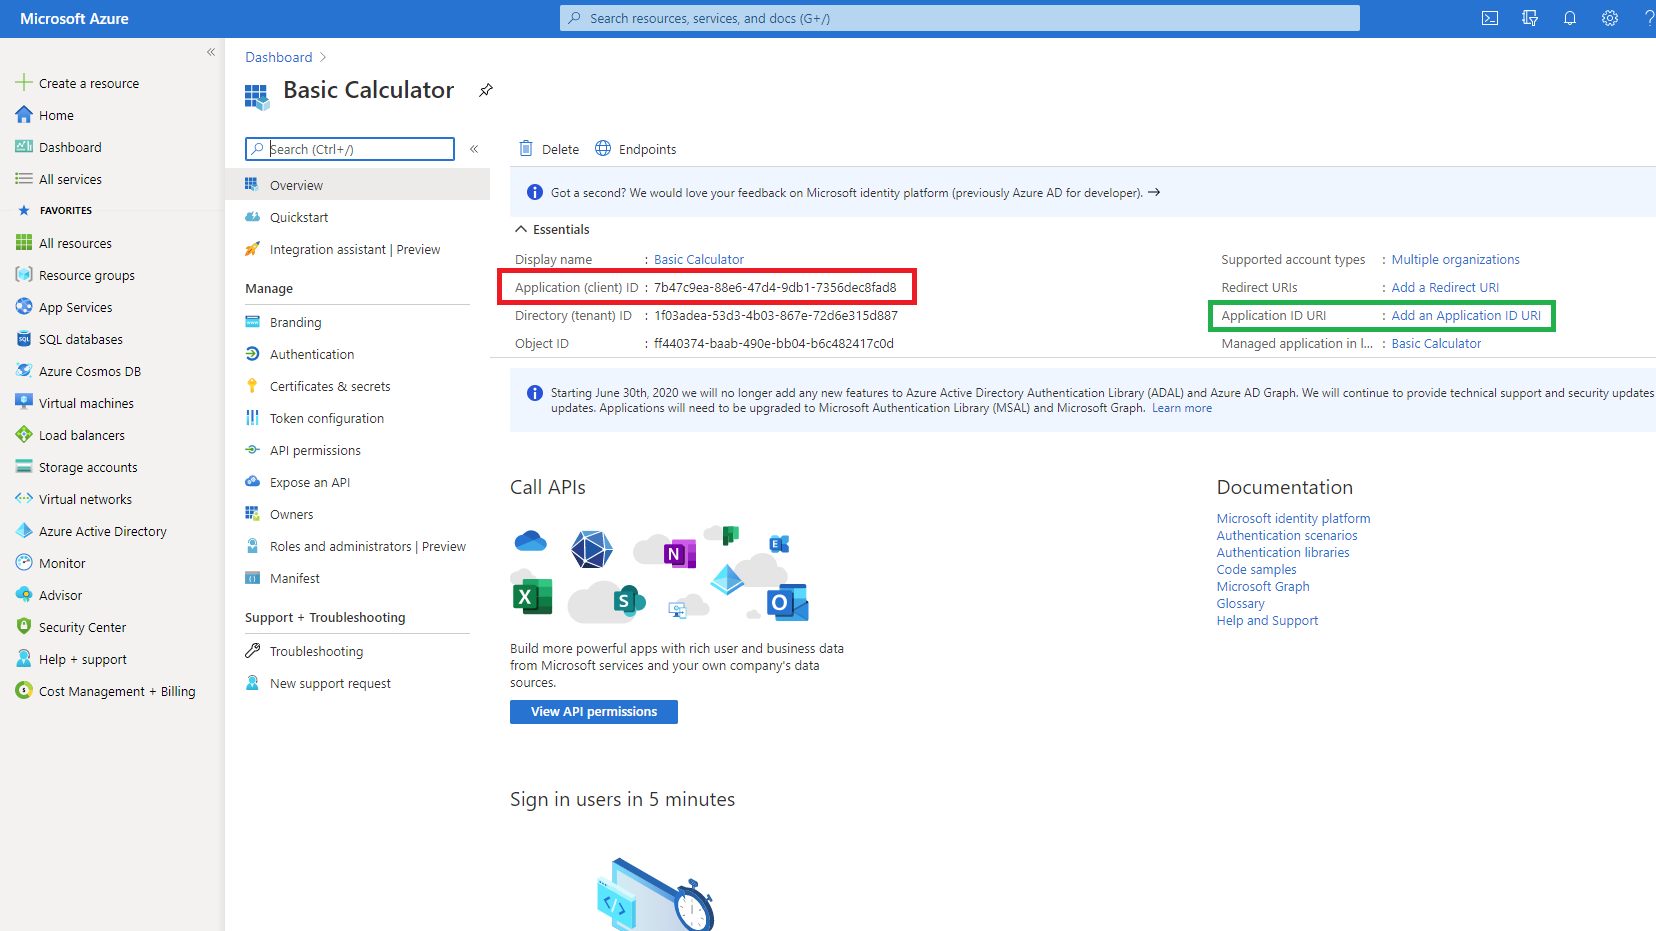
Once new application is registered, capture its Application (client) ID. This will be a used as a Client Id by API Client applications that will access Basic Calculator API.
NOTE
In this simple scenario, I will skip defining Application ID URI (highlighted in green on the screenshot above), which can affect future Audience (aud) claims and Scopes. If you need to add them, use Add and Application ID URI link to add scopes, but even without them you can still build a simple and yet practical use case as shown in this article.
Navigate to Certificates and secrets and click New client secret button.
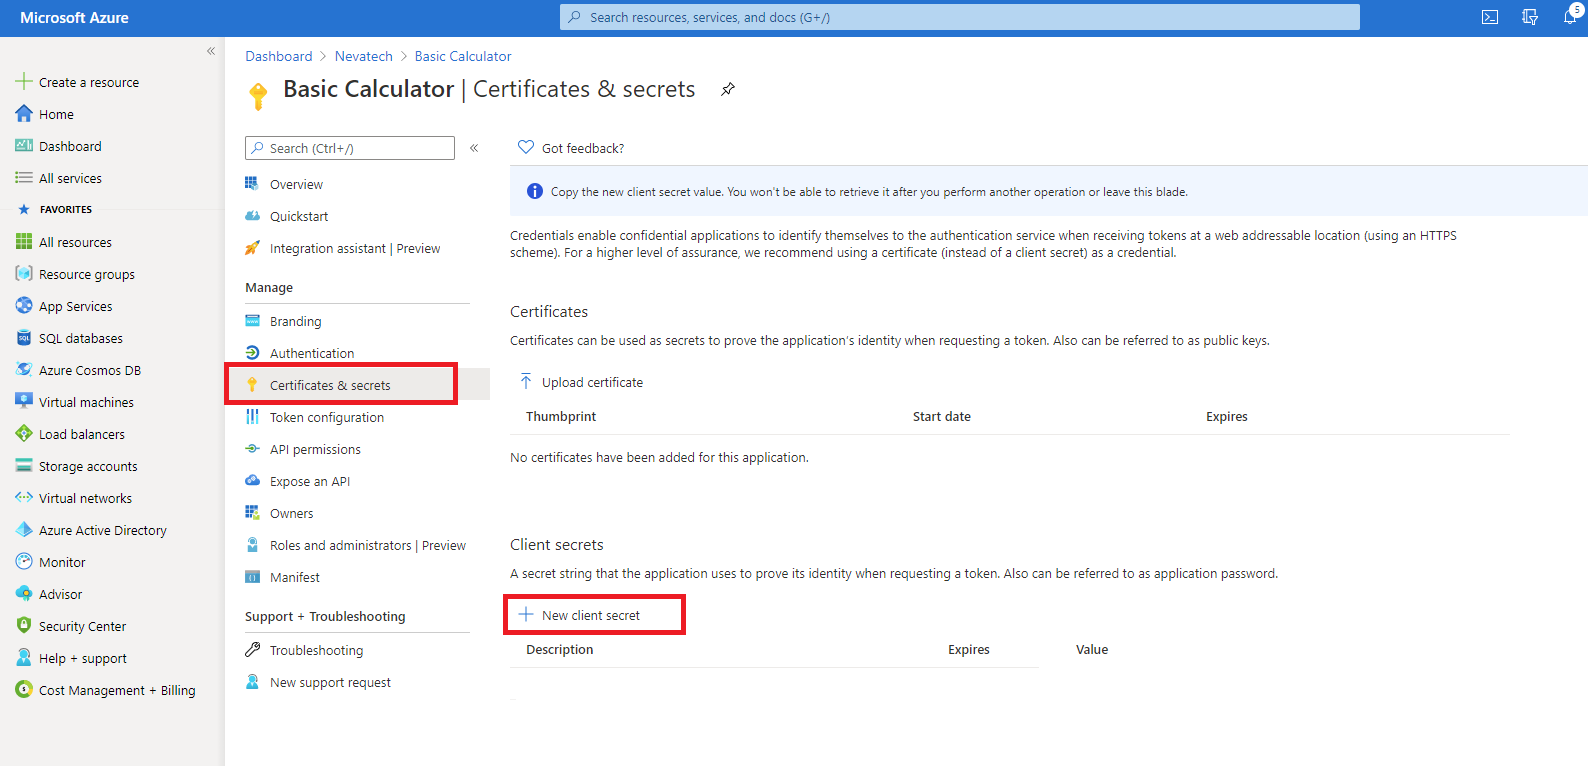
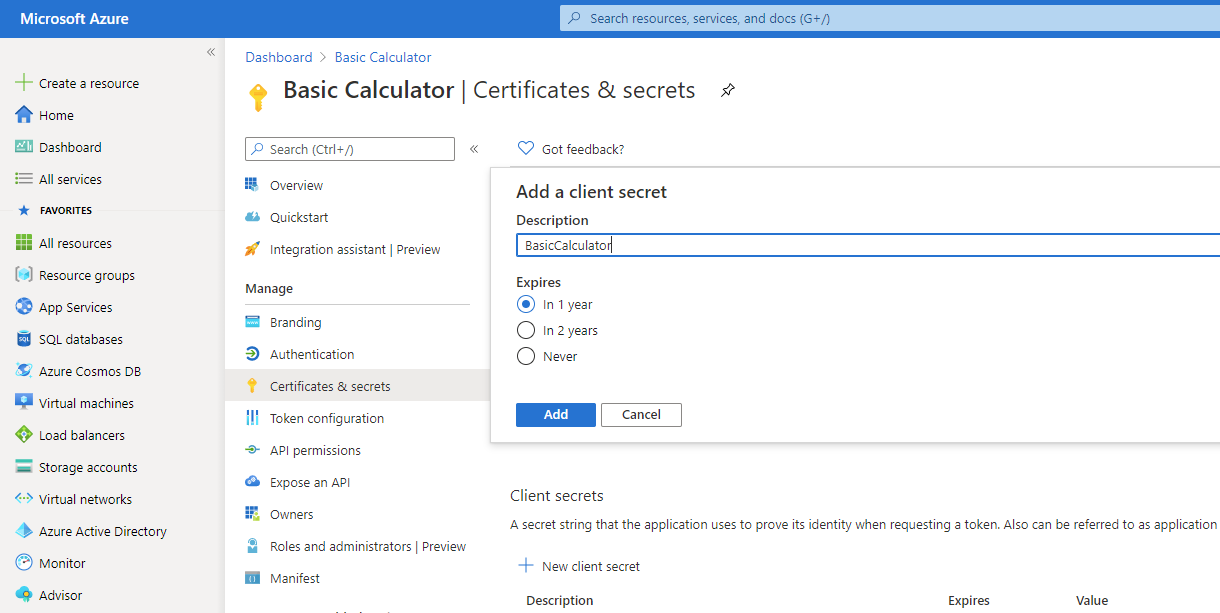
Provide the name for your Client Secret, select its expiration option and click Add button.
Once client secret is added, you will have one-time opportunity to capture it (copy in the clipboard), because next time you navigate to this page the secret will not be shown and there will be no way to restore its visibility. Capture your client secret, it will be a used as a Client Secret by API Client applications that will access Basic Calculator API.
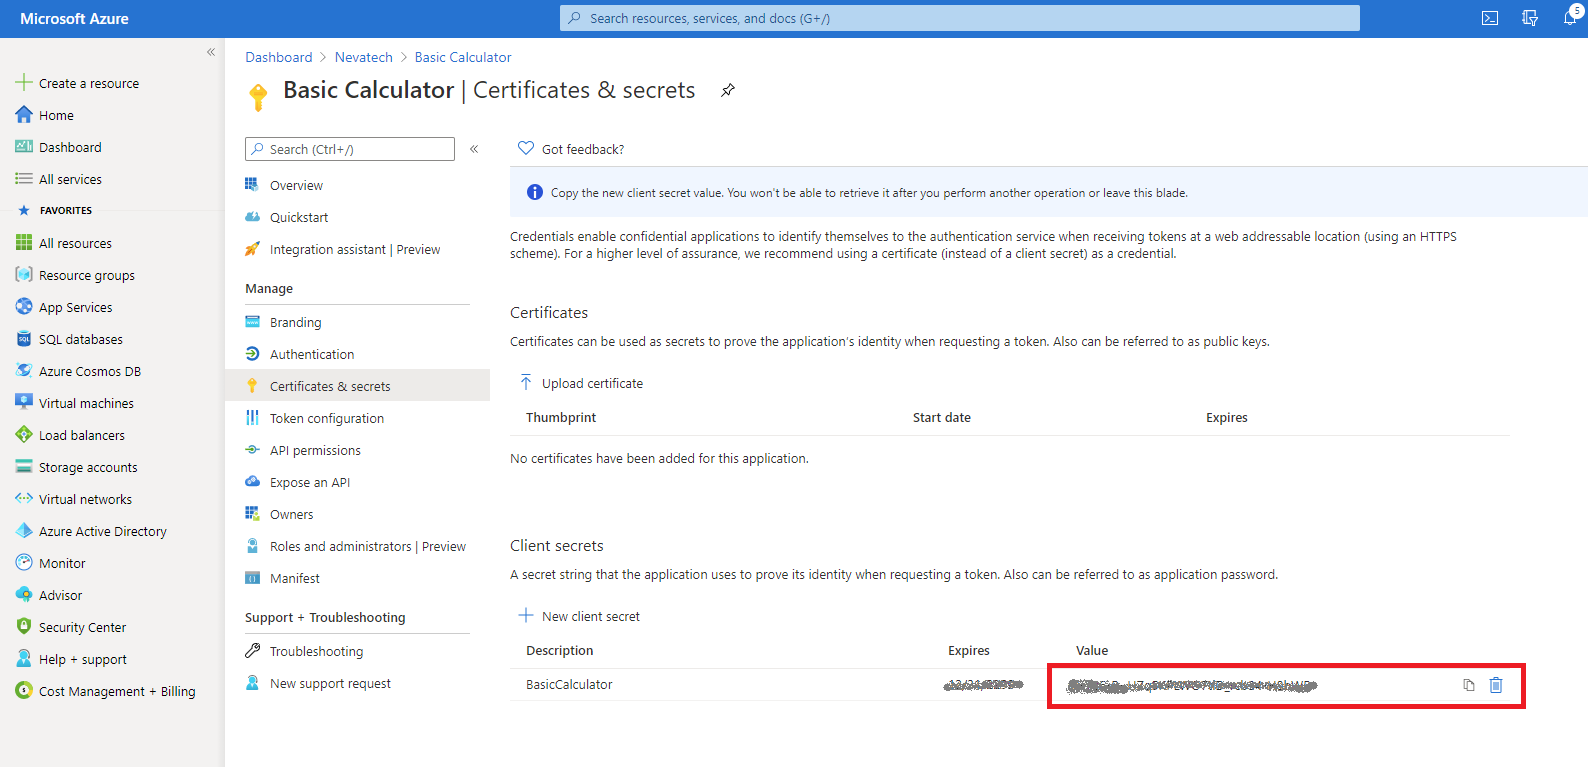
This is all you have to do to create a minimum working configuration for an API application registered in the Azure Active Directory.
Sentinet API Management Configuration
As described above, I will use Sentinet with double-virtualization configuration, to demonstrate Sentinet’s capability to execute as both API Client application and API service application.
A typical configuration process in the Sentinet API Management product consists of few steps:
Register Physical (backend) API
Create Virtual API for registered backend API
Design Virtual API with its inbound endpoint(s) and their security policy(ies)
Assign Access Control rule(s) for the virtual API
Because I will use double-virtualization, I will have to go through this process twice, where one virtual API will be used as a physical (backend) API for the other virtual API.
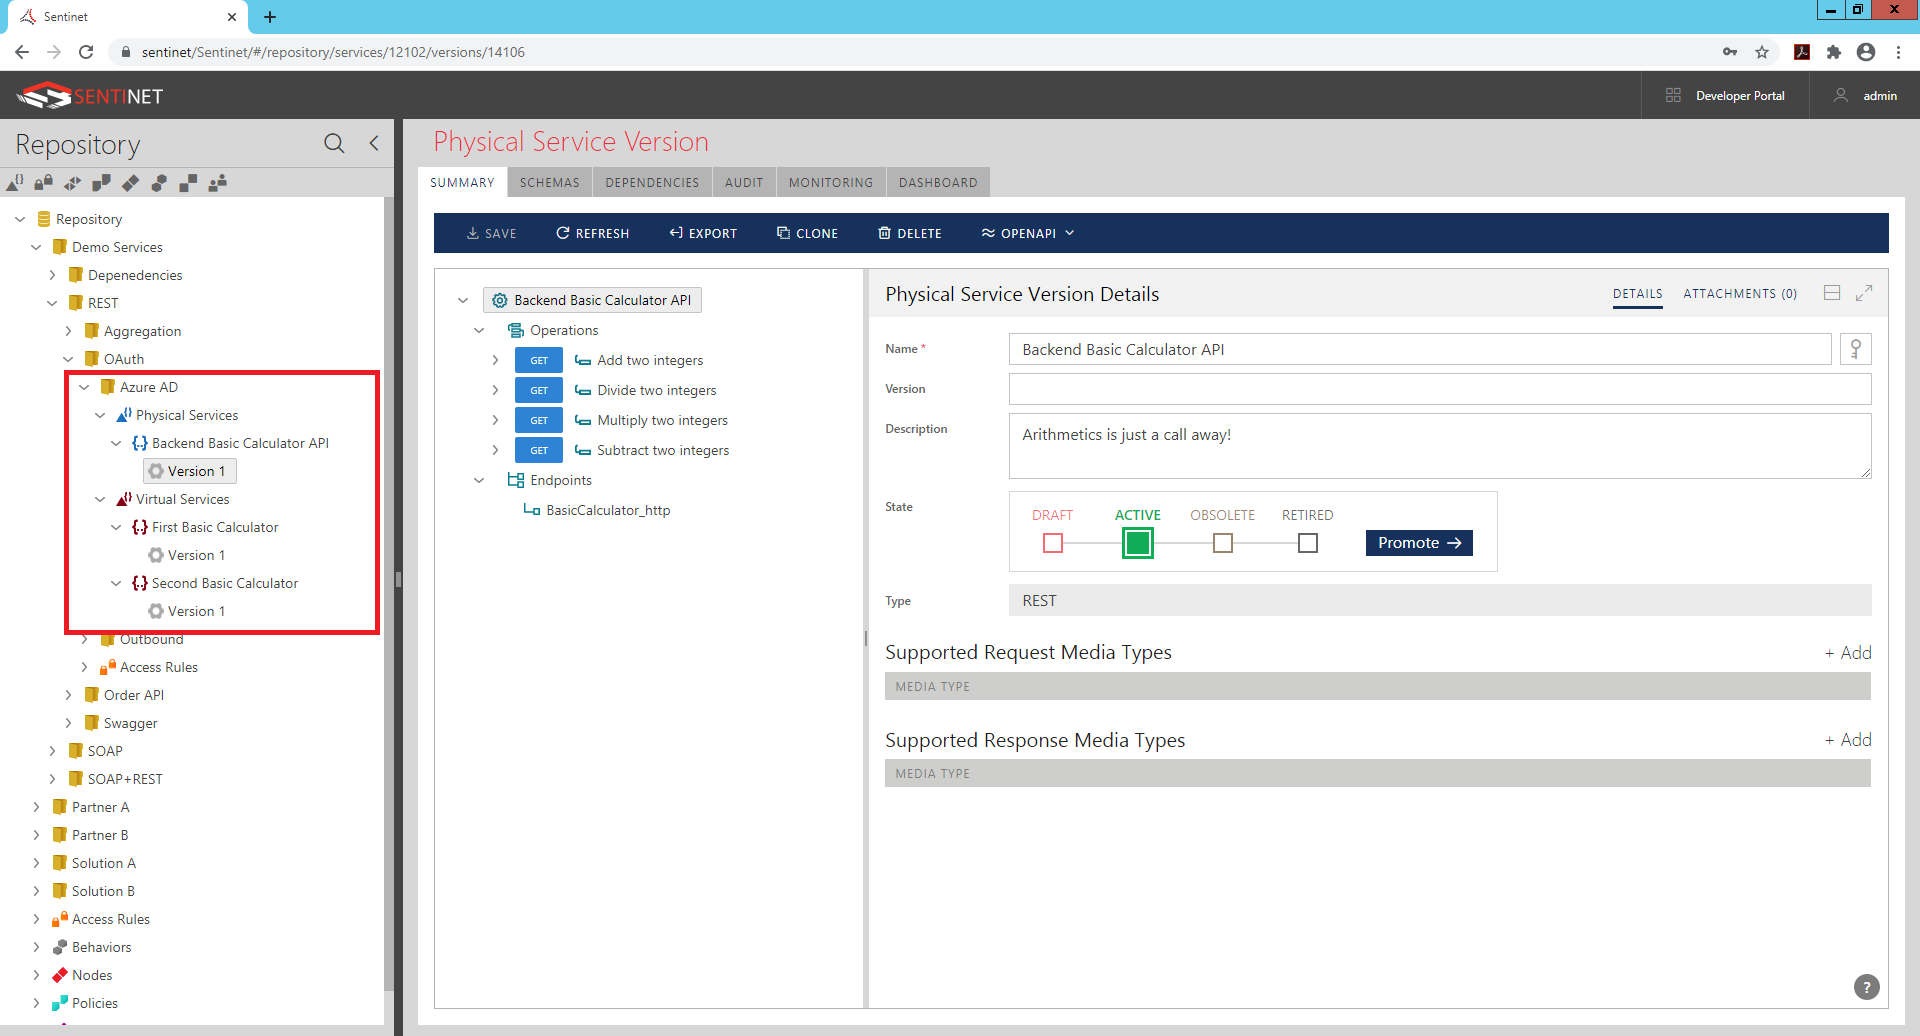
On the diagram above, Second Basic Calculator is the virtual service that will be called after (by) the First Basic Calculator, but the registration process of virtual services in Sentinet goes in reverse order, from the physical (backend) API to its virtual API. That means that Second Basic Calculator API must be registered before First Basic Calculator. In this article I will not go through all the details of how to register physical service Backend Basic Calculator, and how to virtualize it through two sequential virtual services using Sentinet Administrative Console’s user interface. You can find these details in the Sentinet User Guide . For example, you can follow Registration from Swagger / OpenAPI documents chapter to register Backend Basic Calculator from Swagger documents provided in this article, while Managing Virtual REST Services chapter describes the process of designing and configuring virtual services hosted in the Sentinet Nodes (API Gateways). In this article I will rather focus on specific details on how to configure Sentinet virtual services to integrate with Azure Active Directory. In my case, I registered all three API in the same folder, Azure AD of the Sentinet Repository:
Second Basic Calculator - API Gateway for the Backend API
According to the diagram above of this part of a setup, Second Basic Calculator virtual API is supposed to validate tokens issued by the Azure Active Directory, and to authorize access to API resources based on the claims contained in Access (JWT) tokens. In this case, virtual service’s inbound endpoint must be configured with the service side of OAuth security policy. Sentinet offers User Interface to help prepare this policy. In the Add Policy Wizard for the virtual service’s inbound endpoint select HTTPS transport scheme (assuming that the virtual service will be called via its HTTPS endpoint), and select OAuth in the Client Credentials drop-down. Sentinet knows that this will be security policy configuration for the inbound (service-side) endpoint of the virtual service, so it opens Service Security section (as shown below). All you need, is to take all its defaults and to provide Metadata Endpoint address of your Azure Active Directory tenant, which should look like this:
https://login.microsoftonline.com/[your-domain-name].onmicrosoft.com/.well-known/openid-configuration
You can also use similar address with Tenant ID instead of Primary domain name that you captured earlier. Note, that if you navigate to your App registration page and click Endpoints button, Azure Portal will show you all endpoint relevant to this AD, where they use Tenant ID.

Metadata Endpoint entry is the only configuration entry that you need to provide in the Sentinet in order to implement Azure Active Directory Access tokens validation. At runtime, Sentinet will fetch this metadata, cache it, and will use information contained in it to validate incoming Access tokens. This is all possible only because Azure Active Directory provides such metadata endpoint and because Sentinet knows how to deal with it effectively.
First Basic Calculator - API Gateway for API Client application
According to the diagram above of this part of a setup, First Basic Calculator virtual API is supposed to request OAuth tokens from the Azure Active Directory, and to attach them to its requests forwarded to the Second Basic Calculator virtual API. In this case, virtual service’s outbound endpoint must be configured with the client side of OAuth security policy. Sentinet offers User Interface to help prepare this policy. In the Modify Policy Wizard for the virtual service’s outbound endpoint select OAuth in the Client Credentials drop-down. Sentinet knows that this will be security policy configuration for the outbound (client-side) endpoint of the virtual service, so it opens Client Security section (as shown below). You provide exactly the same Metadata Endpoint that was used in the previous chapter, select Client Credentials for Authentication Flow, and provide Client Id and Client Secret captured during API registration in Azure API Portal. Everything else can stay with default values.
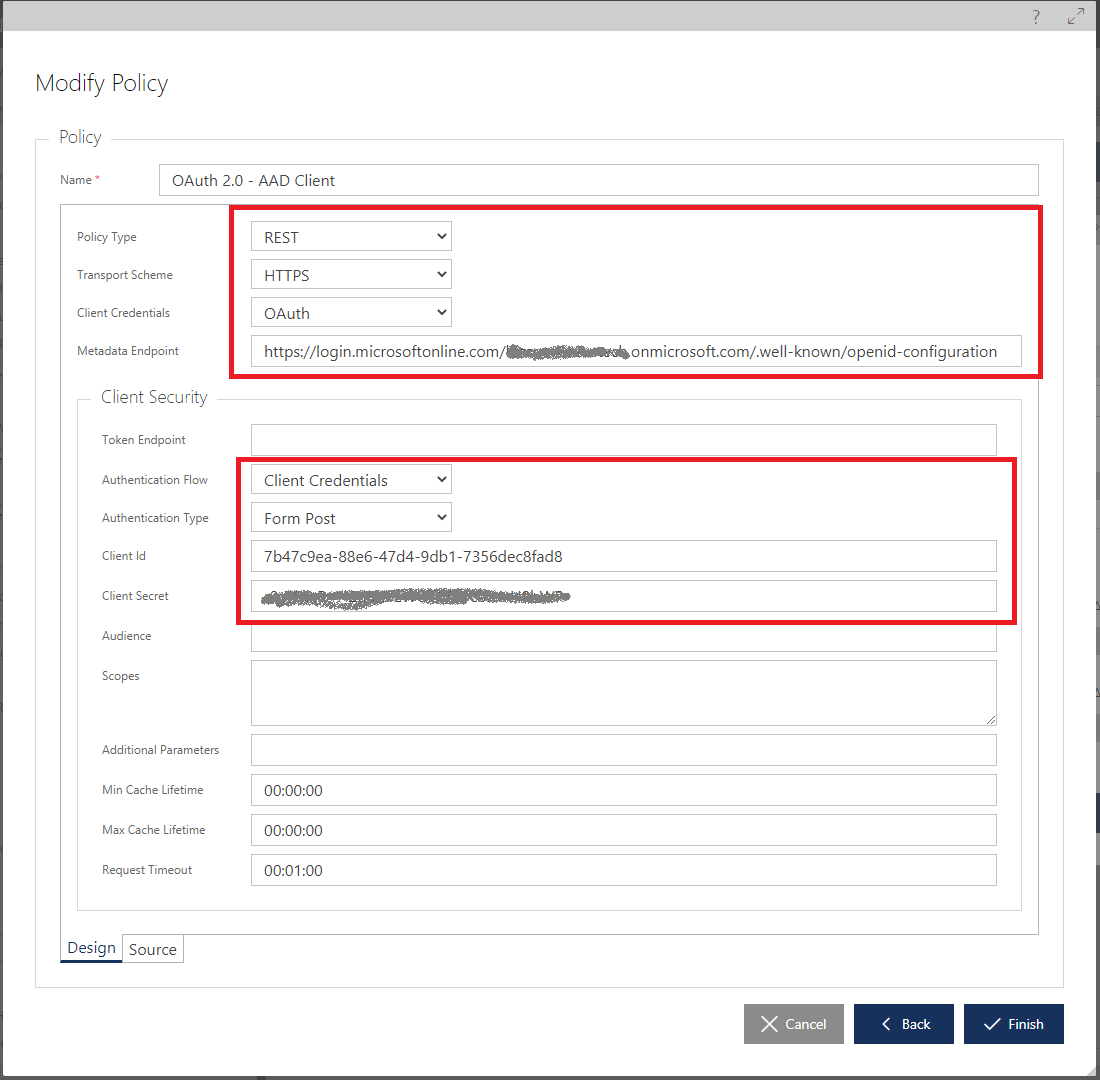
Sentinet will fetch and cache Azure Active Directory tenant’s metadata from provided metadata endpoint, it will figure out how to request token from Azure, it will automatically cache received token according to its expiration assigned by the Azure Active Directory, and it will attach it to requests forwarded to the Second Basic Calculator virtual API.
Sentinet Monitoring and Tracing for OAuth
Just because API Client App on the diagram above can be even a simple browser, you can initiate entire message exchange by navigating your browser to the inbound endpoint of the First Basic Calculator virtual API, for example: https://sentinet/NodeAsp/firstbasiccalculator/add?a=1&b=2 Sentinet can be graphically configured to control messages recording. Looking at the recorded message at the First Basic Calculator virtual API, you can see that this API forwarded its request message with Authorization: Bearer header that contains Access (JWT) token received from Azure Active Directory.
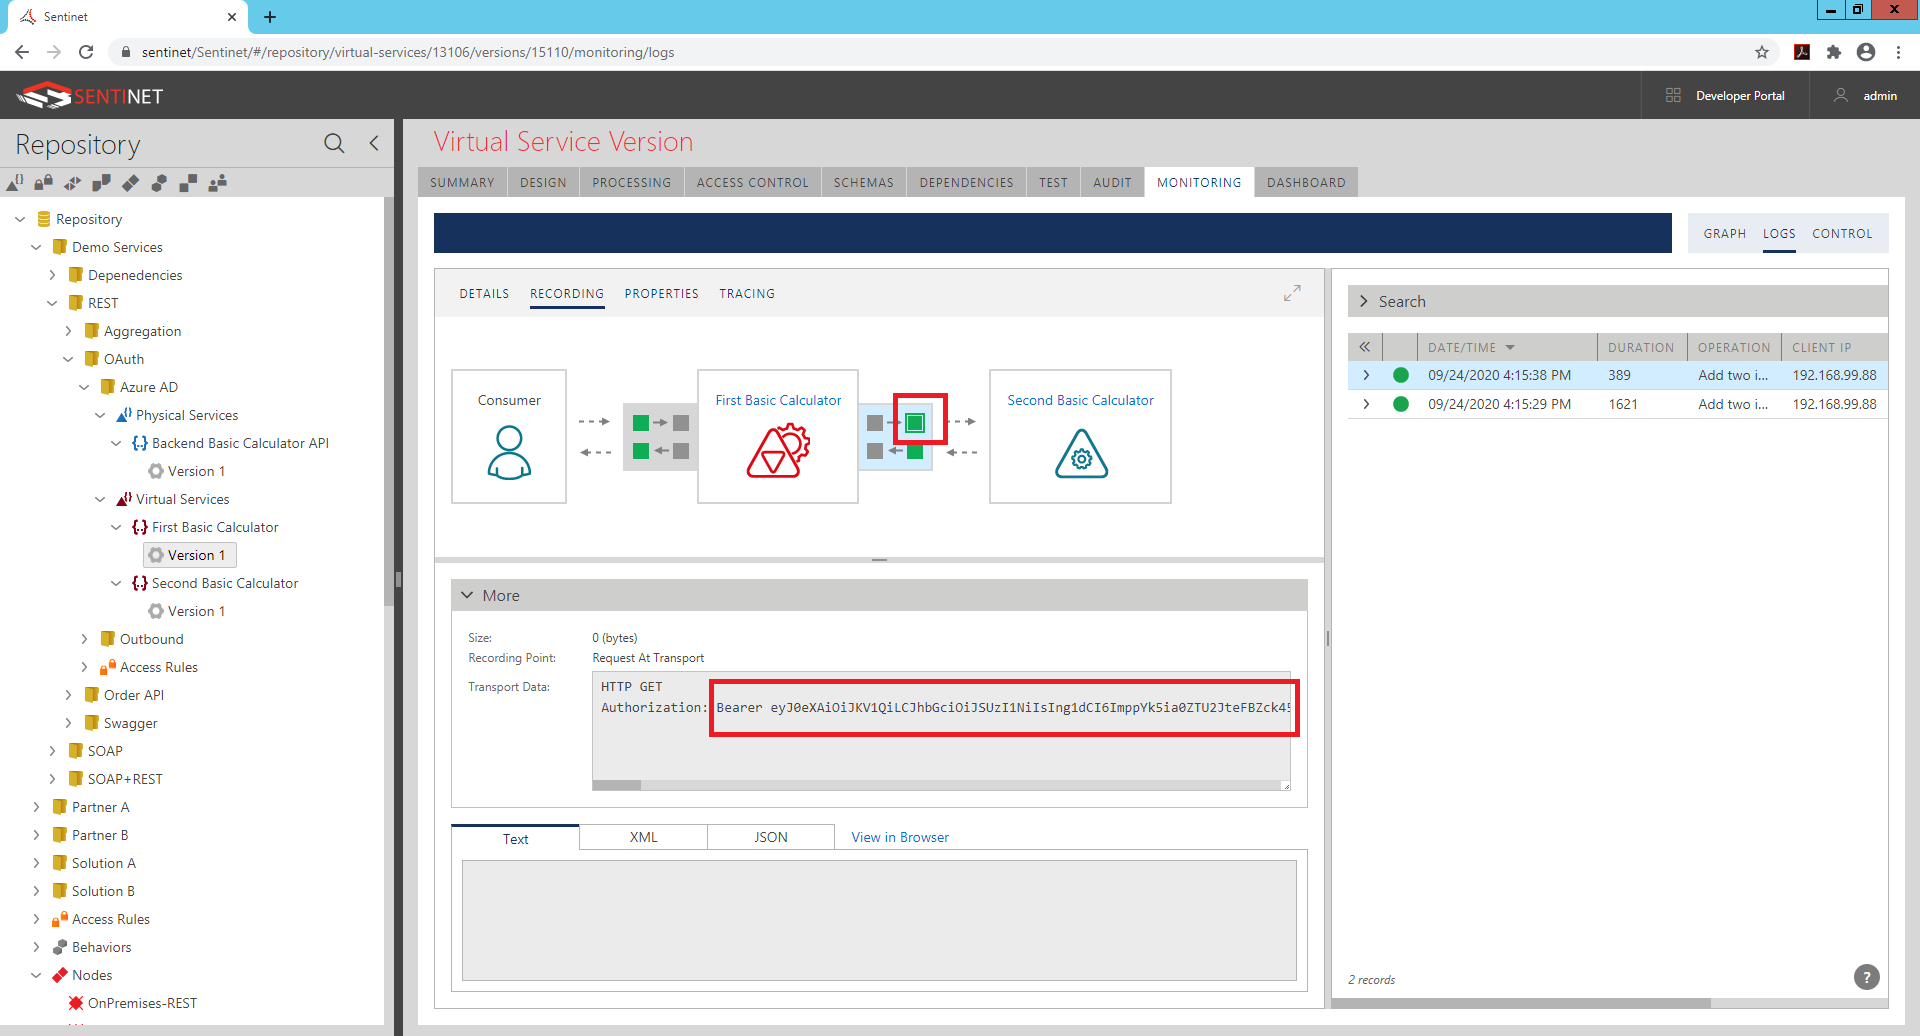
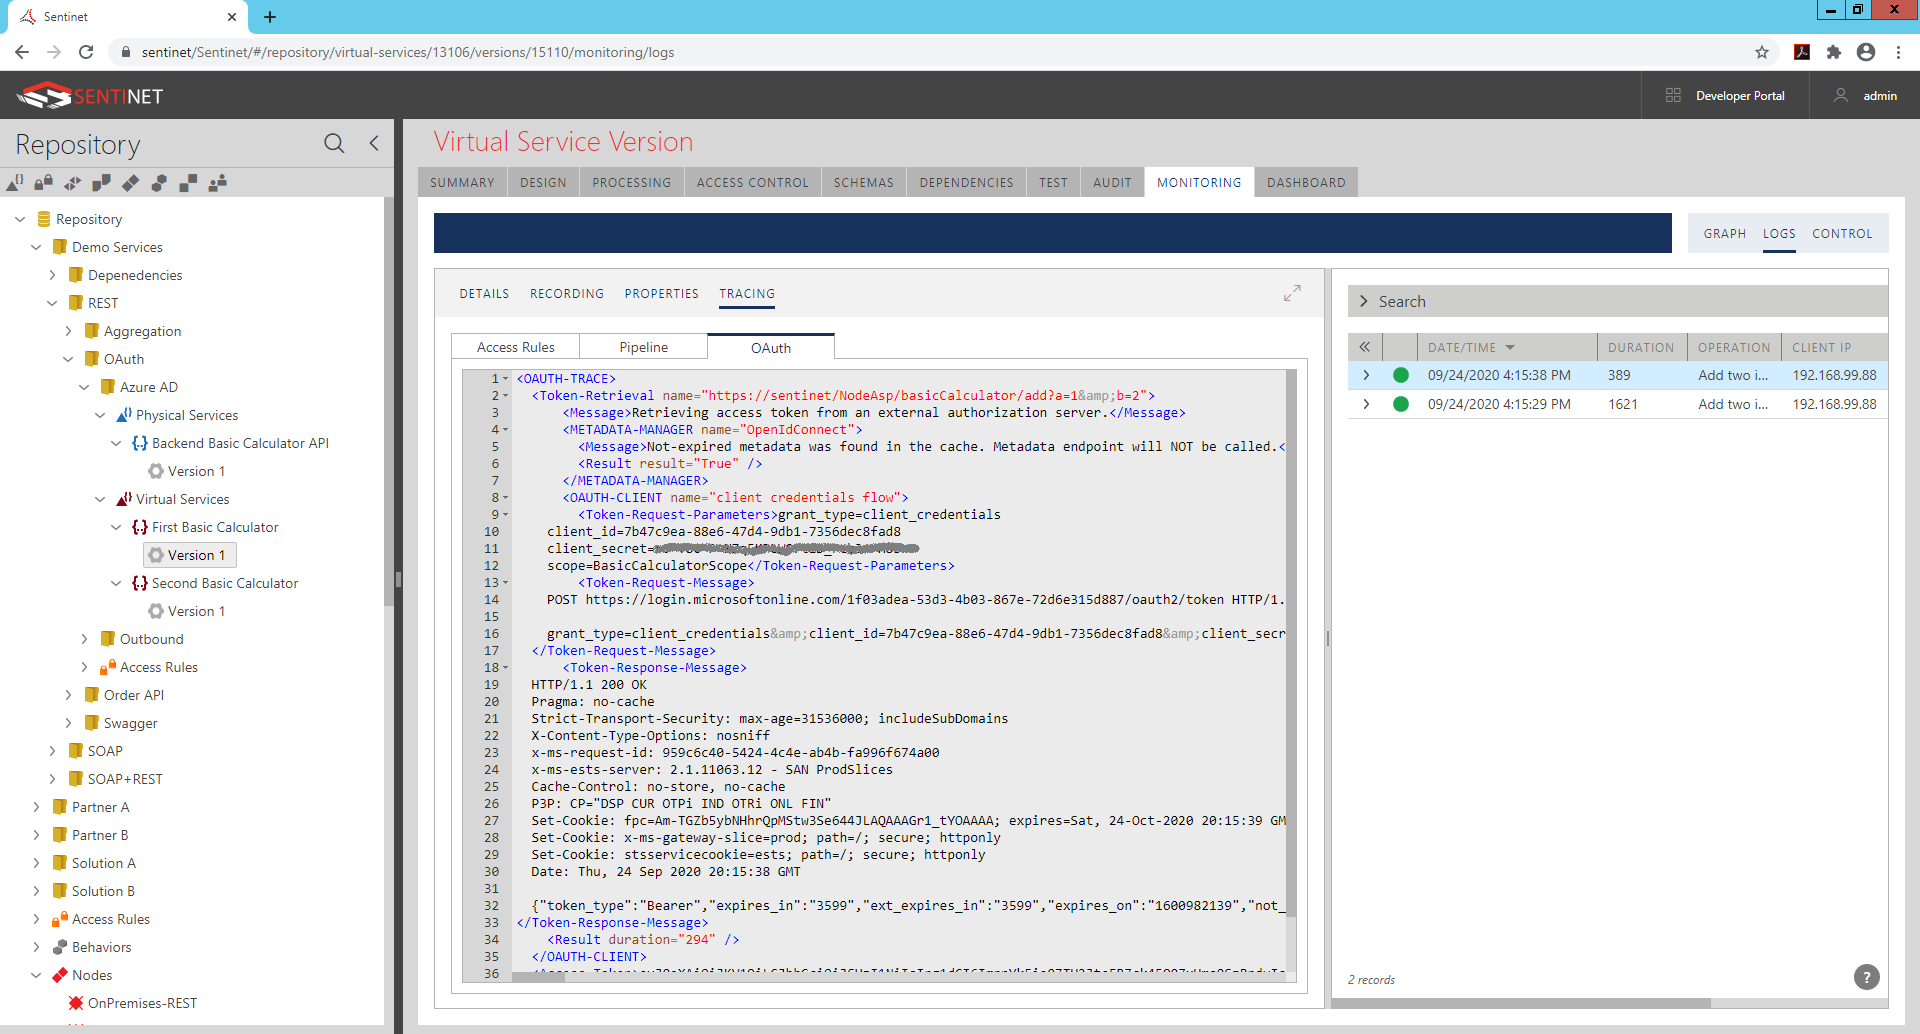
If OAuth tracing is enabled for this virtual service (which is optional), you can also see the trace of the messages exchange with Azure Active Directory:
Looking at the recorded message at the Second Basic Calculator virtual API, you can see that request was received with Access (JWT) token, which was validated and disassembled in a set of claims printed by the Sentinet as a Consumer Identity (assuming that Record Identity Claims setting is enabled for the virtual service).

Authorization based on claims
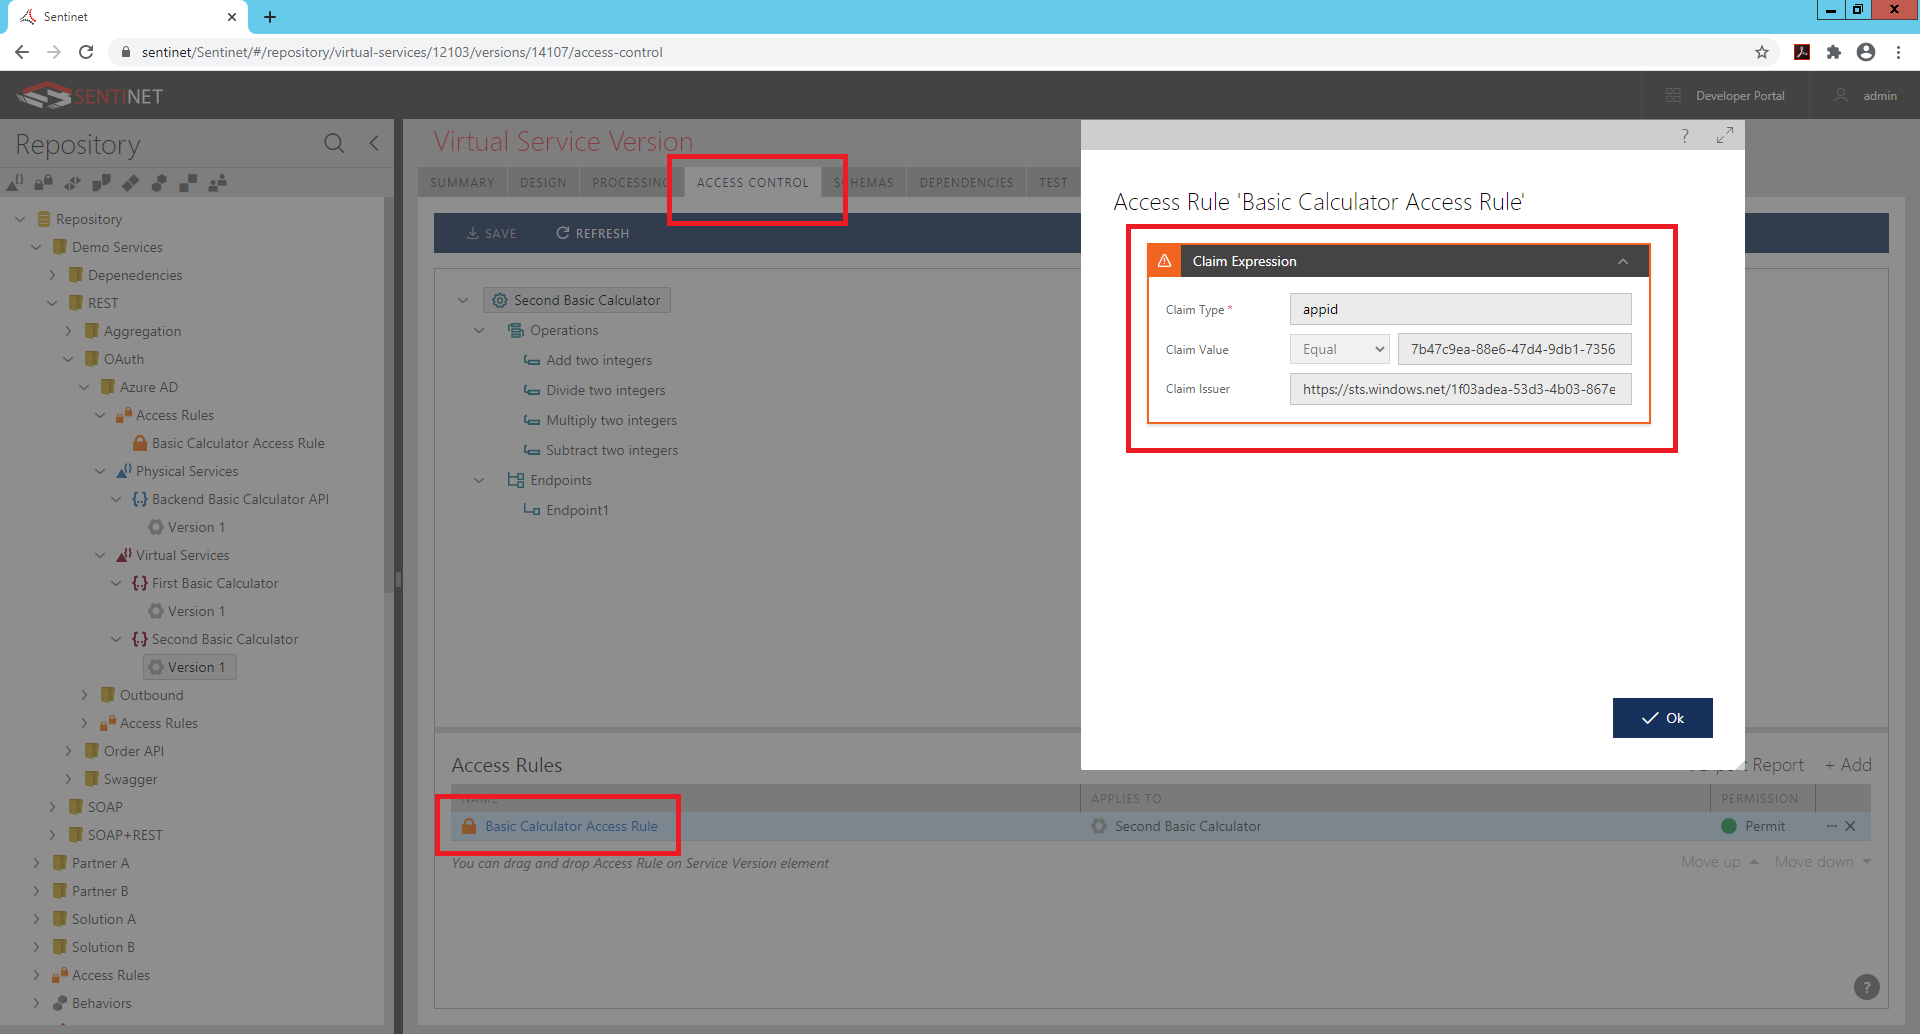
Earlier in this article I mentioned that Second Basic Calculator virtual API covers API Gateways for APIs scenario, where API Gateway has responsibility to authenticate (validate Access token) and Authorize requests. I also mentioned that this article demonstrates simple and yet practical configuration, where Authorization can still be added based on received claims. Out of all claims received in this simple setup, only one claim, appid carries information about the target API intended by this message exchange. You can create a simple graphical Sentinet Access Rule that requires appid claim to match API’s Client Id and add Claim issuer to match exactly your Azure Active Directory tenant’s identifier recorded by the Sentinet as such.
Final Notes
More complex Azure Active Directory configurations and Sentinet Access Rules can be added to this simple use case scenario, but the point remains the same – it is quite easy to make API Gateways serve all your OAuth needs and integration with Azure Active Directory without any code changes and in no time.
Download Basic Calculator API's Swagger v2 or OpenAPI v3 documents
basicCalc-Swagger20.json (3.17 kb)
basicCalc-Swagger30.json (3.52 kb)