How to call Salesforce.com REST APIs using API Gateways and OAuth security
[This article continues the series of posts that describe different scenarios of building effective integration solutions that require support for OAuth security models]
In the previous articles I described the high-level concepts and few examples of how API Gateways enable applications with OAuth security models without making any changes to the applications themselves. In part 1 of this series I provided details of a demo use case setup for the Service OAuth security when we have to protect existing API with OAuth security. In part 2 I gave example of how to call external API that requires OAuth security. In that article the external API was the Microsoft Translator REST API available from the Microsoft Azure Marketplace.
In this article I will demonstrate how an application can call Salesforce.com REST API without any coding of the application itself against OAuth and by using just an API gateway, Sentinet Node from Nevatech in this case. There are some fundamental differences in how calls to Salesforce.com REST API must be configured compare to the calls to Microsoft Translator API discussed in part 2 article. These differences will be explained later in this article.
Note that application that calls Salesforce API can be any kind of application (web, mobile, desktop, etc.), and more than one application can be enabled with the capability to call Salesforce API via API gateway:
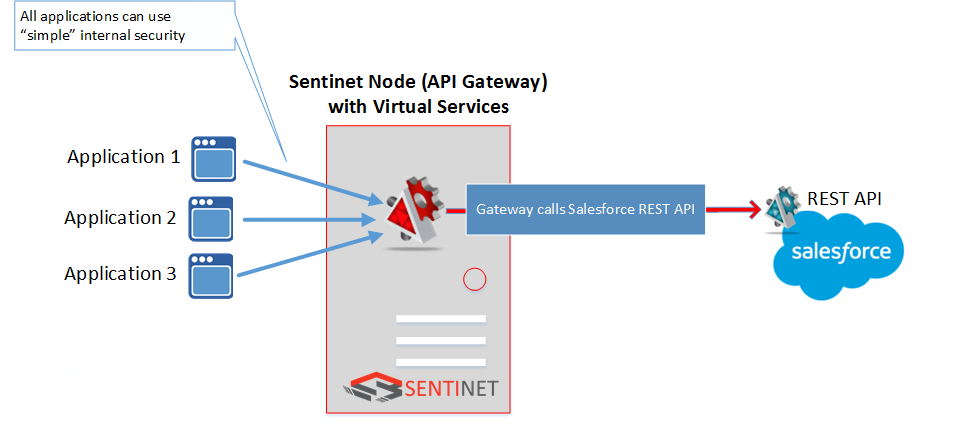
Another good example is a BizTalk Server application that has to call Salesforce REST API by one or more of its Send Ports. Both use cases will be demonstrated later in this article.
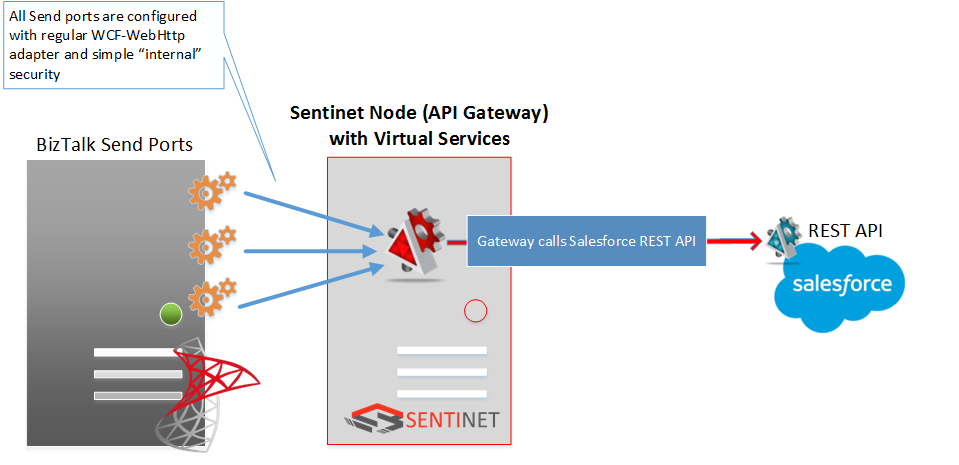
Interestingly enough, calling Salesforce REST API from the BizTalk Server is a very popular subject of discussions in the integrations community. Richard Seroter, a prominent blogger and one of the leading experts in the BizTalk Server, was actually asked by the Salesforce to publish a special edition article in the Salesforce Technical Library to explain how Salesforce API can be called from the BizTalk server. The solution that Richard provides involves coding of a special WCF endpoint behavior component that must be deployed and configured with each and every BizTalk Send port that calls Salesforce API. In April 2015 Muhammad Ehsan published extension to this article on the Microsoft TechNet Wiki. In his article, Muhammad explains how to fix original Richards’s code to allow BizTalk Server to call multiple Salesforce endpoints. A month later, his article was awarded “Community Win” by the Microsoft TechNet Wiki.
What we have learned from these articles is that this particular topic is important, popular, involves special coding/deployment/configuration and presents continuous challenges. What I will demonstrate in this article is that all these challenges can be fully delegated to the API gateways and there will be no coding or BizTalk deployment/configuration involved as part of this solution.
The process of enabling any application to call Salesforce REST API via Sentinet Node API gateway involves few configuration-only steps:
- Register your client application with your Salesforce account.
- Register Salesforce REST API in the Sentinet API Repository.
- Create in the Sentinet Repository a virtual REST API that exposes Salesforce API through the Sentinet Node (API gateway) endpoint.
- Test the call to Salesforce REST API via virtual service endpoint hosted in the Sentinet.
After completing these steps we can test our application (for example regular BizTalk application) by calling API gateway endpoint using “simple” security model. We can then observe how API Gateway forwards calls to Salesforce API using OAuth security and brings back to the client application the response expected from the Salesforce API.
So, here are these configuration steps:
Step 1. Register your client application with your Salesforce account
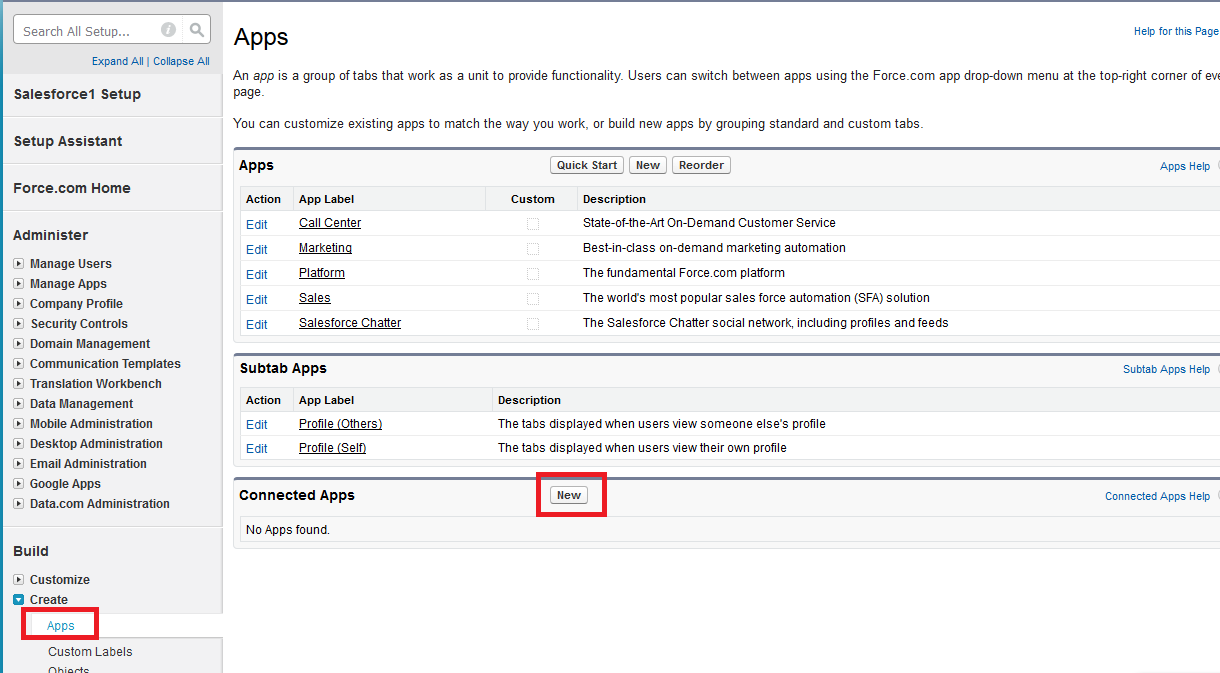
In order for an application to call Salesforce API it has to be registered with your Salesforce account as a Connected App. Log into your Salesforce account and select Setup->Build->Create->Apps. Click New button in the Connected Apps section:
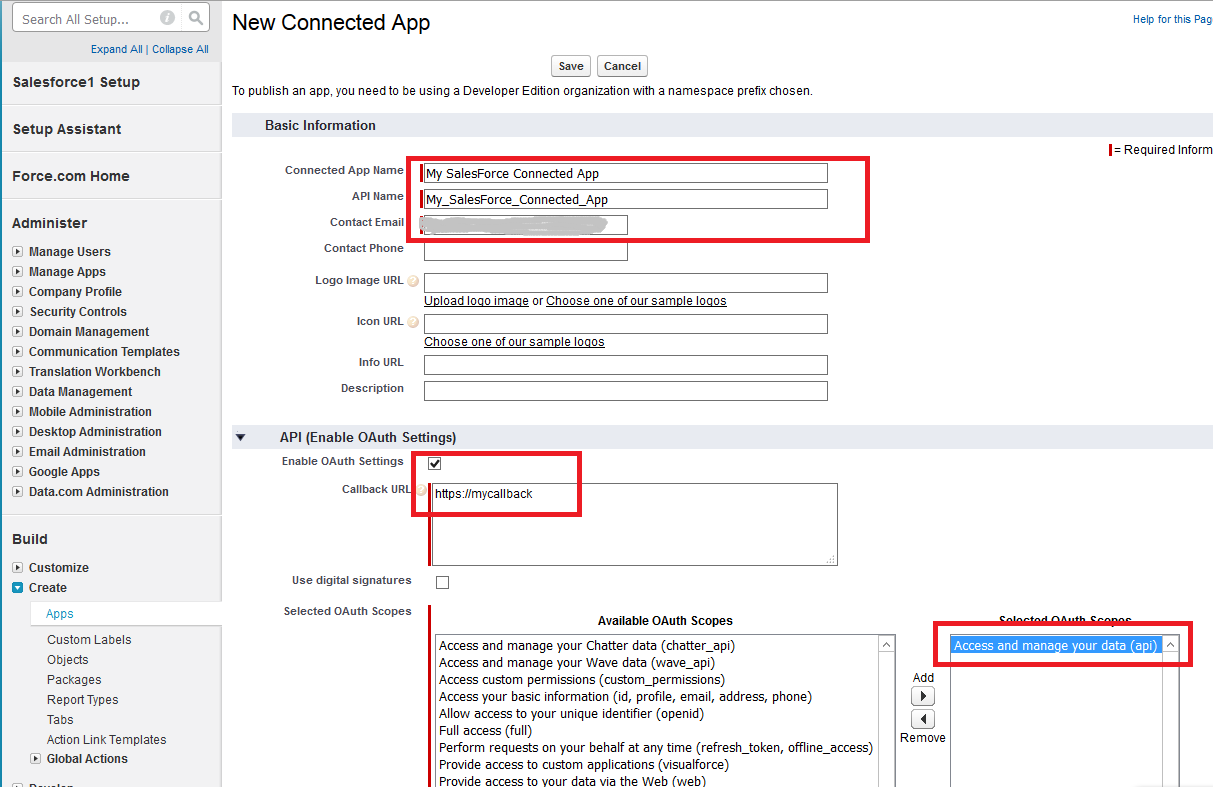
On the next screen fill in:
- Connected App Name field. For example: My SalesForce Connected App
- API Name field. For example: My_SalesForce_Connected_App
- Contact email field
- Check mark Enable OAuth Settings under API (Enable OAuth Settings) section
- Provide any https URL for the Callback URL field. For example: https://mycallback. Calling external API does not involve interactive user sign-in process, that’s why this callback URL can be anything
- For the Selected OAuth Scopes add Access and manage your data (api)
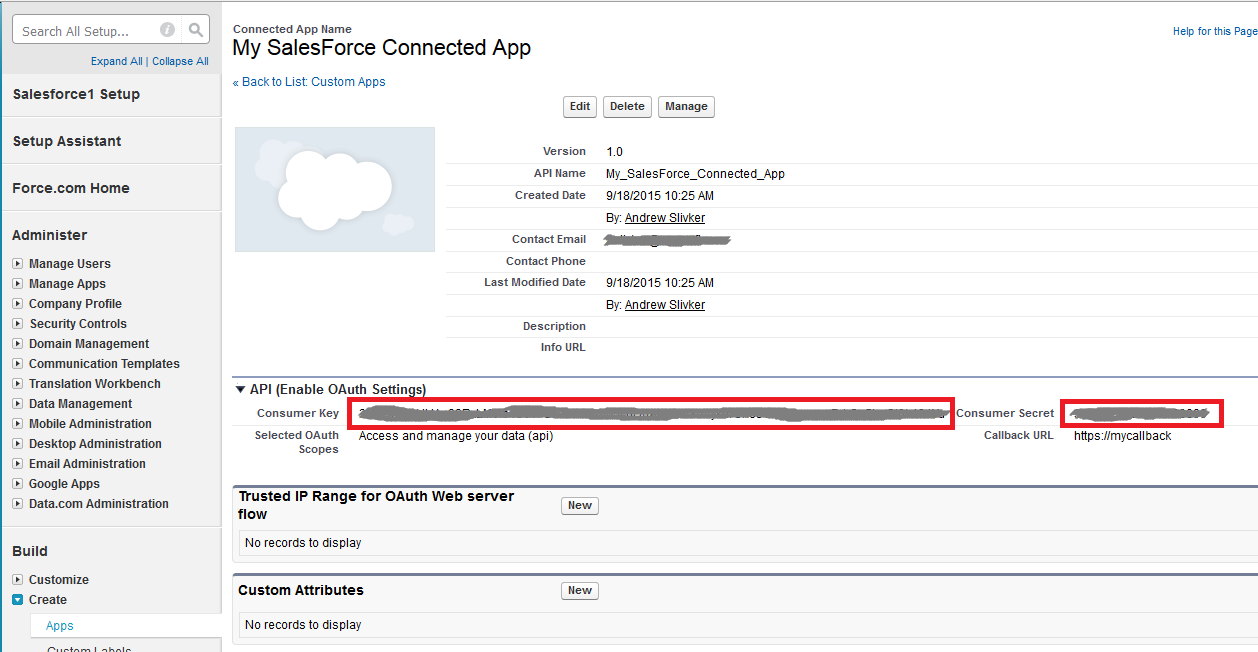
Click Save button and you will be shown the next screen with the security properties of the created application. Capture the values of the Consumer Key and Consumer Secret fields. You will need them later to configure Sentinet with the Salesforce OAuth security:
Step 2. Register Salesforce REST API in the Sentinet API Repository
In order to register Salesforce REST API you have to provide:
- List of Salesforce API operations along with their respective Uri template definitions
- Salesforce API endpoint address
- Salesforce API endpoint OAuth security policy
API Operations
In this demo setup we will use just one operation from Salesforce API, Query. All other operations can be registered in a similar manner. Query operation can be defined with the following Uri template: query?q={q} where {q} is a template parameter that designates the actual Salesforce query. This Uri is the template of operation’s address relative to the API endpoint address.
Endpoint Address
Salesforce REST API endpoint address has the following form:
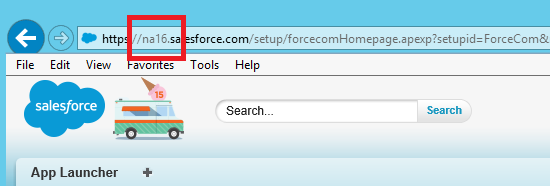
https://[naX].salesforce.com/services/data/v20.0/, where [naX] is the address prefix from your Salesforce account. You can see this prefix when you are logged into the Salesforce application in the browser, for example https://na16.salesforce.com/services/data/v20.0/
The ultimate request URL of the Query operation becomes: https://na16.salesforce.com/services/data/v20.0/query?q={q}
Security Policy
Endpoint security policy of the Salesforce API endpoint must be defined as a WCF XML binding configuration:
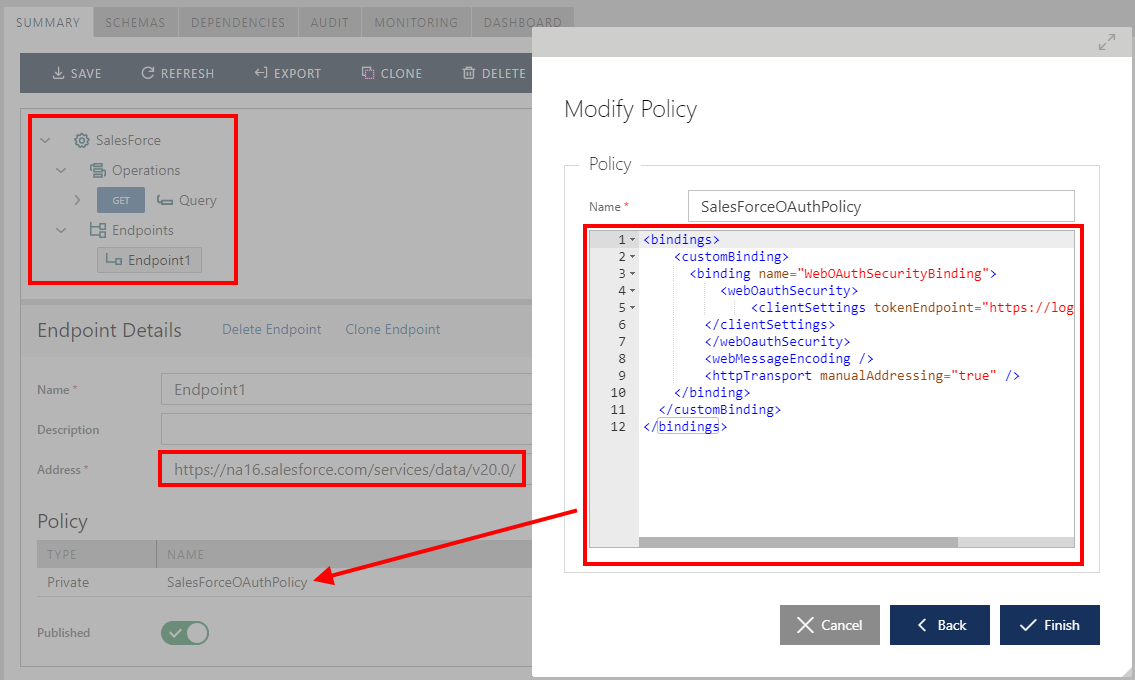
The binding is shown below:
<bindings>
<customBinding>
<binding name="WebOAuthSecurityBinding">
<webOAuthSecurit
<clientSettings tokenEndpoint="https://login.salesforce.com/services/oauth2/token"
clientId="....."
clientSecret="....."
authenticationType="FormPost"
authenticationFlow="ResourceOwner"
minimumCacheLifetime="00:02:00" />
</webOAuthSecurity>
<webMessageEncoding />
<httpsTransport manualAddressing="true" />
</binding>
</customBinding>
</bindings>
There are only few attributes that drive the whole configuration:
- tokenEndpoint - address of the Salesforce OAuth server endpoint that accepts requests for OAuth token as described in the Salesforce documentation for Username-Password Authentication Flow.
- clientId – Id of the client application registered in the Salesforce portal in the Consumer Key field (described in the Step 1 above).
- clientSecret – secret string value registered in the Salesforce portal in the Consumer Secret field (described in the Step 1 above).
- authenticationType – FormPost value that indicates that the clientId and clientSecret credentials must be transmitted in the request message as the HTTP POST Forms parameters.
- authenticationFlow – ResourceOwner value that indicates that OAuth security policy should use resource owner grant flow as described by the Salesforce documentation.
- minimumCacheLifetime – minimum time period to cache results of the request for OAuth token (2 minutes in this case).
What is different in this security policy configuration compare to the use case described in part 2 of my article where we called Microsoft Translator REST API from the Microsoft Azure Marketplace? The fundamental difference is that Salesforce OAuth server uses resource owner grant flow as opposed to Microsoft Azure Active Directory’s client credentials grant flow. With resource owner grant flow the calling application (Sentinet Node in this case) will have to provide both application clientId/clientSecret values and username/password of the Salesforce user account which is considered to be the actual resource owner. So where is this username/password in the Sentinet configuration? Username/Password is one of those “standard” security credentials that can be directly attached to the virtual service’s outbound endpoint. When we create Sentinet virtual service in the next step we will add these credentials to the virtual service’s outbound endpoint that is used to send messages to the Salesforce OAuth server and Salesforce REST API.
Later in this article I will demonstrate another use case scenario when the application calls virtual service endpoint using username/password identity (for example via Basic Authentication over HTTPS). Sentinet can also be configured to use this inbound client identity (received from the Basic Authentication) on its outbound side for OAuth security. The client application in this case provides Salesforce account’s username/password while Sentinet simply uses them in its outbound OAuth call.
Step 3. Create in the Sentinet Repository a virtual REST API that exposes Salesforce API through the Sentinet Node endpoint
We use standard Sentinet technique to drag-and-drop the registered Salesforce REST API on the virtual REST API Design surface. For the properties of the virtual service outbound endpoint we select to add Username/Password credentials and specify Salesforce user account in the form of email address and password.
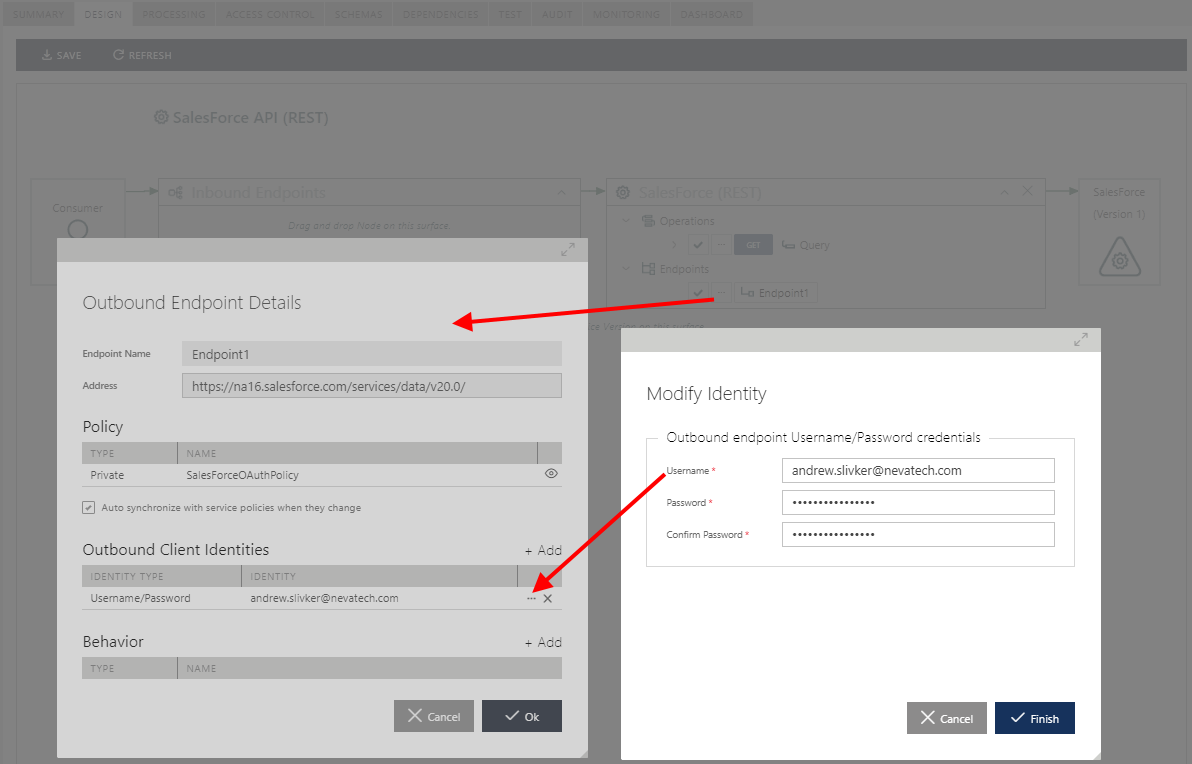
Sentinet is smart enough to realize that the security policy of this endpoint requires OAuth with the resource owner grant flow, and it will automatically use provided username/password in its request for OAuth security token to the Salesforce OAuth server.
Step 4. Test the call to Salesforce REST API via virtual service endpoint hosted in the Sentinet
Calling Salesforce REST API from the browser
We can test the calls to the Salesforce API and its Query operation by calling Sentinet virtual endpoint from a browser application. For example we can use https://sentinet/SentinetNodeHttp/salesforce/query?q=SELECT Name,Id from Account LIMIT 100 address in the browser to get the list of up to 100 accounts. The response comes back as JSON formatted list:

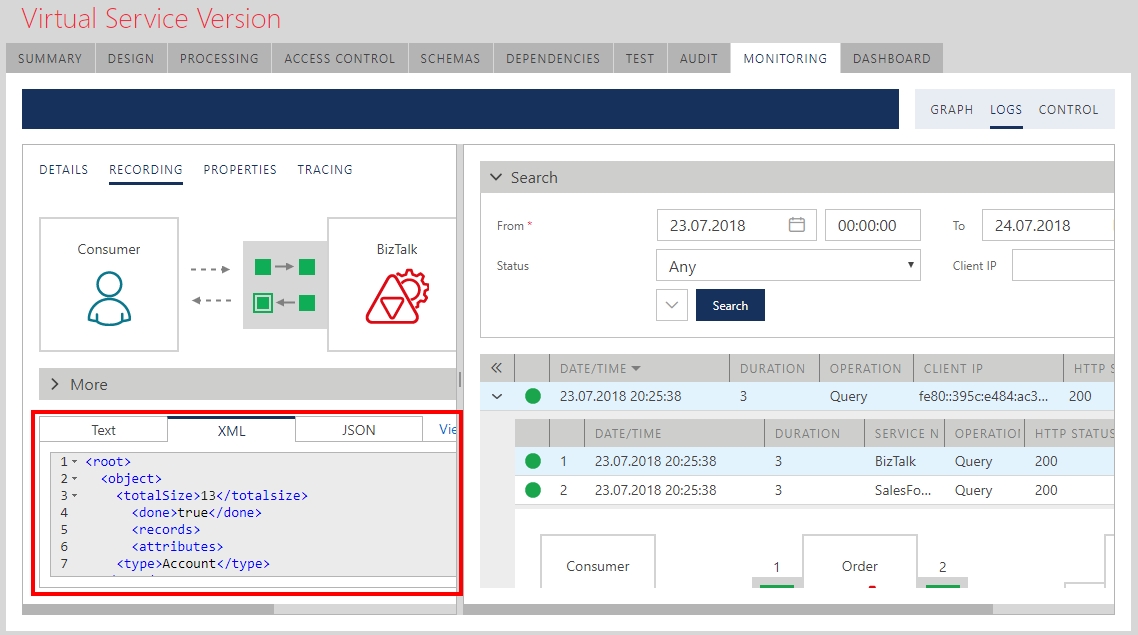
Complete messages exchange can be observed with more details from the monitoring feature of the Sentinet console:

Calling Salesforce REST API from BizTalk application
The implementation of this demo use case scenario uses simple messaging-only (no BizTalk orchestrations or schemas) setup:
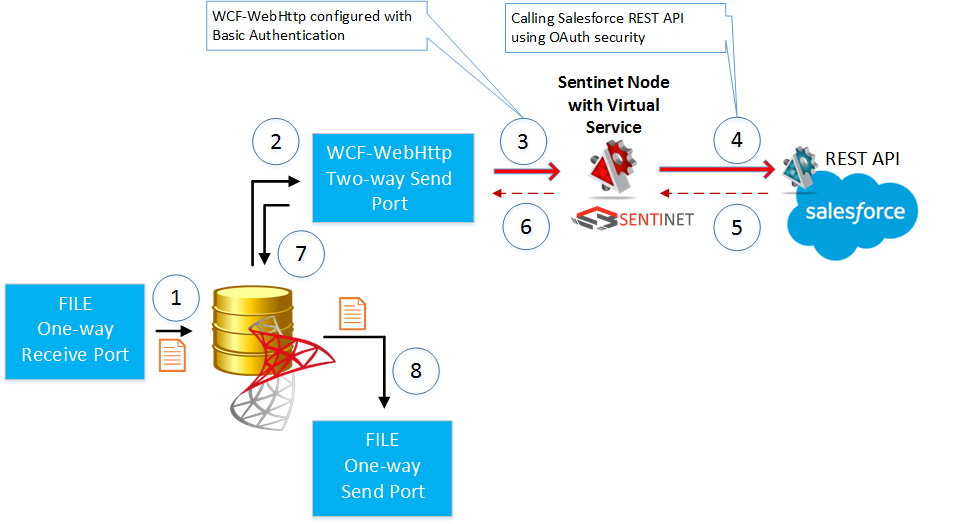
- A flat file with arbitrary content is dropped into FILE One-way Receive port location.
- The file is used as a simple trigger to kick-of BizTalk server WCF-WebHttp Two-way Send port subscribed for messages coming from the FILE Receive port.
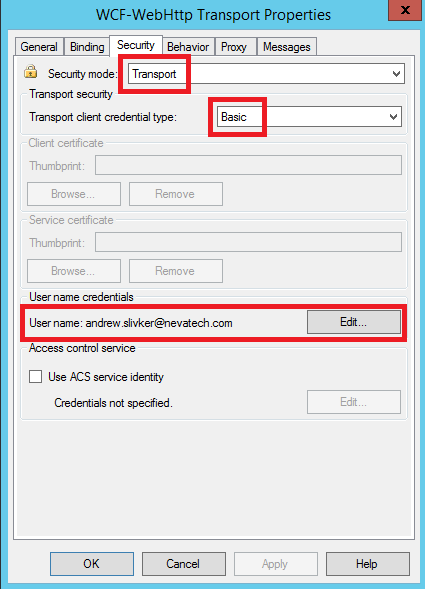
- WCF-WebHttp Send port is configured with Basic Authentication over HTTPS endpoint. It sends message to the virtual service hosted in the Sentinet Node (API gateway) using this simple and classical security model. Username/password configured with BizTalk Send Port in this case are the Salesforce account email and password credentials.
- Sentinet virtual service forwards this message to Salesforce REST API using OAuth security. Sentinet in this case is configured to use username/password identity received from the BizTalk server (received over the Basic Authentication security) in its outbound OAuth call to the Salesforce REST API.
- JSON response comes back from Salesforce API to the virtual service.
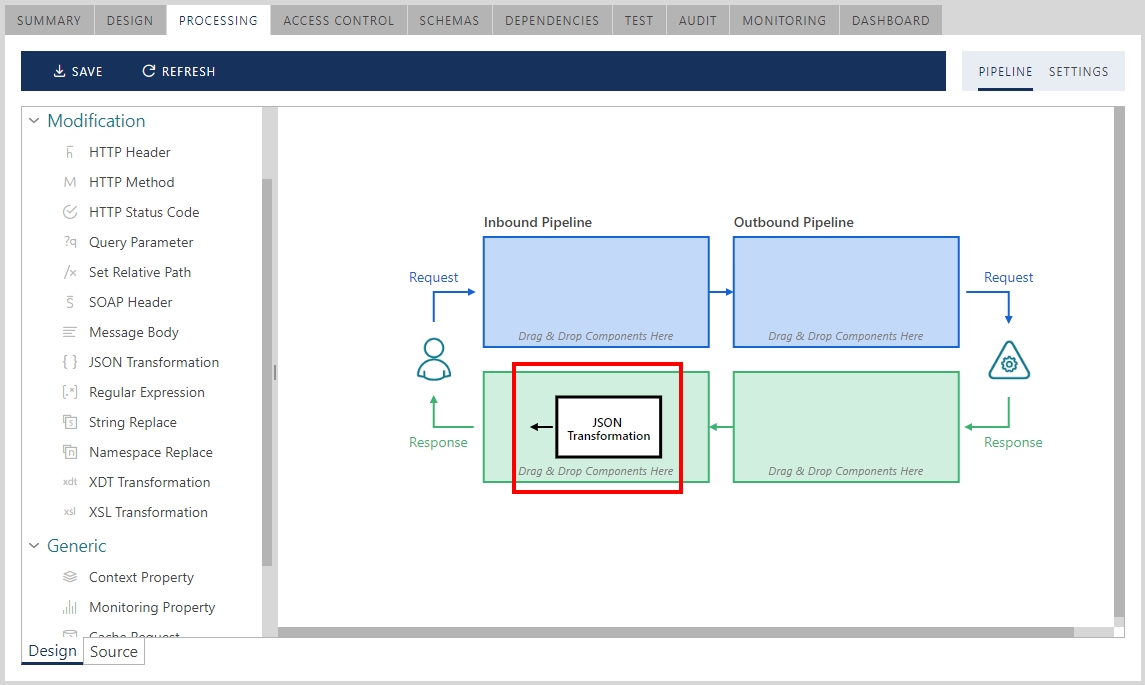
- Virtual service is configured to transform this JSON response in the BizTalk-friendly XML format.
- XML response comes back to the WCF-WebHttp Two-way Send Port.
- Another FILE One-way Send port is subscribed for responses from the WCF-WebHttp Two-way Send Port. As a result, the XML response is dropped in the file location of that port.
Here are the most critical (and yet simple) configuration-only steps to implement scenario above:
a) Configure Sentinet virtual service with inbound security policy that requires Basic Authentication over HTTPS transport:
<bindings>
<webHttpBinding>
<binding name="UsernameWithTransport">
<security mode="Transport">
<transport clientCredentialType="Basic" />
</security>
</binding>
</webHttpBinding>
</bindings>
b) Configure Sentinet virtual service with the pipeline component to transform JSON response to XML format:
c) Configure WCF-WebHttp Send port with address of the Sentinet virtual service:
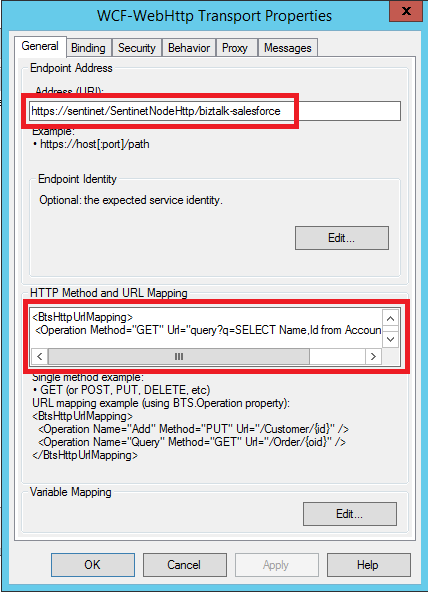
Populate HTTP Method and URL Mapping field with the URI template for the Salesforce REST API Query operation:
<BtsHttpUrlMapping>
<Operation Method="GET" Url="query?q=SELECT Name,Id from Account LIMIT 100"/>
</BtsHttpUrlMapping>
With this configuration BizTalk will send the following request to the Sentinet virtual service:
https://sentinet/SentinetNodeHttp/biztalk-salesforce/query?q=SELECT Name,Id from Account LIMIT 100
d) Configure WCF-WebHttp Security tab to use Basic Authentication over Transport with attached username/password of the Salesforce user account:
e) Configure WCF-WebHttp Messages tab to suppress message body when sending HTTP GET Request:
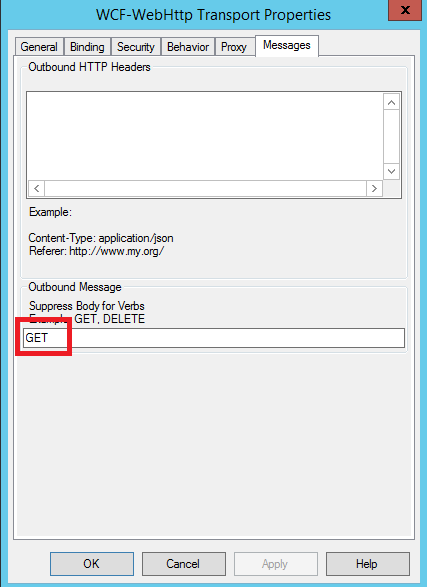
This will insure that the content of a trigger file will not be send via POST, and the request from BizTalk Server will go out over HTTP GET with no body.
Now we can drop trigger file in the FILE Receive location to trigger the messages exchange. The response can be found in the FILE Send location and it will be in XML format. You can see from the Sentinet Monitoring console the actual JSON response received from the Salesforce and its transformed XML version that was delivered back to the BizTalk application:

Conclusions
Any application can be easily enabled with the capability to communicate with OAuth-protected APIs without making any changes to the application itself. On-premises or cloud API Gateways help with integrations with OAuth security models.
The benefits of using Gateways are even higher when application direct enablement with OAuth security presents bigger challenges from the development, deployment and management perspectives. Consider a BizTalk application that has to call different external APIs where different APIs require integrations with different OAuth providers.
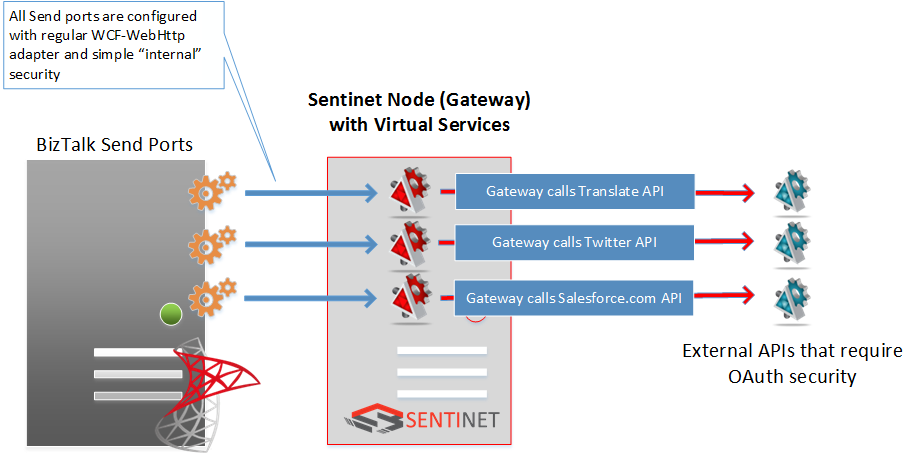
Configuring BizTalk application for this scenario requires quite some custom code development for each OAuth provider with the additional deployment and management of that code within the BizTalk infrastructure. By using Gateway as a generic security mediation broker, all BizTalk Send ports can be configured identically with some simple “internal” security (for example, Basic Authentication or Windows integrated). The Gateway will make sure to forward messages using OAuth security required by each specific external API.