Manual Registration
REST APIs can be registered either manually or from an existing Swagger metadata document. This is similar to SOAP services being either registered from scratch (as Schema First Services), or from an existing WSDL metadata document.
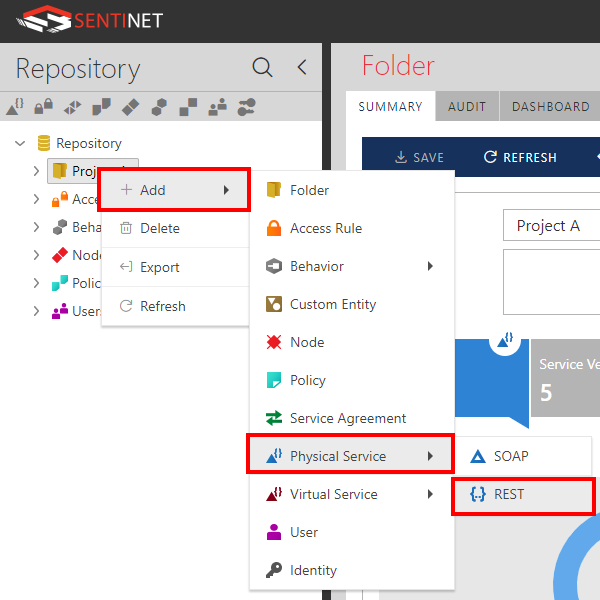
To register REST service manually, select the Repository folder in which the REST API should be registered, right click on this folder and select + Add->Physical Service->REST menu option (you can also select the same menu option from the Add toolbar button). If the selected folder already has registered services, you can also add a new service to an existing Services group.
In the Add Service Wizard select Do not import service metadata option. This option will create a new service (as a container for future service version), or a new service and its first service version for the manual REST API registration.
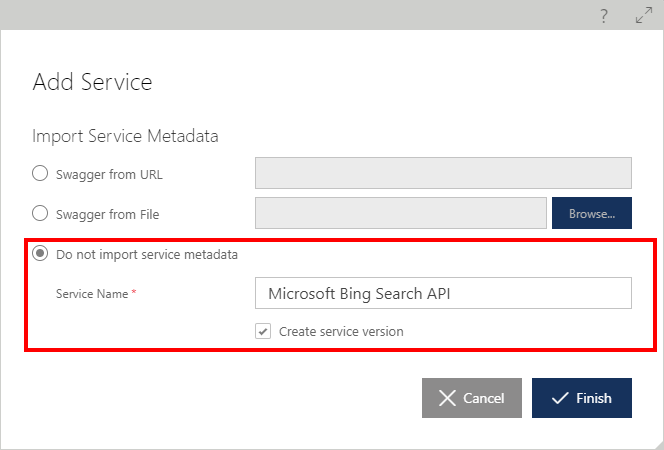
Provide service name in the Service Name field and keep Create service version checked if you want to create first service version along with the service itself. Click Finish button to close Add Service wizard. A new service version is now created in the Draft state without any operations or endpoints defined.
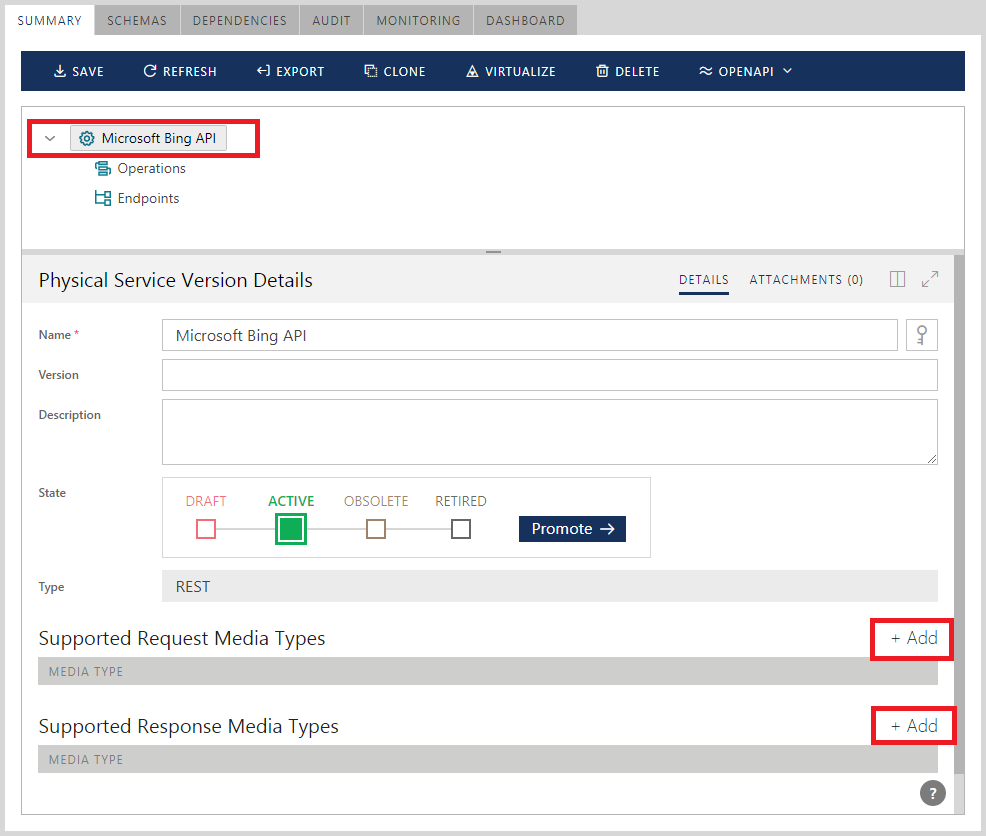
Add optional Supported Request Media Types and Supported Response Media Types.
Note
Optional Supported Request Media Types and Supported Response Media Types describe default MIME (or Content) Types supported by the registered REST service. Individual service operations may overwrite these settings with their own supported media types.
Sentinet uses these settings only to describe REST APIs. Once they are entered in the Sentinet Administrative Console, they will also be available in the generated Swagger documents.
Supported Request Media Types and Supported Response Media Types settings are not validated at run-time against the actual content types of the request and response messages. If you need to provide run-time validation, you can use either Sentinet Access Rules or Sentinet Pipeline components.
Note: the service version root element now shows Operations and Endpoints sub-elements, that do not have any child elements yet.

Rename service version if service version name should be different from the service name. For example, "Microsoft Bing Search API v1.0" can be the service version name while service still has "Microsoft Bing Search API" name.
You can now start assigning operations and endpoints in any order.
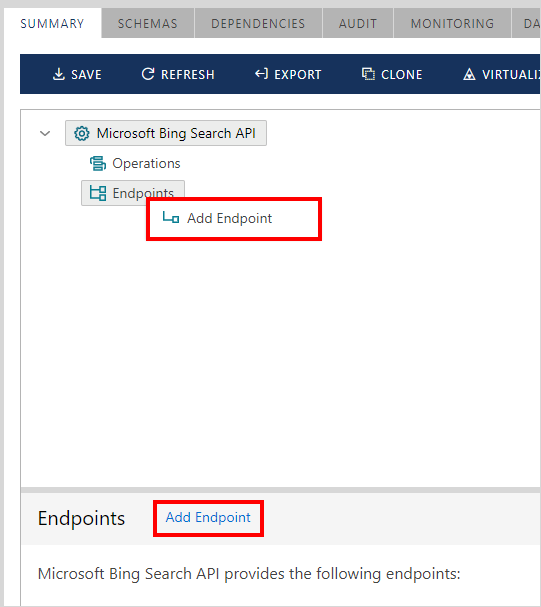
Endpoints
Right-click the Endpoints element and select the Add Endpoint menu option. You can also use the Add Endpoint link.
Rename the endpoint name to provide a readable and meaningful endpoint name, for example ep_http. You can also keep default, the auto-generated endpoint name.
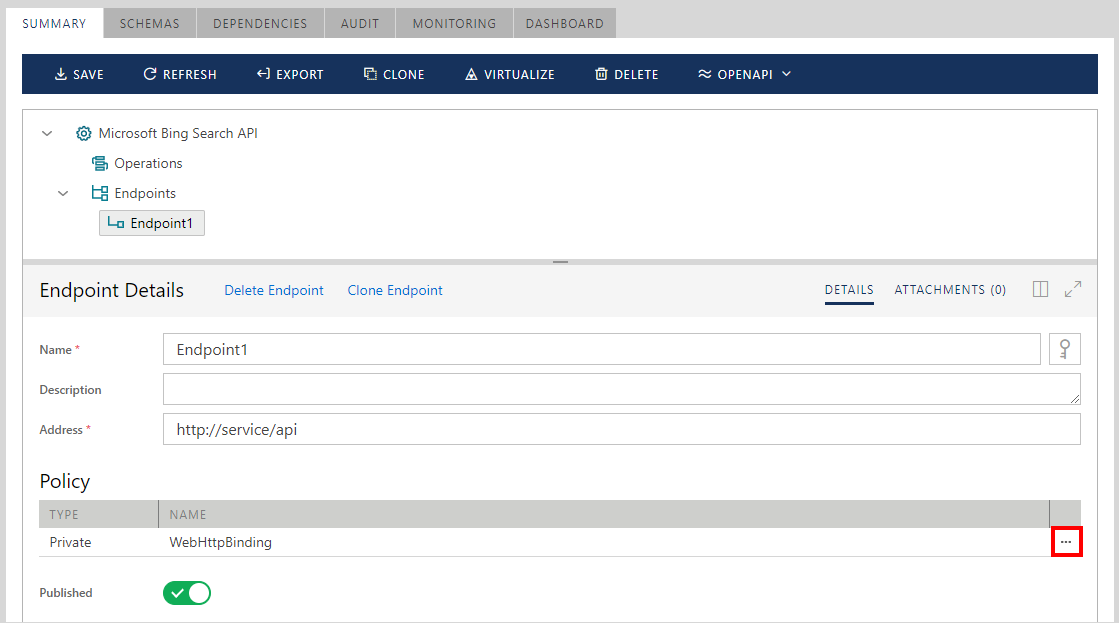
Notice that the endpoint is already configured with default private REST - HTTP policy that represents basic HTTP communication with no transport security (see the Endpoint Policy and Policies chapters in this guide for more details on Sentinet policies).
Note
Internally, a Sentinet endpoint policy is described by the industry standard and WCF-supported communication and security protocols. The policies that describe REST service’s policies are transport-based security policies based on HTTP and HTTPS protocols. All these policies are described by a single WCF webHttpBinding binding and its various configurations. Typical standard security policies include Basic Authentication, X.509 certificates mutual authentication, OAuth/OpenID Connect and Windows Integrated (Kerberos or NTLM) authentication (see Microsoft documentation for complete description of webHttpBinding binding configuration, https://msdn.microsoft.com/en-us/library/bb412176.aspx). Other non-standard authentication models are supported by Sentinet either through custom Access Rule Expressions (see the Access Rules and Access Control chapter in this guide) or through custom WCF bindings and behaviors.
Provide an endpoint address in the Address field. The endpoint address must represent an "operation independent" part of the address that does not include any parameterized values. For example: http://server/myapi. Consider an endpoint address as a common part for all ultimate operations' addresses. For example, http://server/myapi will be a good candidate for an endpoint address when ultimate operations' addresses are expected to be:
http://server/myapi/{x}
http://server/myapi/z/{y}
http://server/myapi?q={q}
Click the [...] modify button to assign your own policy.
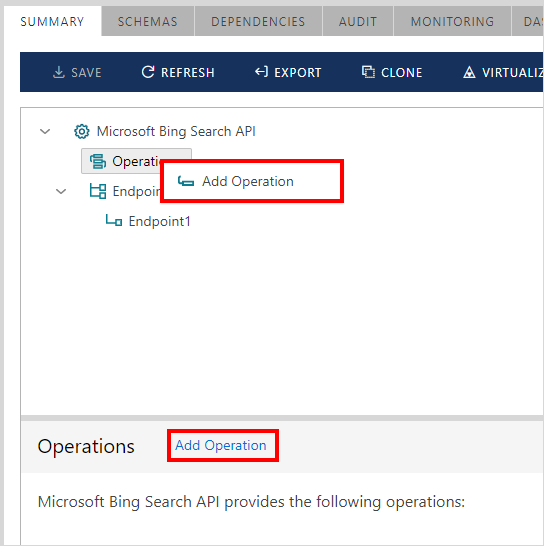
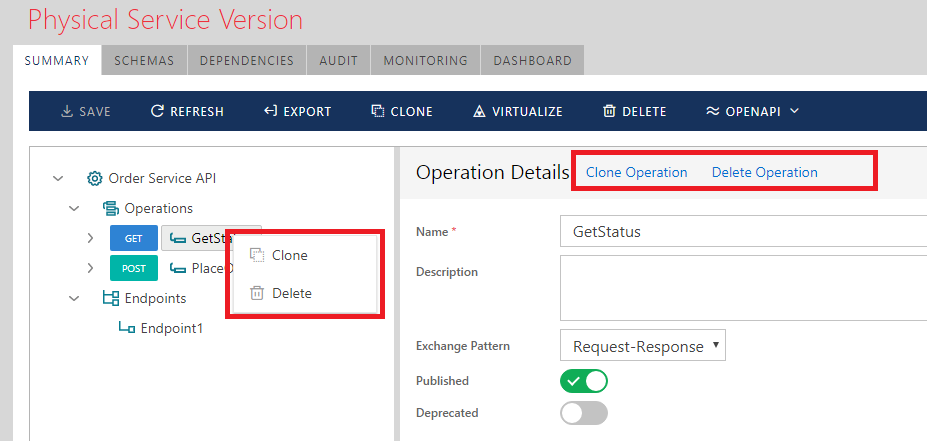
Operations
Right-click the Operations element and select the Add Operation menu option. You can also use the Add Operation link.
Operation Properties
Provide an operation Name. An operation Name may contain spaces.
Provide optional operation description that can be a multiline text.
Select the operation Exchange Pattern---Request-Response or Send (one-way).
Add optional Supported Request Media Types and Supported Response Media Types.
Note
If optional Supported Request Media Types and Supported Response Media Types settings are specified for an operation, they will overwrite default settings provided for the whole service version if Supported Request Media Types and Supported Response Media Types were assigned at the service version level.
Sentinet uses these settings only to describe REST APIs. Once they are entered in the Sentinet Administrative Console, they will also be available in the generated Swagger documents.
Supported Request Media Types and Supported Response Media Types settings are not validated at run-time against the actual content types of the request and response messages. If you need to provide run-time validation you can use either Sentinet Access Rules or Sentinet Pipeline components.
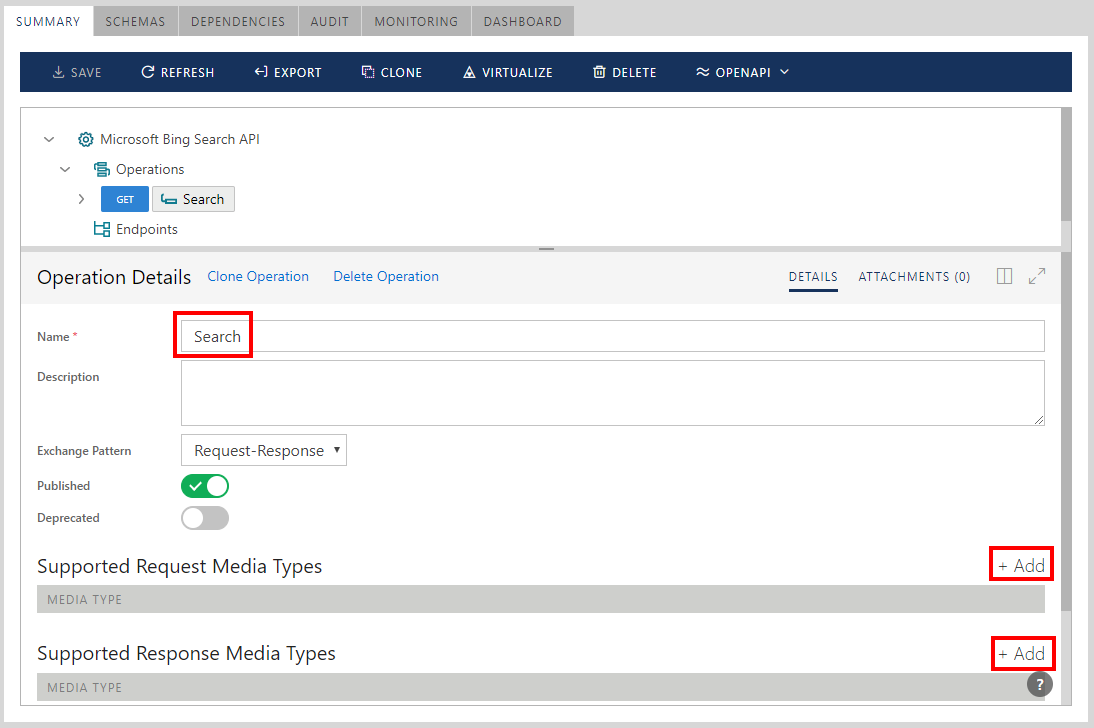
An operation can be marked as Deprecated, in which case it will be shown grayed out and with the strikethrough effect. REST APIs will emit this operation in the generated Swagger/OpenAPI document(s) with deprecated: true property.
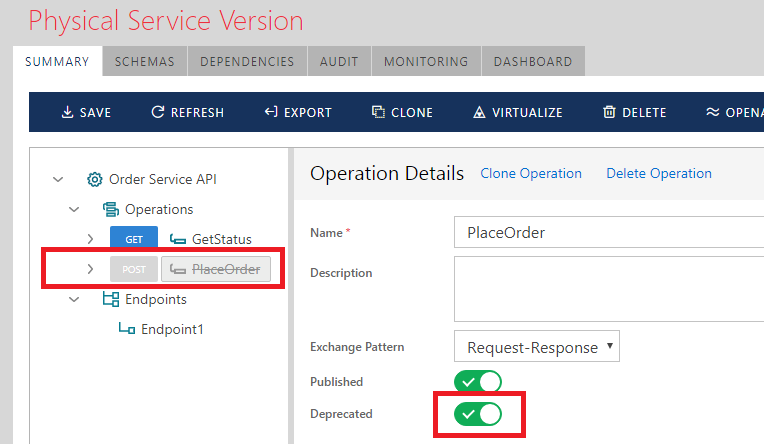
An existing operation can be cloned or deleted.
Request Properties
Expand operation tree element and select Request tree item.
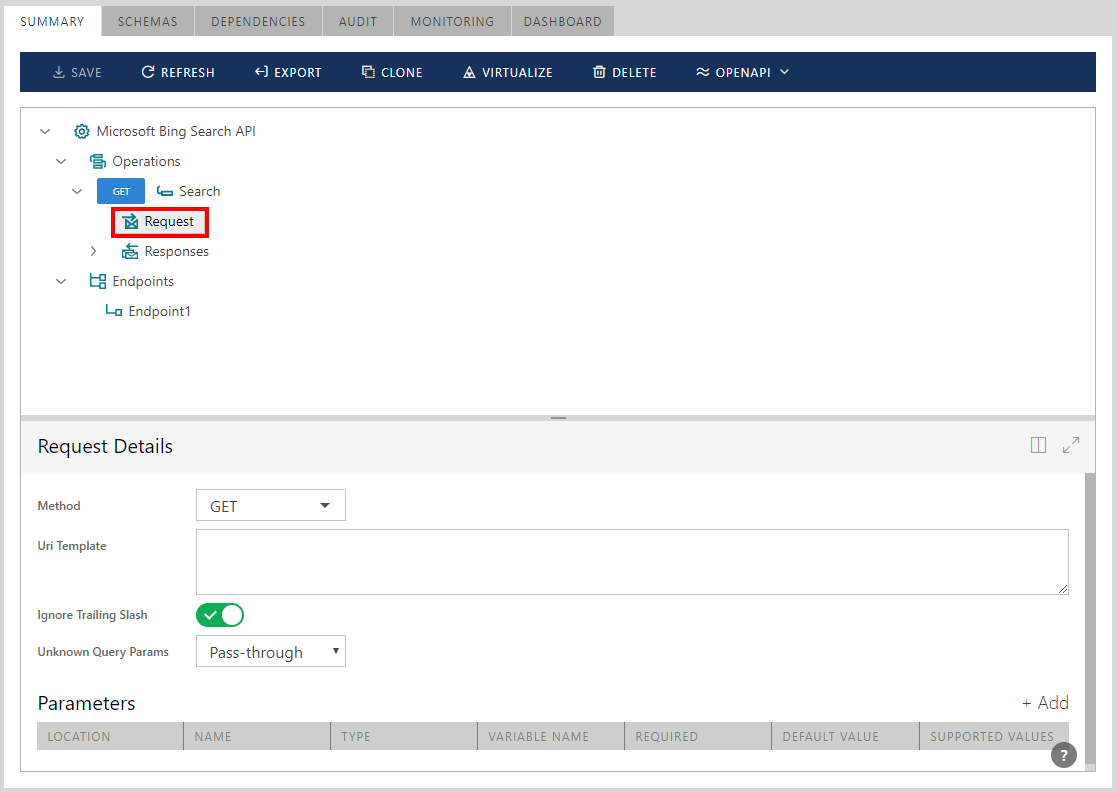
As described in this User Guide at the beginning of the Registering REST Services chapter, operation's Request and its properties describe how service operation must be (or can be) called.
At minimum, Request must be configured with an HTTP Method (GET, POST, PUT, etc.) and Uri Template. The HTTP Method describes the HTTP verb used to call the operation. Uri Template field can be empty (in which case full operation address is the same as the service endpoint address).
Important
Each service operation must be configured with its own unique combinations of HTTP Verb, Uri Template, and optional list of required HTTP Headers. Uniqueness of this combination allows Sentinet to match request messages against service operations.
Sentinet will not allow saving of a service version, if at least one service operation is configured with a non-unique combination described above.
Uri Template field and its syntax are described in details in the Uri Template chapter of this User Guide.
Ignore Trailing Slash property controls the rules that determine how the actual request URIs will be matched against Uri Template configured for an operation in regards to possible trailing slashes. It should be changed only for advanced scenarios. The rules this property controls are summarized in the table below.
| Which service this property is set for | Rules |
|---|---|
|
Physical service |
If Ignore Trailing Slash is set to Yes, then trailing slash will be removed from URIs constructed from an empty ("") or wildcard ("/x/*") templates. For example, templates "" ("/") and "*" ("/*") will produce "" URI. If Ignore Trailing Slash is set to No, then trailing slash will be added to URIs constructed from an empty ("") or wildcard ("/x/*") templates. For example, templates "" ("/") and "*" ("/*") will produce "/" URI. This option has no effect on non-empty templates or templates without wildcards (for example, template "/x" will always produce "/x" URI). Default setting is Yes for services registered manually (via Do not import metadata option), it is No for services registered from existing metadata. |
|
Virtual Service |
If Ignore Trailing Slash is set to No, then URI templates ending on "/" will only match URIs ending on "/". For example, template "/x/*" will match "/x/", but not "/x". If Ignore Trailing Slash is set to Yes, then trailing slash in the URI template will not affect the URI matching, so URIs ending or not ending with "/" will be matched. For example, templates "/x/" and "/x" are equal and will match both "/x/" and "/x". Ignore Trailing Slash property is ignored for empty or "*" URI templates (effectively it will always be treated as Yes value for these templates). For example, templates "" ("/") and "*" ("/*") will match both "" and "/". Default settings for virtual services are inherited from the current physical service's settings. |
Unknown Query Params property controls how Sentinet will treat Query parameters that are not described in the Uri Template while they are found in the actual request messages during the run-time. Value options for this property are:
Pass-through (default value) -- Sentinet will let unknown Query parameters fly through the virtual services.
Ignore -- Sentinet will strip out request messages from unknown Query parameters and they will not be delivered to the backend physical API. This option is particularly valuable when physical REST API must be protected from receiving Query parameters that are not described in the API.
Parameters table provides with advanced descriptions of any kind of possible API parameters including those that cannot be defined by the Uri Template property. Click Add parameter button to add an API parameter.


Sentinet Console automatically synchronizes Uri Template property and Parameters table when they define API parameters that are common to them (for example Uri Template Query parameters). Synchronization happens as soon as User Interface control loses focus.
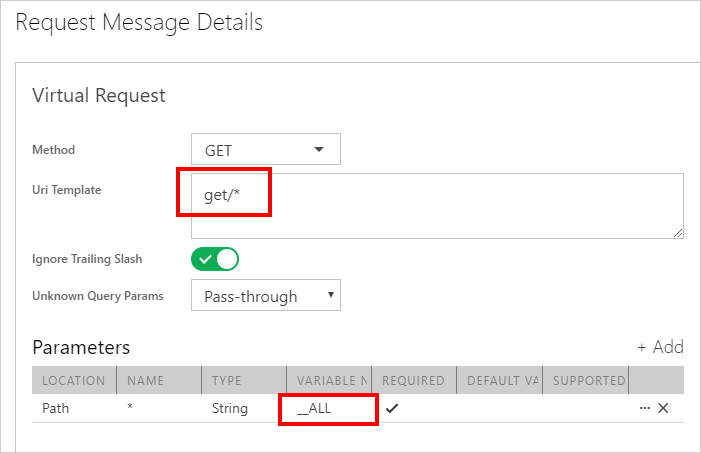
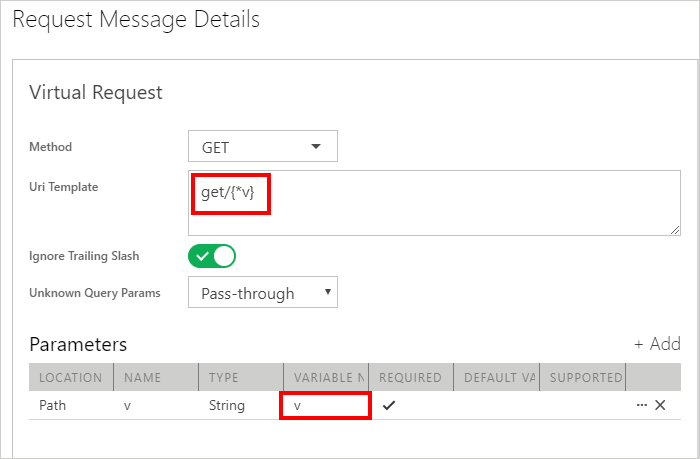
Important
By default, Sentinet uses built-in variable name __ALL for * mask path character that is used in the Uri Template. If you would like to use different variable name, place it in curly brackets after * character. For example, {*v} will create variable named v that will be used in place of * position.
Note
Query Parameter Name, Default Value and Supported Values may contain special characters that require URL encoding (or Percent-encoding) when they are transmitted in HTTP URL request. Query parameter Name and Default Value must be provided in URL Encoded form when they are entered directly in the Uri Template field. Alternatively, they must be provided in URL Decoded (clear text characters) form when they are entered directly in the Parameters table. Sentinet Console will automatically synchronize clear text characters in the Parameters table with the URL Encoded text in Uri Template field.
For example: You can enter /?q=a%2bb in the Uri Template field, which will show as a+b in the Default Value column in the Parameters table soon as focus changes from the Uri Template field (+ character was entered as Url encoded %2b). Alternatively, you can start by entering + character directly in the Parameters table which will show as Url encoded %2b in the Url Template Field as soon as focus changes from the Default Value field.

An API parameter that is added to the Parameters table can also be configured with additional properties via Advanced Parameter Configuration dialog box (described later in this chapter). All properties specified for an API parameter will be emitted in the Swagger document generated by Sentinet, and all available properties will be automatically populated in the Sentinet for an API that it is registered from the existing Swagger document. Table below describes common set of API parameter properties.
|
Property |
Description |
|---|---|
|
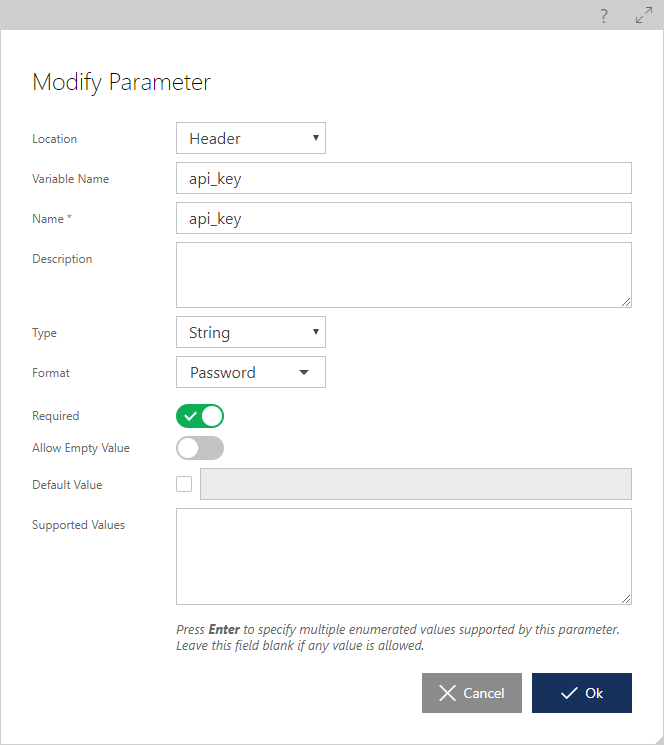
Location |
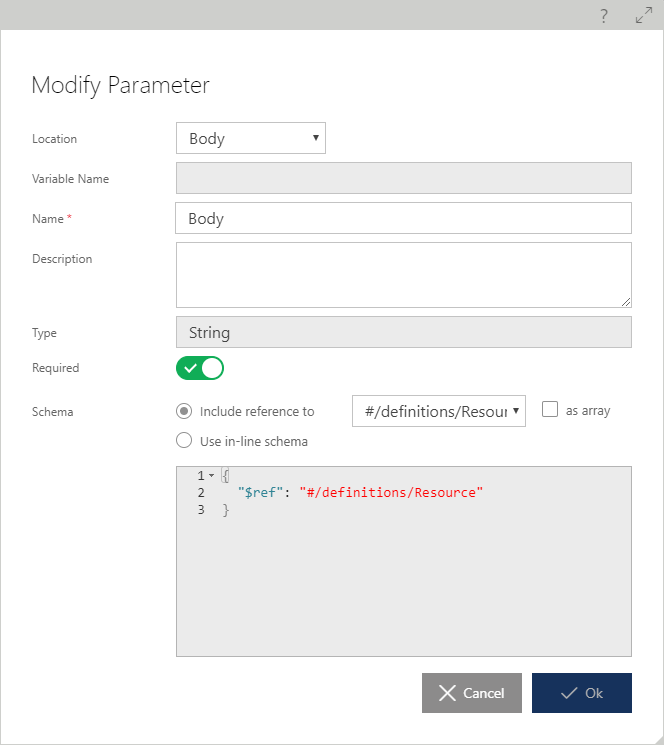
Specifies location of an API parameter in API definition. Possible values are: 1. Path – parameter location is part of a Uri Template path, for example “/search/{customerId}” creates customerId Path parameter. Path parameters are automatically added to the Parameters table when Uri Template field is populated. Path parameter cannot be added to the table from the Add Parameter button shown on the figure above. 2. Query – parameter is a Query Parameter in the Uri Template. 3. Header – parameter is an HTTP header. 4. Form – parameter is a form parameter in the request message body (form parameters are represented as [name]=[value] pairs in the request body when either application/x-www-form-urlencoded, multipart/form-data or both are used as the content type of the request). 5. Body – specifies request message body as a single parameter. Only one parameter with location Body can be specified for an API operation. |
|
Name |
Parameter Name. The meaning of the Name parameter depends on the parameter location. Examples: name of a Query parameter or name of an HTTP header. |
|
Type |
Data type of an API parameter. Sentinet supports specification of those data types that are supported by Swagger 2.0 specification and OpenAPI 3.0.
Body parameter is always of Complex type even though it can also be described with specific JSON via Advanced Parameter Configuration dialog box. All other parameters are of type String by default.
Sentinet does not validate type of a parameter value at run-time. You can use Sentinet Access Rules or Pipeline components to add required validations. |
|
Variable Name |
Name of a Variable (can be optional for some parameters) that represents parameter value. For example, if Uri Template is “/search?for={q}” then the Name of the query parameter is for while the Variable Name is q. Name and Variable Name can be, and often are the same. |
|
Required |
Specifies if parameter is required to be present in the request message. Note: Sentinet can inject required Query or HTTP header parameter in the outbound message even if it was not available in the inbound message. It happens when physical service is defined with the default parameter value. |
|
Default Value |
Specifies default value for an API parameter. |
|
Supported Values |
Specifies the list of an API parameter supported values. Each value must be specified in a new line. Press Enter keyboard key to start a new line. If actual parameter values are not in the Supported Values list, Sentinet will return error to API client application. |
Click [...] button to add or modify additional (advanced) API parameter properties.

The Modify Parameter dialog box allows configuration of all API parameter properties, including those not listed in the Parameters table. The content of the dialog box depends on the Location property of selected API parameter. All properties specified in the dialog box will be emitted in the Swagger document generated by Sentinet, and all available properties will be automatically populated in the Sentinet for an API that it is registered from the existing Swagger document.
Response Properties
A REST service operation is always defined with one or more Responses that describe possible operation's response messages. At run-time Sentinet does not validate actual response messages against their definitions. These definitions exist only to provide proper Sentinet and Swagger documentations for REST APIs. By default, Sentinet automatically creates a single Response with HTTP status code 200 and no additional properties.
Important
As mentioned above, at run-time Sentinet will process any response message regardless if it is defined for REST operation or not.
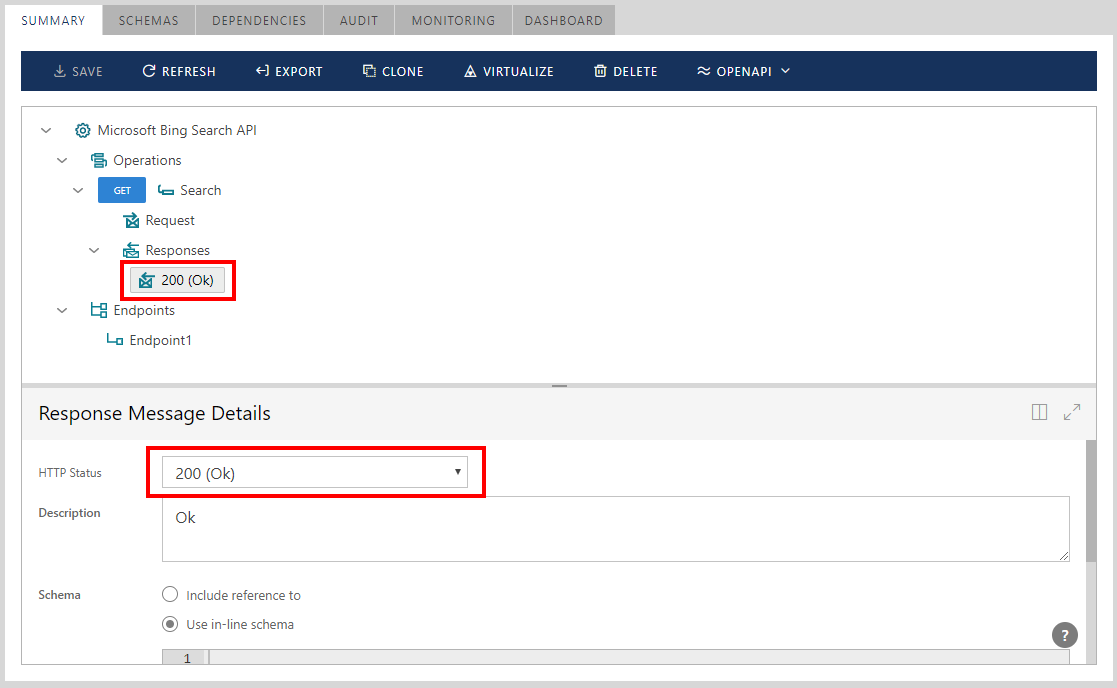
An operation's Response has an HTTP Status property and can be configured with additional and optional properties. These properties are:
Description of the HTTP Status.
Schema -- JSON schema of the response message.
a. Message schema can be assigned (referenced) from the existing service schemas (see Schemas chapter in this User Guide for more details) or entered as an in-line schema.
b. as array -- specifies that referenced schema element must be treated as an element of array
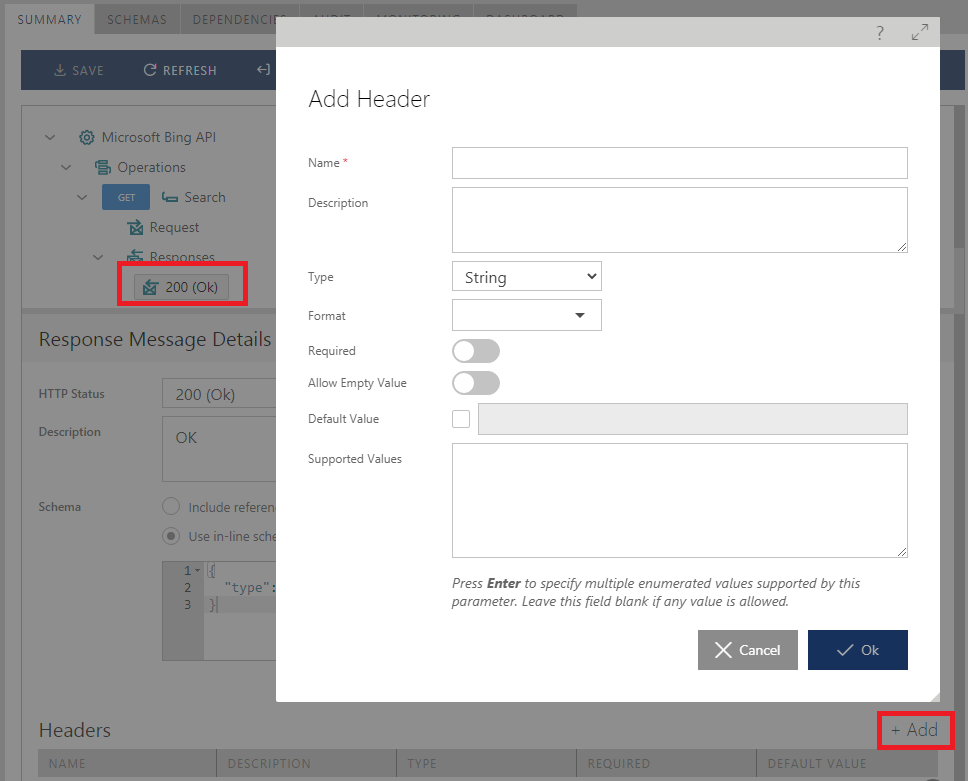
Headers -- response HTTP headers.
To add optional HTTP headers to a Response, click +Add button. Add Header dialog describes HTTP properties that will be published in the generated Swagger/OpenAPI documentation. Sentinet does not validate at run-time the requirements on defined Response HTTP header. You can use Sentinet Pipeline components to add required validations.
Schemas
REST API messages can be described with JSON schemas. Schemas can be assigned to:
Body parameter of an API Request message
API Response messages
Schemas can be assigned as in-line schemas or as a reference to service shared schemas. Click Schemas tab to view or modify service shared schemas.

SCHEMAS tab shows all shared schemas assigned to a REST API in a JSON schema document format inside definitions object. By default, new services are created with an empty schema document.
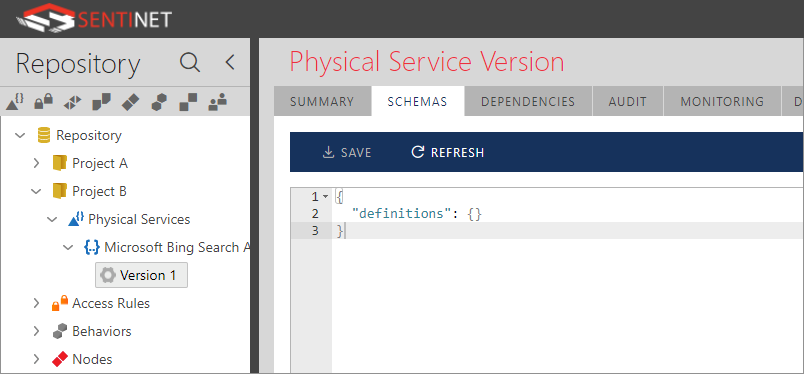
Sentinet users can populate the schema document with their own schemas, or they can already be pre-populated from the existing Swagger document the REST service was registered from, that contained schemas (to view a sample of shared schemas in the Sentinet see next chapter in this User Guide, Registration from Swagger documents).