Configuration
Sentinet Repository Web Application
To configure a new or update an existing Sentinet Repository Web Services Application:
Start the Repository Configuration Application from Repository Configuration Windows shortcut or launch RepositoryConfiguration.exe located in the root of the installation directory. This will open the Repository Configuration Wizard, starting with the Repository Database page.
Note
You have to be logged in to the machine as a member of the local Administrators group and start Repository Configuration Wizard with option Run as administrator on the machine that has tightened security settings.
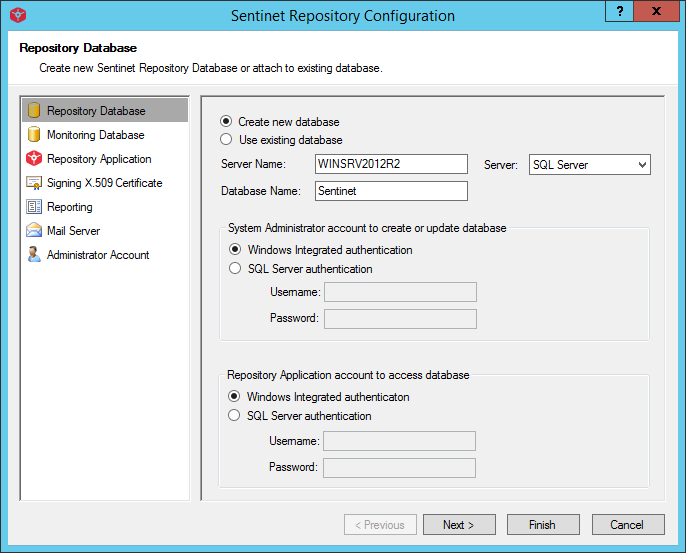
Select Create new database to create a new Sentinet Repository database on a MS SQL server. Enter the database server machine name or the machine network address in the Server Name field. Enter database name in the Database Name field (default is Sentinet).
In the System Administrator account to access database section:
If the SQL Server is configured with Windows Integrated authentication and your Windows account has an access right to create a new database or update an existing database on this server, select Windows Integrated authentication in the System Administrator account section. Alternatively, select the SQL Server authentication option and provide a SQL Server Username/Password account credentials with sufficient (to create and update) databases access rights. These credentials will be used by this Repository Configuration application while it is running.
In the Repository Application account to create or update database section:
If the Repository Web Application is planned to use Windows Integrated access to the Repository database, select Windows Integrated authentication in the Repository Application account section (default setting). Alternatively, select the SQL Server authentication option and provide a Username/Password for the SQL Server account that will be granted access to the Repository database. If SQL Server account does not exist, it will be automatically created by this Wizard. These credentials will be used by the running instance of the Repository Web Application.
Note
If SQL Server authentication option is used for both accounts described above, make sure they are different SQL server accounts.
Click Next button to navigate to Monitoring Database page.
This is the page, where Sentinet can be configured with advanced settings suitable for high-performance, high-loads environment(s). Leave checkmarks to Enable Monitoring tables partitioning and Enable stand-alone Monitoring database in default, unchecked state.
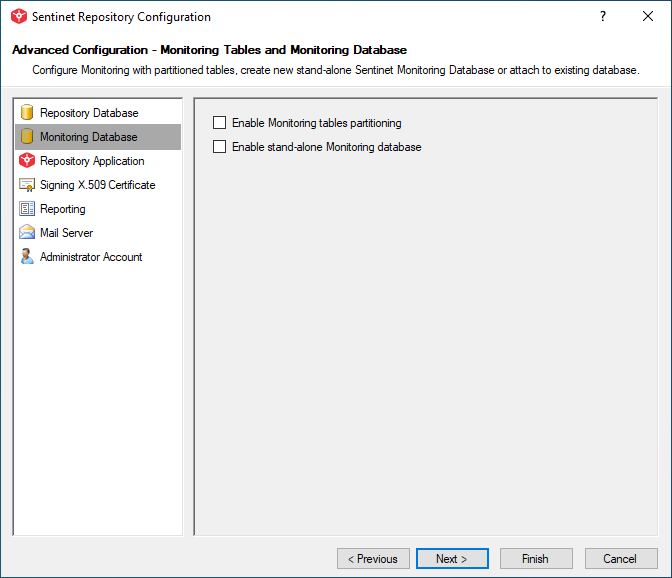
Note
This tutorial covers Sentinet standard deployment model, when a single Repository Database is used to handle all Sentinet data storage and management tasks. Sentinet Installation Guide and Sentinet User Guide cover in details all other deployment models supported by the Sentinet product.
Click Next button to navigate to Repository Application page.
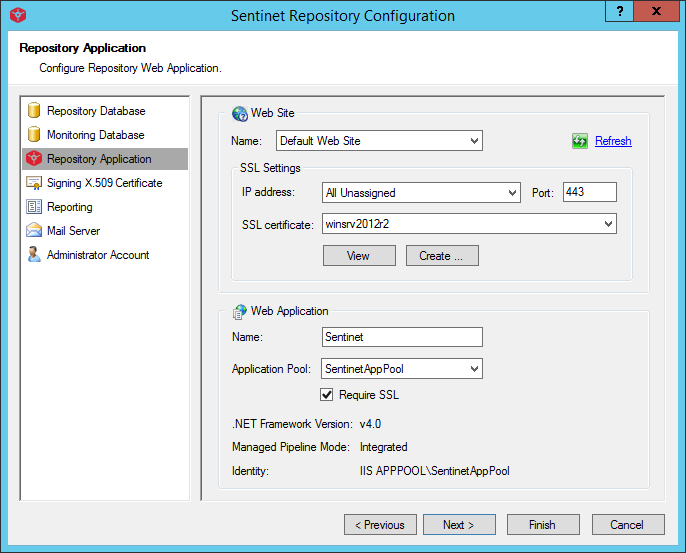
i. Select the IIS Server Web Site that will host Repository Web Application.
ii. Select SSL settings.
Configuration Wizard automatically uses SSL settings currently configured with selected IIS server's Web Site. If the Web Site is not configured with SSL, you may select an X.509 certificate from the list of available valid certificates (from the drop-down list) or request the Configuration Wizard to generate a new, self-signed SSL certificate (click the Create button to generate new certificate).
iii. Select Web Application settings.
Input a name for the Repository Web Application (default is Sentinet) and select an IIS server's application pool from the list of available Application Pools. By default, the Configuration Wizard will create its own Application Pool, SentinetAppPool dedicated to the Repository Web Application and configure it with the IIS server's standard, ApplicationPoolIdentity (a low-privileged pseudo-machine account).
Check Require SSL box (recommended and checked by default) to restrict access to Repository Web Application with SSL. Repository Web Application will automatically redirect all traffic to https addresses when Require SSL setting is turned on.
Click Next button to navigate to Signing X.509 Certificate page.
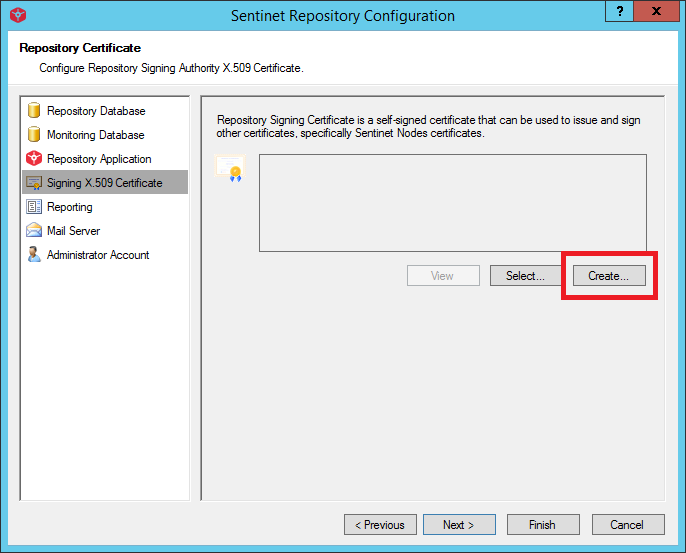
A Repository Signing Certificate can be used to issue other X.509 certificates, for example certificates for Sentinet Nodes. This simplifies management of the X.509 certificates infrastructure and allows the use of Sentinet as a private certificate signing authority, including certificates issued for your REST APIs and SOAP services when they need them. Using Sentinet Repository Signing Certificate feature is entirely optional, but the certificate must be assigned (or created) on this screen.
Select a valid certificate from the list of available valid certificates, or click Create button to generate a new self-signed Signing Certificate using the Configuration Wizard.
Note
If you requested Sentinet to generate IIS SSL certificate in step 4 above, the same certificate will be automatically selected in this step 5.
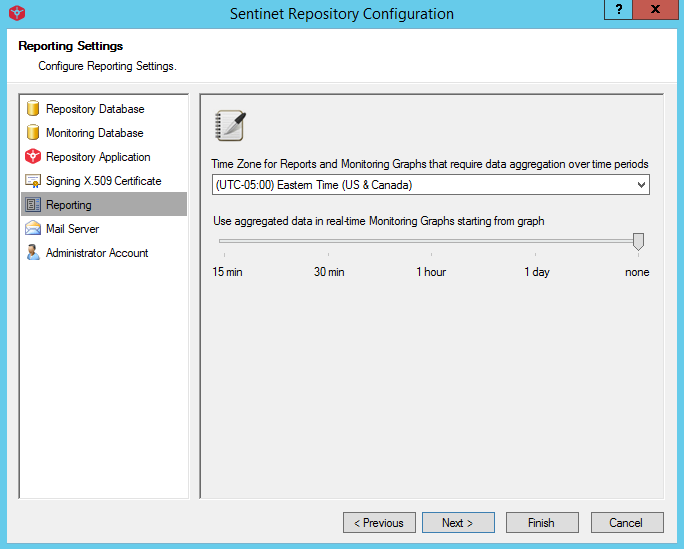
Click Next button to navigate to the Configure Reporting Settings page.
-
Select Reporting Time Zone.
Sentinet Reports and real-time Monitoring Graphs can show data aggregated over specified time periods. Data aggregation results depend on the Time Zone used by Sentinet data aggregation processes. To avoid ambiguity, Sentinet uses a single Time Zone configured for data aggregation processes. By default, the Configuration Wizard selects the current Time Zone of the computer it is on.
-
Select the real-time Monitoring Graph interval that will start using aggregated data.
Sentinet is designed to process millions of messages. Under a high-volume messages load, Sentinet responds with faster real-time monitoring if aggregated data is used.
Selecting a Monitoring Graph interval at which to start using aggregated data will enable the Sentinet Administrative Console to have a lower response time for monitored services and for monitored Sentinet Nodes.
By default, none of the Monitoring Graph intervals are configured to use aggregated data, resulting in all monitored data to be collected against a live feed.
Example: If 1 hour Monitoring Graph interval is selected, it is expected that monitored services and Sentinet Nodes will handle high volume of messages within any monitored hour. These Monitoring time intervals will use aggregated data for Sentinet real-time Monitoring Graphs. Lower monitoring intervals (15 and 30 minutes in this case) will continue to use live data for the same graphs.
-
Click Next button to navigate to the Mail Server page. Uncheck Use Mail Server for alert notifications for this Quick Start Tutorial.

The Mail Server page is used to configure a connection to a mail server. If the email option is selected for alerts and notifications, Sentinet will use this mail server connection configuration to send notification emails.
Note
It is strongly recommended to configure a mail server connection, because otherwise no email alerts will be sent and no self-registration for the users of the Developer Portal will be available. Without mail server connection the only way to register Developer Portal Consumer accounts will be to create them by Sentinet Administrators using Sentinet Administrative Console (see Developer Portal chapter in this document).
Click Next button to navigate to the Administrator Account page.
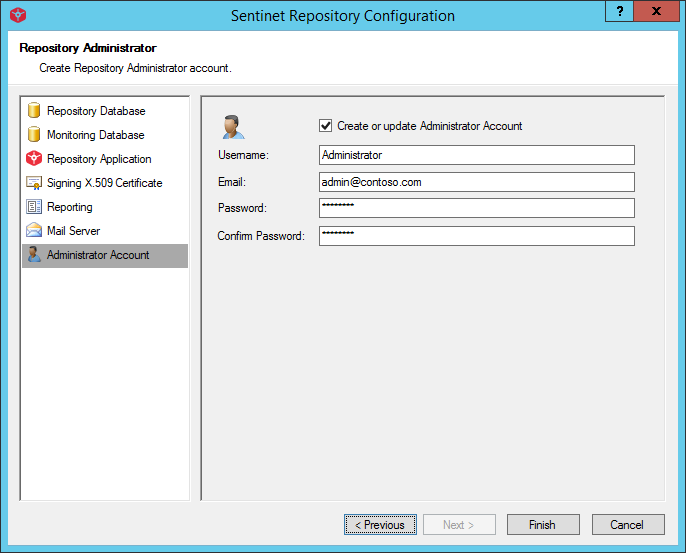
Create an Administrator account. This Administrator account will have the highest access rights to the Sentinet Administrative console. The Administrator credentials set on this page will be used to create and manage other accounts in the Administrative console. Password value must be 6 to 64 characters long and contain at least one upper case character, one lower case character, one number, and one special character.
Click Finish button to start the configuration process. Progress of the configuration process should now be displayed.
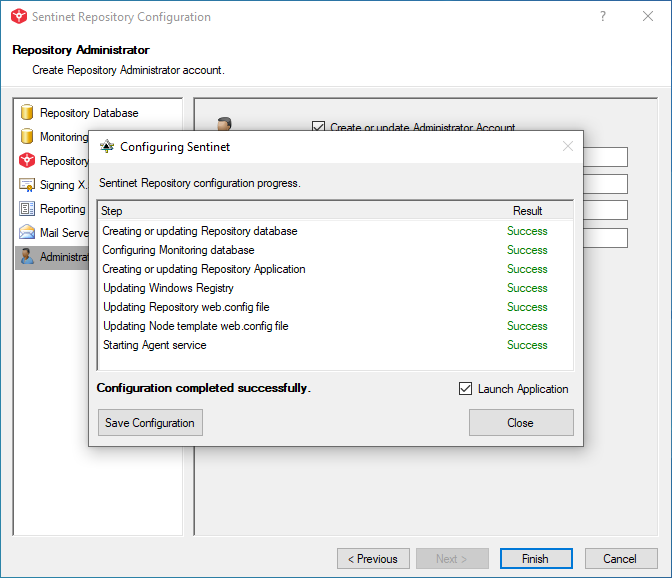
Click Close button (ignore Save Configuration button that is used for automated deployments described in the Installation Guide). If the Launch Application box is checked (default value), your default browser application is started with the login page of the Sentinet Administrative Console.
Note
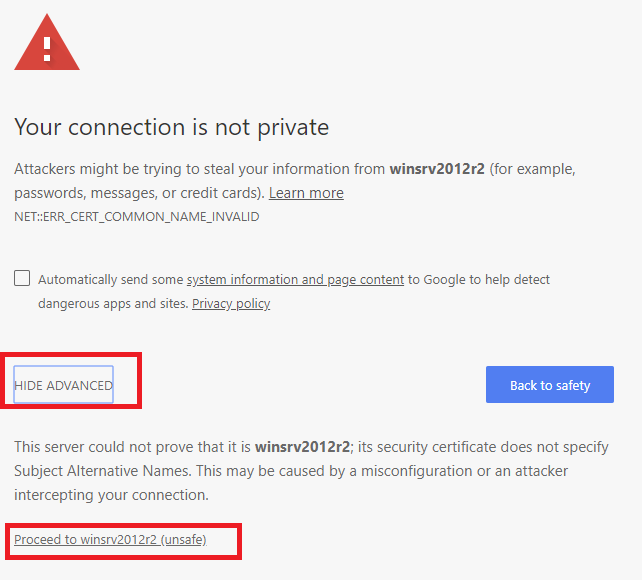
If you selected to use SSL certificate and requested Sentinet to create self-signed SSL certificate in step (3, ii) above, your browser may complain on the use of an unknown self- signed certificate. In this case you can instruct your browser to ignore this error and to proceed. For example, see screenshot below for Google Chrome.
You can open Sentinet Administrative Console in any other supported browser of your choice.
Use the administrator account credentials created in step 7 to login into the Repository Administration console application.
Add to the Repository a Sentinet Node which will be later physically installed and registered as your API Gateway. Select the Repository root element in the Repository hierarchical tree structure. Right click and select Add->Node menu option. Alternatively, click the Add button in the main toolbar and select the Node menu option.
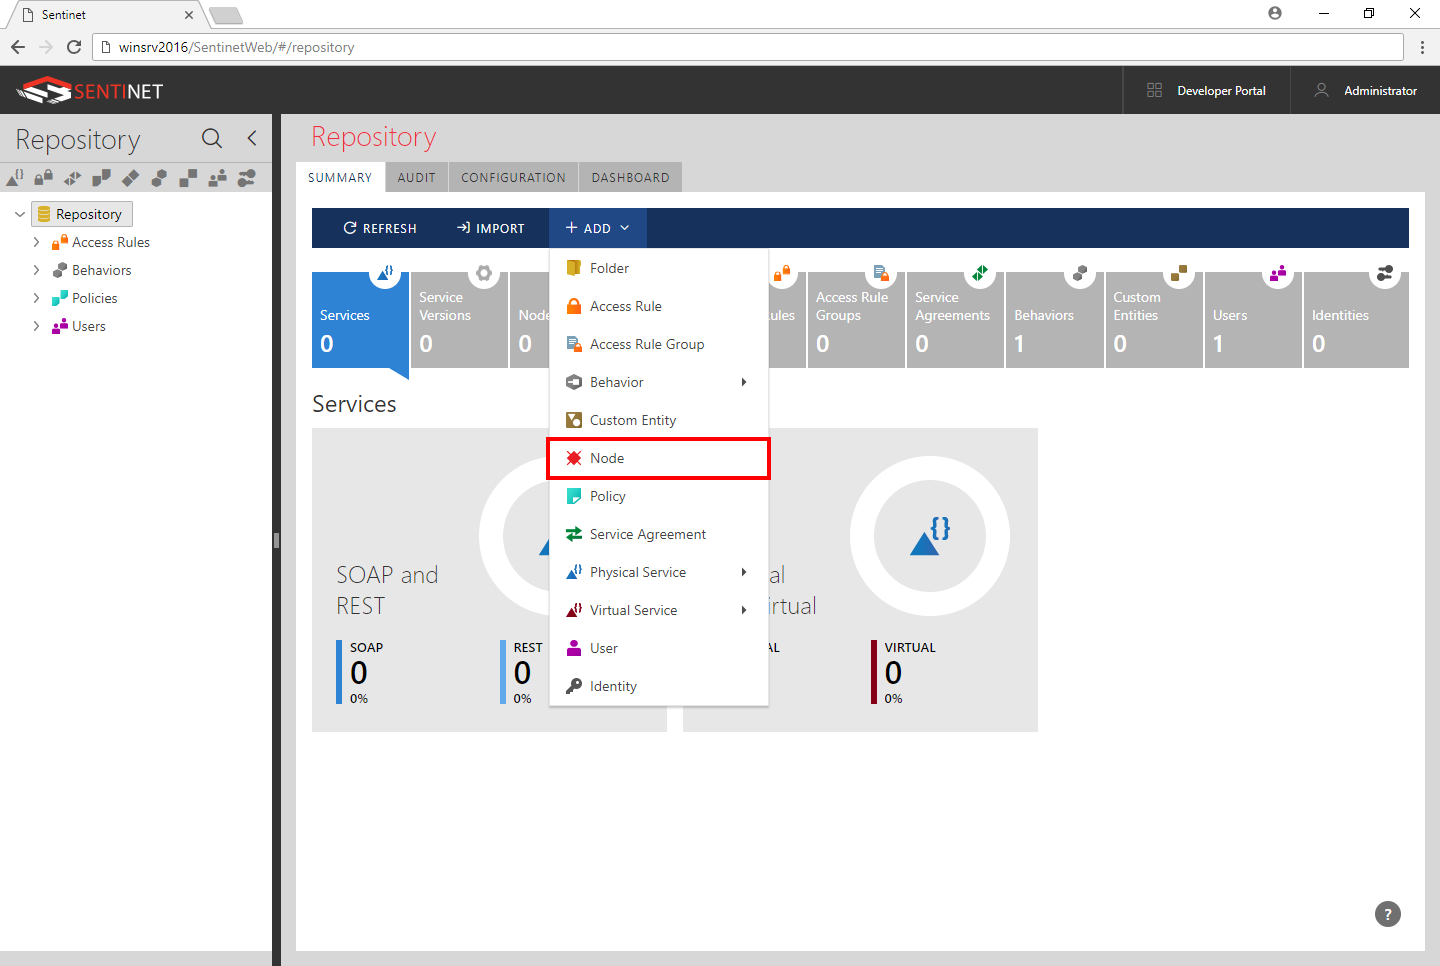
You can assign your own friendly name to the Node or keep the default New Node name. A new Node will be added to the Repository root level and a Node Summary page will be displayed. We recommend changing the Node Heartbeat Interval to 10 seconds for functional test environments.

Click SAVE button in the main toolbar to save Node settings.
At this point, the Sentinet Node instance is only created in the Sentinet Repository. It is not yet installed or configured on the Node hosting machine.