Designing Virtual Services
Click the DESIGN tab to create or modify virtual service interfaces.
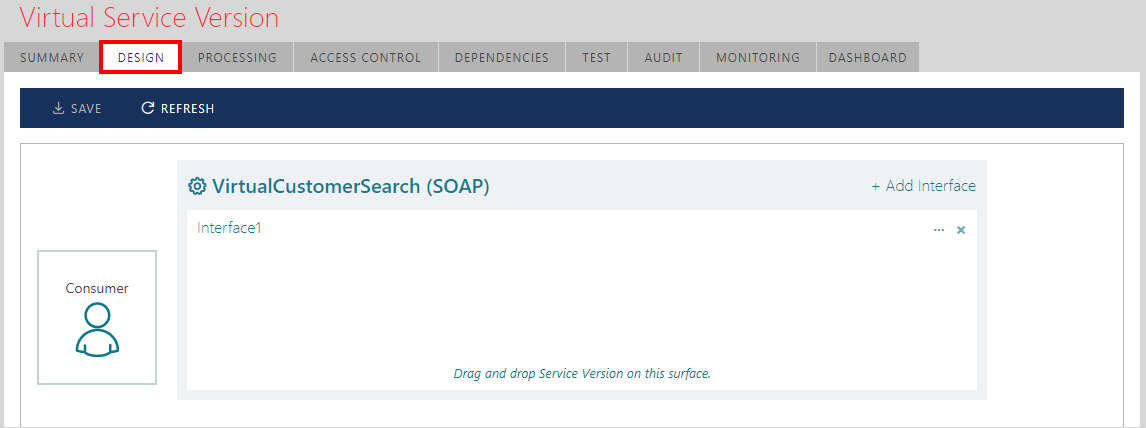
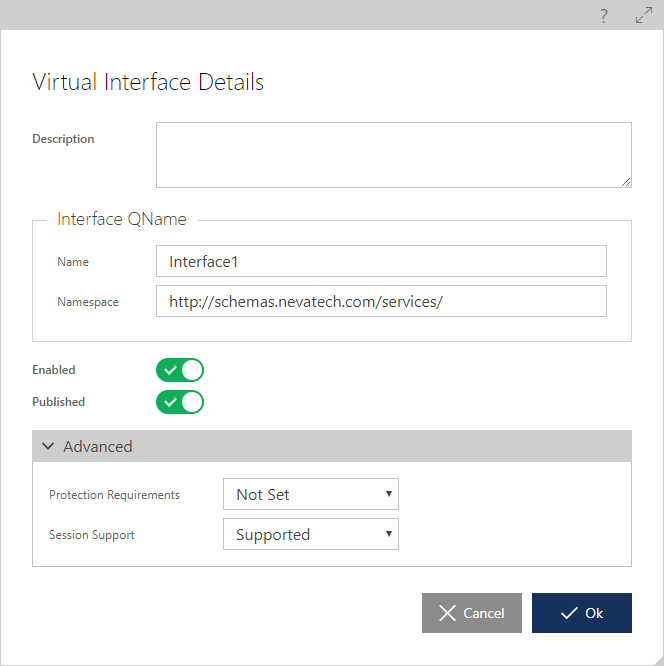
By default, a virtual service has a single empty interface: Interface1. Click the [...] button to modify the default properties of the virtual interface.

The table below lists the interface properties that can be modified:
| Property | Description |
|---|---|
|
Enabled |
If the Enabled property is set to No, all interface endpoints will be removed from active hosting regardless of other virtual service settings. |
|
Published |
If the Published property is set to No, the interface will not be published in the metadata emitted by the Sentinet Administrative console. |
|
Protection Requirements |
Interface-level message protection requirements (Not Set, Sign, Encrypt and Sign, None). Sentinet implements Microsoft WCF Message Protection Levels (https://msdn.microsoft.com/en-us/library/aa347692.aspx). When the protection requirement is Not Set, the effective protection level is determined by the protection level explicitly specified at the levels lower than the interface, or by the highest protection level supported by the endpoint binding and security policies, should all lower level protection requirements also be Not Set. |
|
Session Support |
Microsoft-specific requirement for service interface sessions support (Supported, Required, Not Allowed). https://msdn.microsoft.com/en-us/library/ms733040.aspx |
|
Name |
Name of the service interface in its metadata |
|
Namespace |
Service interface namespace in its metadata. |
These properties can be modified through the Modify Virtual Interface dialog box.
Drag-and-drop the Web service version from the Repository tree onto the virtual interface surface.

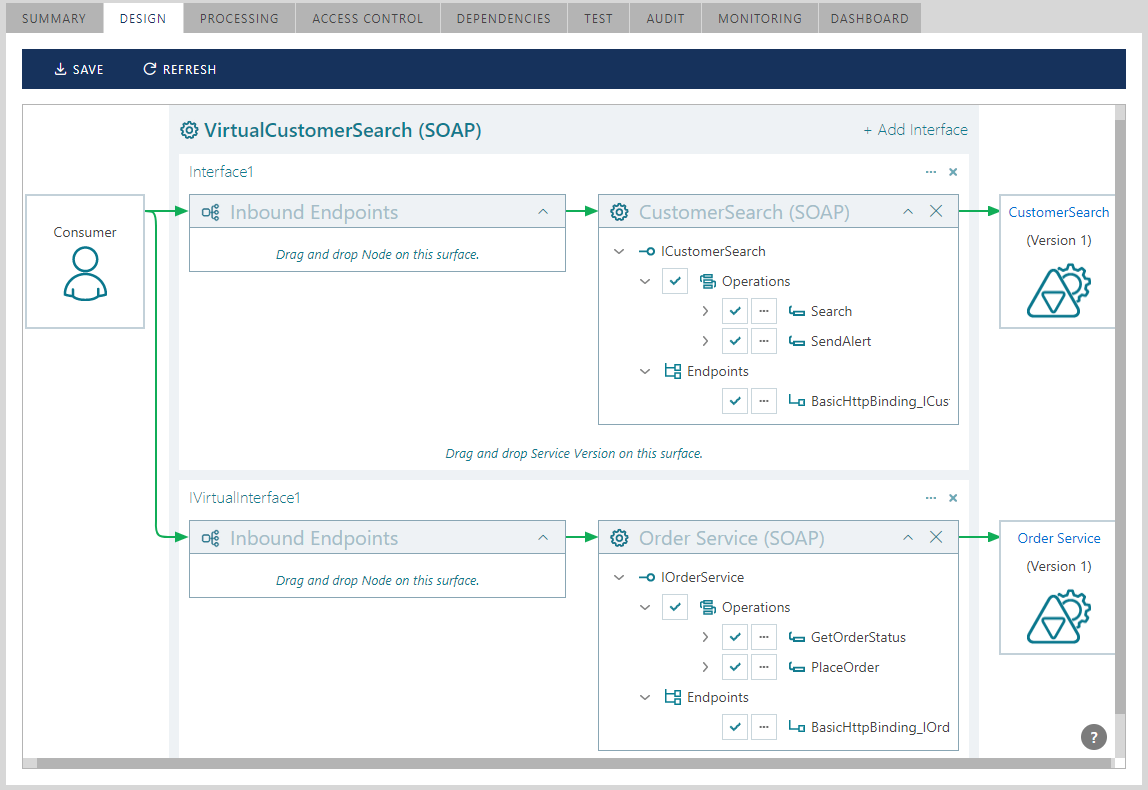
The virtual service will now receive its basic virtualization structure defining the mapping between the physical and virtual operations. Note: if a virtualized service is a multi-interface service, all its operations will be virtualized behind a single virtual interface. To spread virtualized operations through multiple virtual interfaces, click the + Add Interface link button to create a new virtual interface and use it to distribute operations over multiple virtual interfaces. Multiple virtual interfaces can also be used to virtualize different business services.
A single interface can also virtualize multiple Web services or service versions.
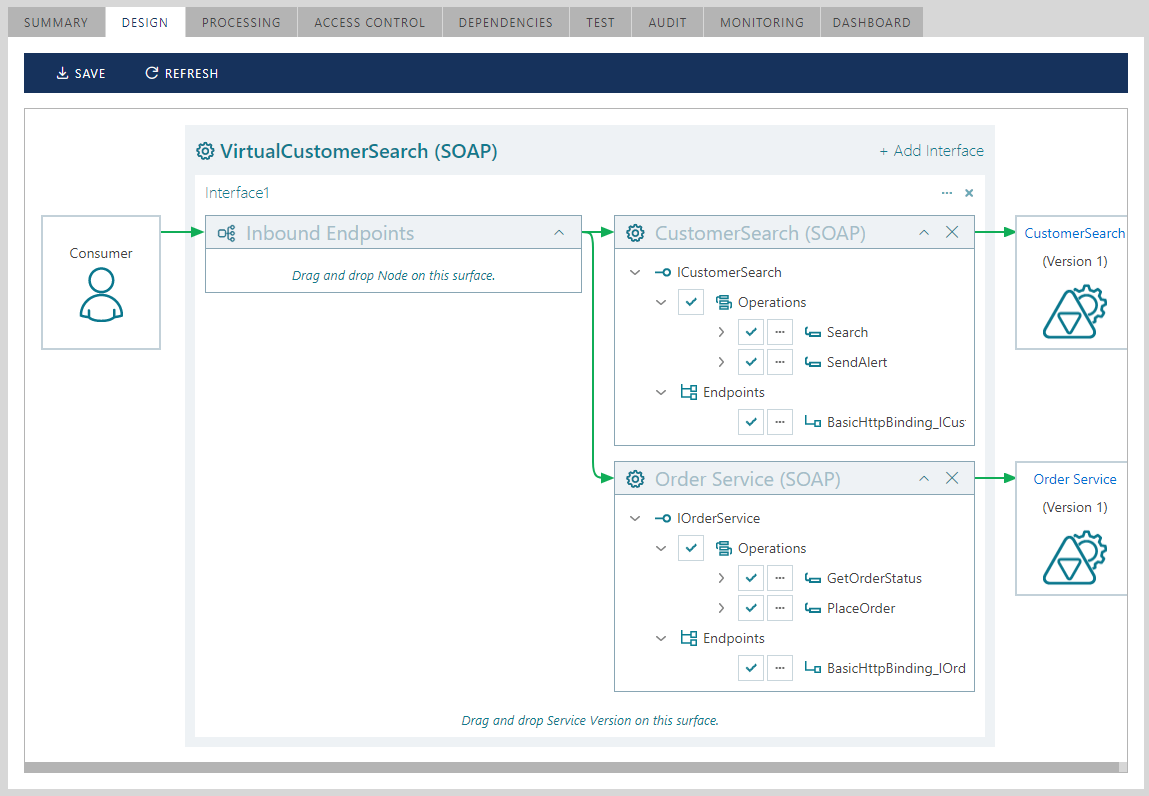
In either case, a virtual service turns into an aggregate service that will be exposed to consumer applications using its own endpoints and policies, while routing messages to the virtualized business services deployed with their own endpoints and policies.
Note
A virtual service can also virtualize other virtual services, creating double, triple, etc. virtualizations.
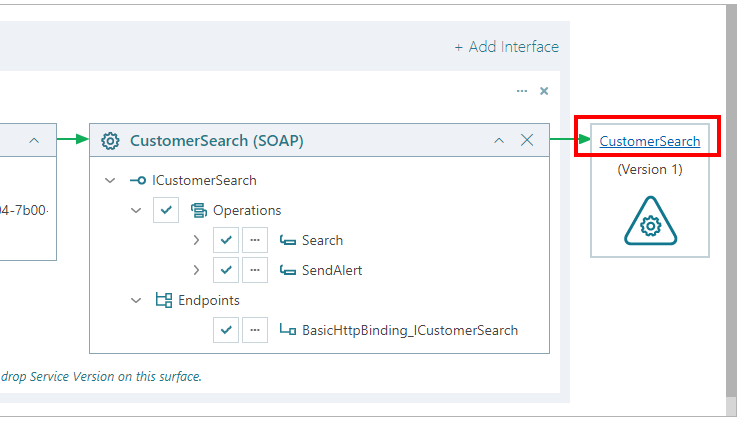
A user can click on a physical service name link to quickly navigate in the Repository tree to that physical service version. This User Interface feature is available in many other Sentinet diagrams.
Virtual and Virtualized Operations
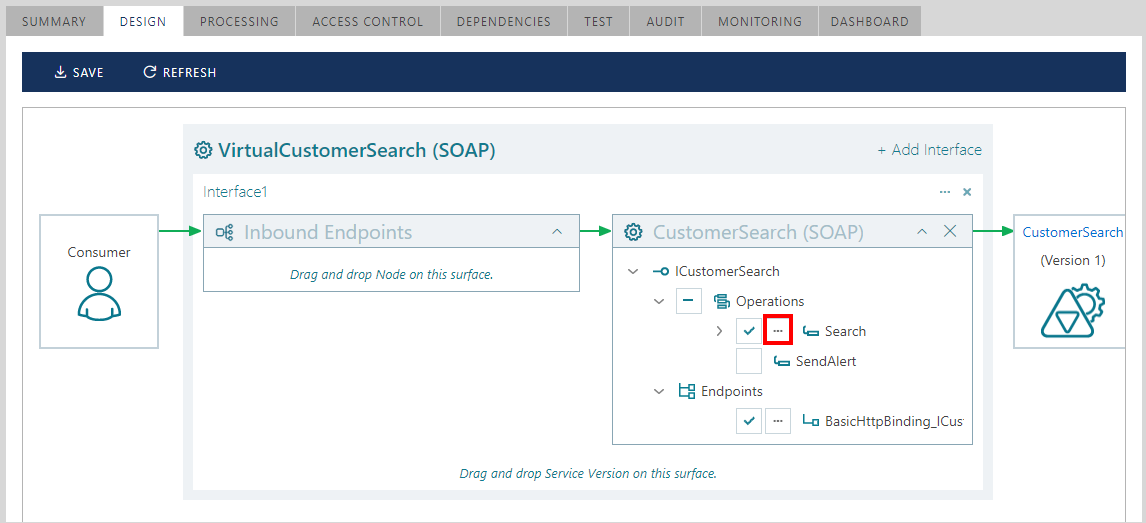
Virtual services can be designed to virtualize only selected operations of the virtualized service(s). Uncheck any virtualized operation to exclude; operations excluded from virtualization will neither appear in the virtual service metadata nor will be available at runtime.

Modify virtual Operation properties by clicking the [...] button located next to a virtualized operation.
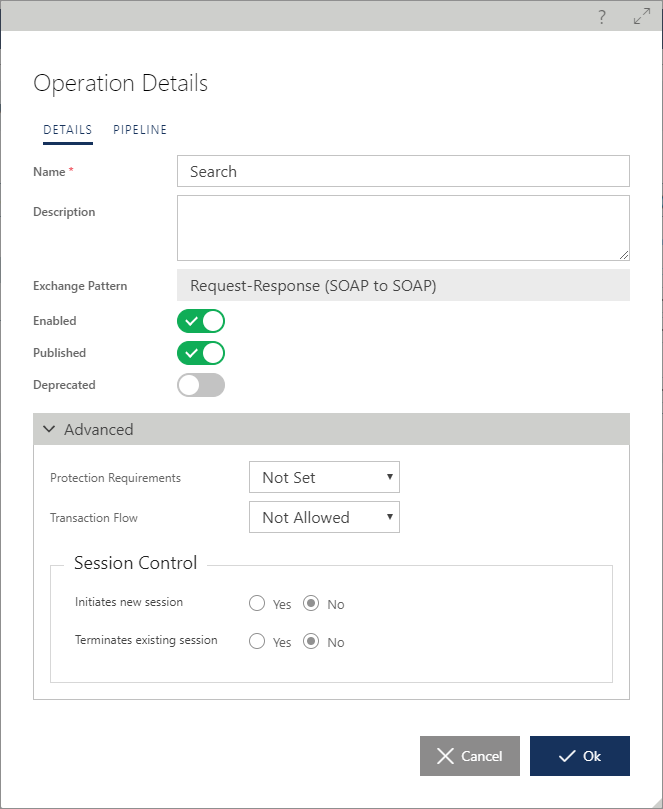
The virtual Operation Details dialog box allows modification of operation properties at operation and message level. These properties are the same as for non-virtual services, except that some properties are no longer read-only. For example, a virtual operation can be named differently from a virtualized operation. In this case, the virtual operation name is shown followed by the original virtualized operation name in brackets, e.g. MyVirtualOperation (MyPhysicalOperation). Renaming virtual operations is optional, unless the service virtual interface contains virtualized operations that have duplicate names. In this case, to resolve ambiguity, one of the virtual operations with duplicate name has to be renamed.
Users can create operation’s own execution Pipeline when you switch Operation Details dialog box to the PIPELINE tab.

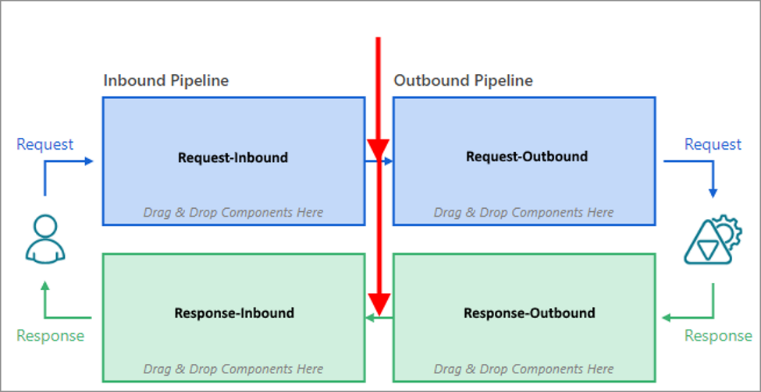
The pipeline itself is created using the same means described in the Messages Pipeline Processing chapter, and it will work together with the global service’s pipeline. Operation’s own pipeline is considered to be an advanced feature that often can be avoided by using global service’s pipeline with If conditions based on operation's name. When operation’s own pipeline is not empty, it will be executed “inside” the global service’s pipeline at the location marked on the diagram below with red arrows.
Note
Operations, which have their own, individual pipeline will show in the Design view service tree with the distinguished icons.

Virtual and Virtualized Messages
Virtual services can be designed with non-default properties of its Request and Response Messages (such as SOAP Action and Body Protection Requirements). By default, these properties are the same as of the virtualized service.
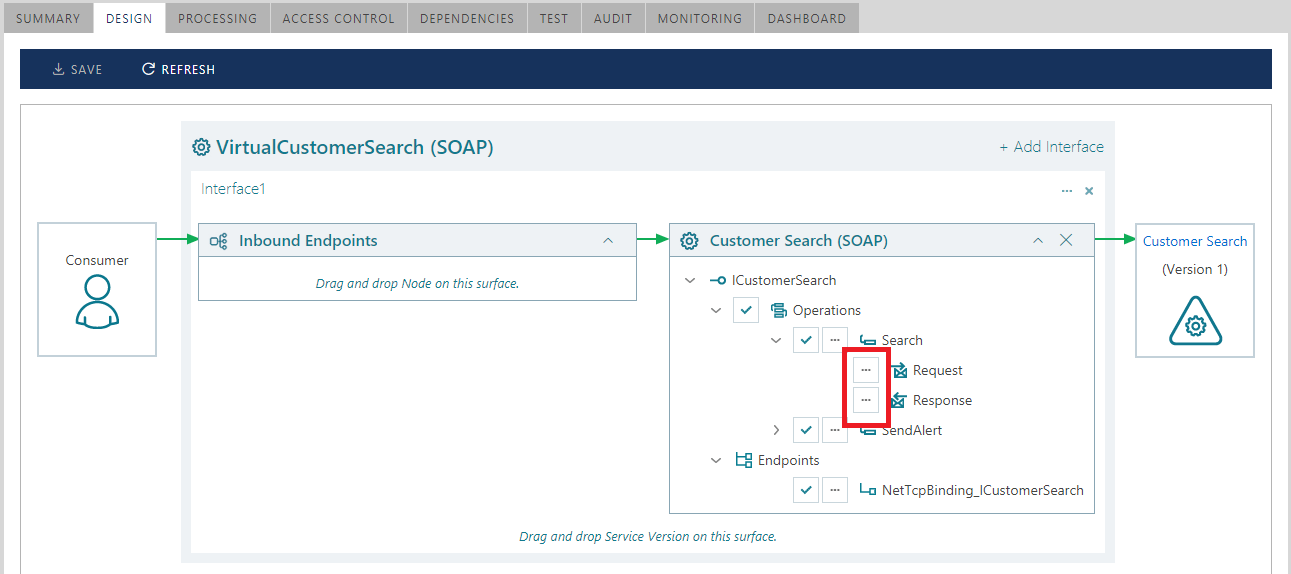
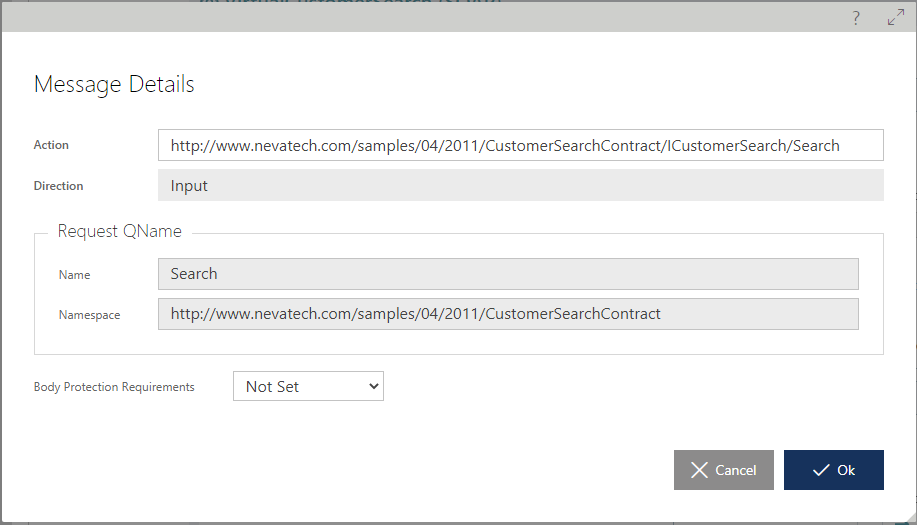
Similar dialog boxes are available when virtual SOAP service has defined SOAP Fault messages and custom SOAP Headers.
Outbound Endpoints
Sentinet automatically creates outbound endpoints that are used as client endpoints to call virtualized services (backend physical services). By default, Sentinet automatically configures virtual service outbound endpoints with the same transport and policies that are required by the registered virtualized service.
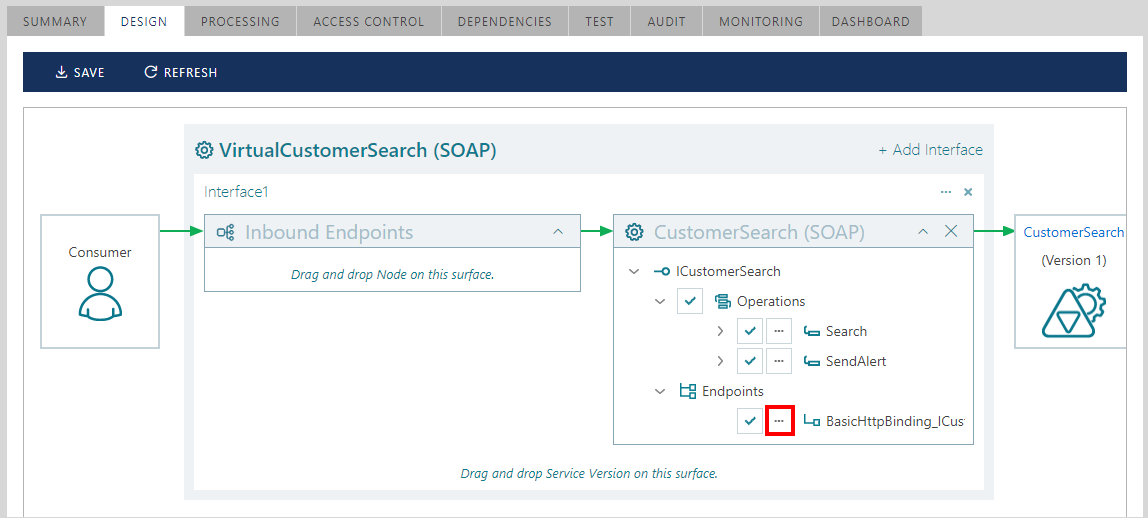
Click the Modify endpoint button to review and modify an outbound endpoint configuration using the Outbound Endpoint Details dialog box.
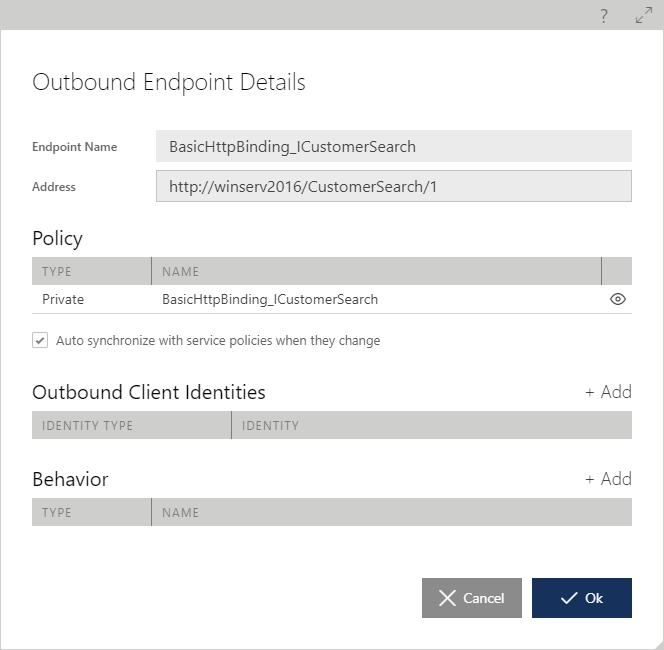
Policy
When a business service is updated in the Sentinet Repository with a new address, policy or identity, then the outbound endpoints of the virtual services that virtualize the business service are also automatically updated with the new configuration. The Auto synchronize with service policies when they change setting controls this behavior. In some cases, however, auto-synchronization has to be turned off, so that a virtual service outbound endpoint policy and address can be changed and be different from the virtualized service endpoint. For example, when the business service is registered in the Repository with its local network machine address, the virtual service uses an Internet address to forward messages to a virtualized service (for example, www.contoso.com). Endpoint Policy chapter describes in more detail how to assign specific policy to a service endpoint.
Outbound Client Identities
Each outbound endpoint of the virtual service can be configured with up to five different explicit client identities. These identities are presented to its virtualized service, when a physical service requires a specific type of client identity.
Note
A Client identity assigned from these screens will be used only if the outbound endpoint is configured with the binding (security policy) that requires an identity of the given type, and if “passthrough identity” is not specified in the virtual service’s Processing tab.
Available outbound client identity types are:
| Identity Type | Description |
|---|---|
|
Username/Password |
Outbound endpoint will use a specified Username and Password for the client identity to call physical service. |
|
Windows |
Outbound endpoint will use the specified Windows domain or local machine account as the client identity to call physical service. Sentinet administrators must specify both Windows account and password. Implicit Windows identity of the Node (Windows Identity of Node’s IIS APP Pool) or impersonated identity can also be configured for this type of the Outbound identity. |
|
X.509 certificate |
Outbound endpoint will use the specified X.509 certificate as a client identity to call physical service. Sentinet administrators have two options to assign an explicit outbound X.509 certificate: 1. Upload a password-protected certificate in PFX (PKCS #12) format that includes the certificate private key. This is the recommended option. 2. Specify certificate’s thumbprint that will be used to reference an existing certificate installed in the Sentinet Node’s local machine certificates Personal Store. Note: in this case the Sentinet Node process must have access to the certificate private key. |
|
OAuth Client Credentials |
Outbound endpoint will use OAuth’s Client ID and optional Client Secret. Even though Client ID and Client Secret can also be entered directly in the configuration of OAuth Client Policy , it is recommended to use them here as explicitly assigned identities of the outbound endpoints to avoid using OAuth secrets in the Policies’ configurations in clear text. |
|
Microsoft Azure Service Bus |
Outbound endpoint will use a specified Microsoft Azure Service Bus identity to call services hosted in the Microsoft Azure Service Bus. |
Outbound endpoint identities can be added, deleted or modified using the Outbound Client Identities list and the Add Identity dialog.
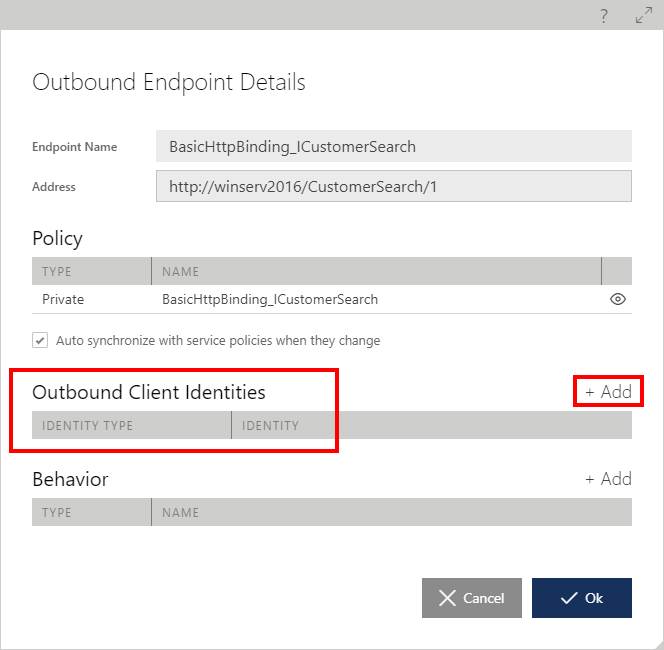

Which identity (if any) the outbound calls will use, depends on the actual policy applied to an endpoint. An outbound endpoint can be configured with any or all five identity types, in which case any change to the physical service policies will automatically trigger the selection of the appropriate endpoint identity type. Sentinet will prompt a user with an error message, if an outbound endpoint is not assigned an identity required by the policy of the physical service.
Every Sentinet Node always has two implicit Node identities, a Node X.509 certificate and a Windows identity of the account the Node process is running under. The node uses these identities as default for all virtual services when their outbound endpoints require either X.509 or a Windows client identity. Users can explicitly assign different X.509 or Windows identity to a virtual service's outbound endpoint when they wish to use specific identities different from the default Node identities.
After selecting type, you will be asked to assign either Shared or Private identity.
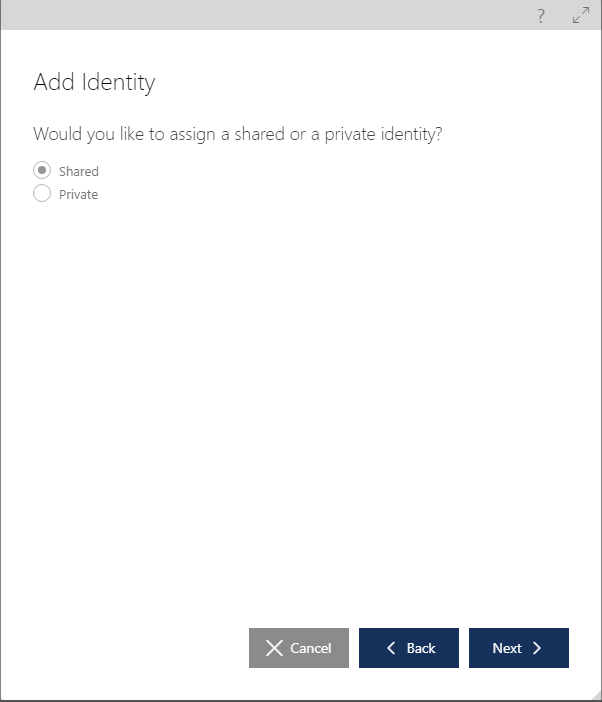
Private identity is the one that is explicitly assigned to this particular outbound endpoint only. Identity configuration screen will be presented after clicking Next button.
Selecting Shared identity and clicking Next button will present a Repository tree with all available Shared identities of selected type registered in the Repository and its folders (read more on registering Shared Identities in this document).
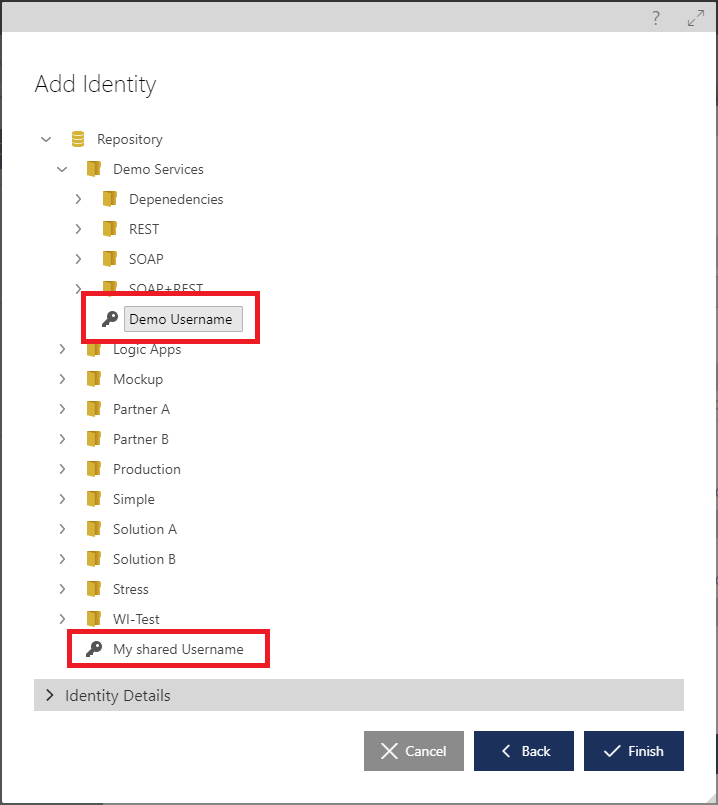
The advantage of using Shared Identities is that they are not configured from theses screens, only references to them are configured here. The same Shared identity can be used by many virtual services and many outbound endpoints. Thus, changing Shared Identity where it is actually configured in the Repository, will automatically change outbound identity for all outbound endpoints that reference it. For example, you may have many virtual services using the same X.509 certificate or the same Username/Password. If certificate need to be updated or Username/Password must be changed, you can change just the configuration of identity itself without reconfiguring all virtual services affected by the identity change.
Another advantage of using Shared Identities, is that access to their visibility and modifications can be enforced by the fine-grained User Role Permissions of the Sentinet User Roles management.
Behavior
Sentinet virtual service outbound endpoints can be extended with custom endpoint behaviors, which are standard Microsoft WCF extensibility points that allow customization of a message’s processing, inspection and transformation (see chapter Behaviors for more details about managing shared service and endpoint behaviors).

When Sentinet users add custom endpoint behaviors, they specify an Endpoint Behavior-friendly name and a behavior configuration expressed as a standard Microsoft WCF behavior configuration element, https://msdn.microsoft.com/en-us/library/ms731403.aspx.
Just as endpoint policies, endpoint behaviors can be either private or shared (see Endpoint Policy chapter that describes the process of selecting shared vs private policy. The process is similar to selecting shared or private behaviors).

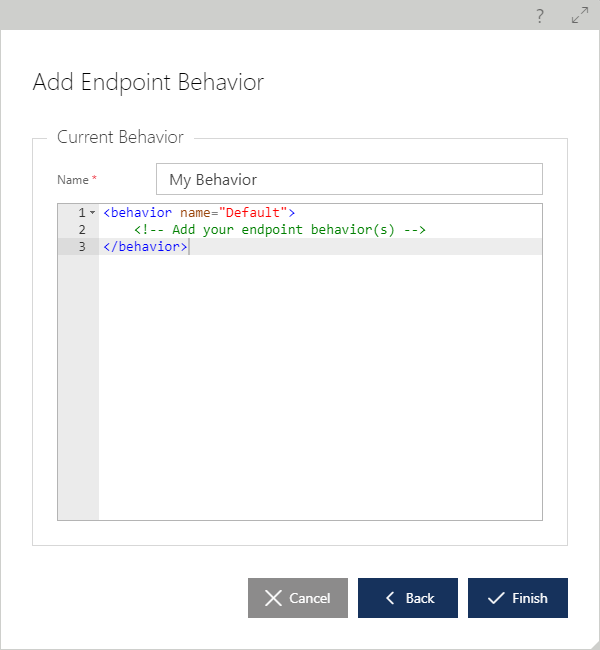
Below is an example of an endpoint behavior configuration specifying two behaviors: WCF built-in <dispatchSynchronizationBehavior> (https://msdn.microsoft.com/en-us/library/ee816913.aspx), and a custom message inspector behavior, <myMessageInspectorBehavior>.
<behavior name="MyEndpointBehavior">
<!-- Add your endpoint behavior(s) -->
  <dispatchSynchronizationBehavior  asynchronousSendEnabled=”true” />
  <myMessageInspectorBehavior />
</behavior>
Endpoint behaviors implemented in custom code and assemblies must be made available to the Sentinet Node at runtime. This can be done in the standard ways for Microsoft .NET framework.
Registering assembly in the .NET 4.0 Global Assembly Cache (recommended).
Placing the custom assembly in the Node's bin directory.
In either case, custom behaviors require custom behavior extension elements in the WCF configuration. These can be added by modifying either:
the machine.config file (recommended) or
a Node's web.config file.
The recommended approach allows for easier and more reliable distribution of custom assemblies by packaging them with distribution scripts that register custom assemblies in the GAC and make appropriate changes in the machine.config file. Assemblies registered in the GAC will be automatically available to all Sentinet Nodes configured on a given computer.
Inbound Endpoints
From a consumer applications perspective, a virtual service is just a service hosted at some address (or multiple addresses). These are addresses of a virtual service's inbound endpoints. Sentinet hosts virtual services and its inbound endpoints on one or more Sentinet Nodes that provide virtual services with the actual physical hosting environment. Unlike business service endpoints, virtual service endpoints can be created, opened and closed dynamically and remotely using the Sentinet Administrative console.
Drag-and-drop a Sentinet Node onto the Inbound Endpoints surface to create an inbound endpoint for the designed virtual service that will be hosted on the dragged Sentinet Node.
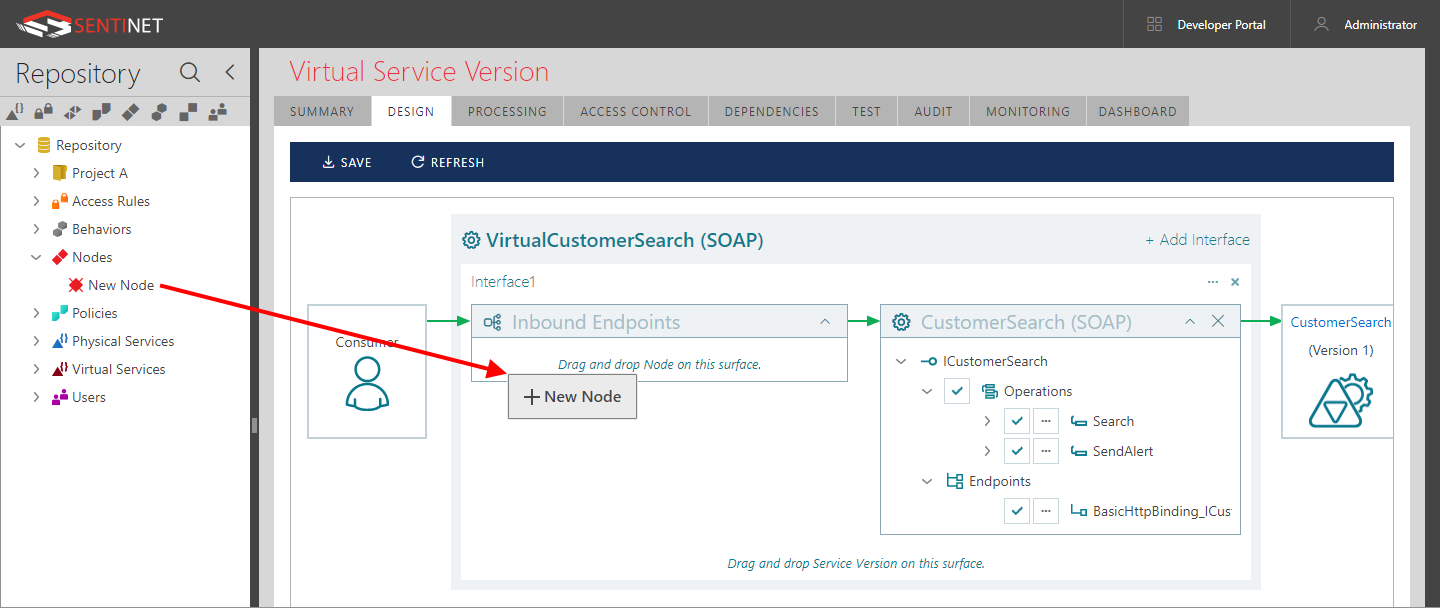
In the Inbound Endpoint Details dialog, select Physical Address from the dropdown list of available Node base addresses. Making this selection will determine which transport scheme an endpoint will be configured with (see the Node Base Addresses chapter in this manual for more details). A full endpoint address will be constructed by combining the dropdown list selection with the endpoint-relative address located just below the dropdown list.
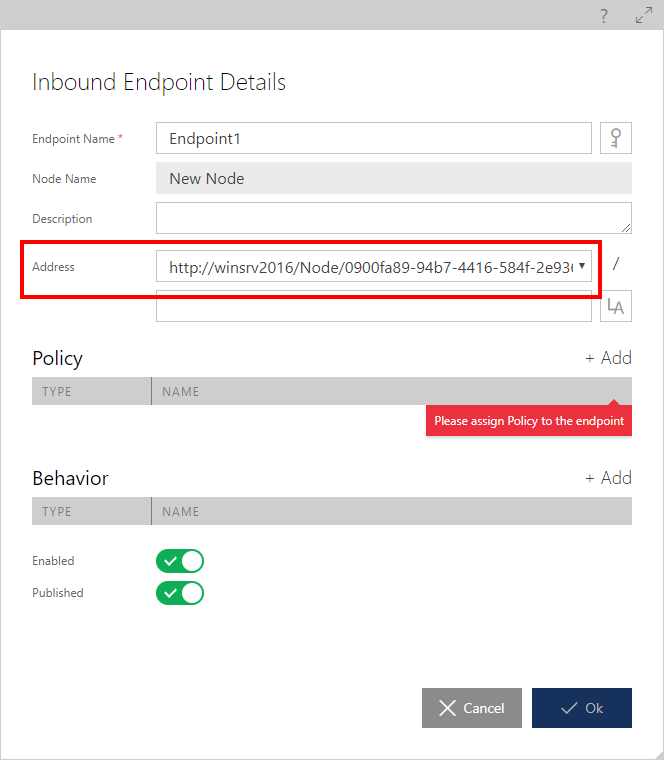
Once the endpoint address is selected, assign the policy that an endpoint will be configured with (see the Endpoint Policy chapter in this manual for more details). Sentinet will validate the compatibility of the selected transport scheme and endpoint policy when the user saves a virtual service design structure. This will prevent incompatible assignments that may affect runtime operations.
Note
If endpoint’s address is selected before the policy (typical case), then Sentinet will filter only those Shared Policies (when Shared policy is used) that fit service shape (SOAP or REST) and endpoints’ transport protocol.
In the Inbound Endpoint Details dialog box, a Sentinet user can also change:
The Endpoint Name field to provide an inbound endpoint with the meaningful name which will be used in the service metadata (WSDL) representation (for example: ep_httpMutualX509).
The endpoint-relative address to provide an endpoint with a meaningful endpoint address (for example: httpMutualX509). Note: an endpoint-relative address may be an empty string, but only one virtual service endpoint may have an empty relative address.
The Logical address, which can be different from the Physical address. Logical address may be different for those rare SOAP services that have to use WS-Addressing SOAP header with its own WS-Addressing endpoint address value.
Behavior. Sentinet users can add custom endpoint behaviors (see the Behaviors chapter in this manual for more details on assigning endpoint behaviors).
Enable state. When a virtual service inbound endpoint is disabled, it will not be actively hosted (available) on the Sentinet Node. This setting allows users to remove a virtual endpoint from real runtime hosting without removing it from the virtual service design structure. Endpoint Enable state can be turned on and off interchangeably.
Published state. This setting allows users to remove a virtual endpoint from the virtual service metadata (WSDL) publishing. Note: Published and Enabled states are different properties. For example, an endpoint can be actively hosted (Enabled), but may not be visible in the service metadata (and vice versa).
An existing inbound virtual endpoint can be reconfigured by clicking the [...] button.
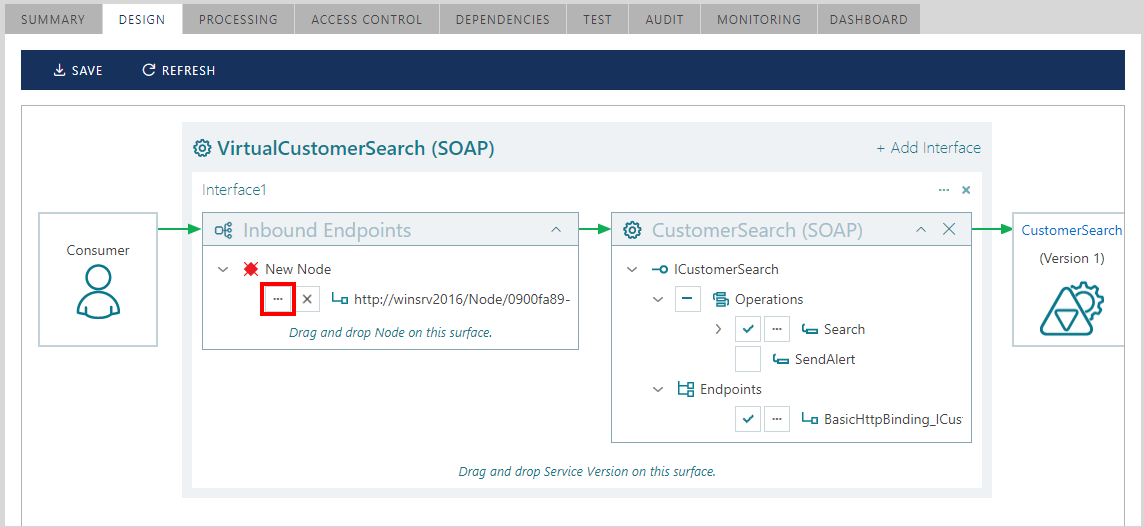
A virtual service can be provided with more than one inbound endpoint, which can be hosted on the same or different Sentinet Nodes. Repeatedly drag-and-drop a Sentinet Node to provide additional inbound endpoints. Each inbound endpoint can be configured with its own independent transport scheme, address, policy and other properties.
Virtual service inbound endpoints are automatically assigned a service identity matching a policy assigned to them, e.g. for a policy requiring Windows Integrated security, the Windows Identity of the Sentinet Node will be used, when requiring a X.509 certificate, the Node's X.509 certificate identity will be used. Unlike the outbound endpoints, the X.509 certificate cannot be changed for inbound endpoints, unless the Node is re-registered with a new certificate.
Note
If different certificates are required for different virtual service inbound endpoints, create another Sentinet Node with a different X.509 certificate and host the virtual service inbound endpoint on that new Node.